Use the search bar above or find help by selecting a category below:
Common Commons Questions
Here are some quick tips for using the Commons:
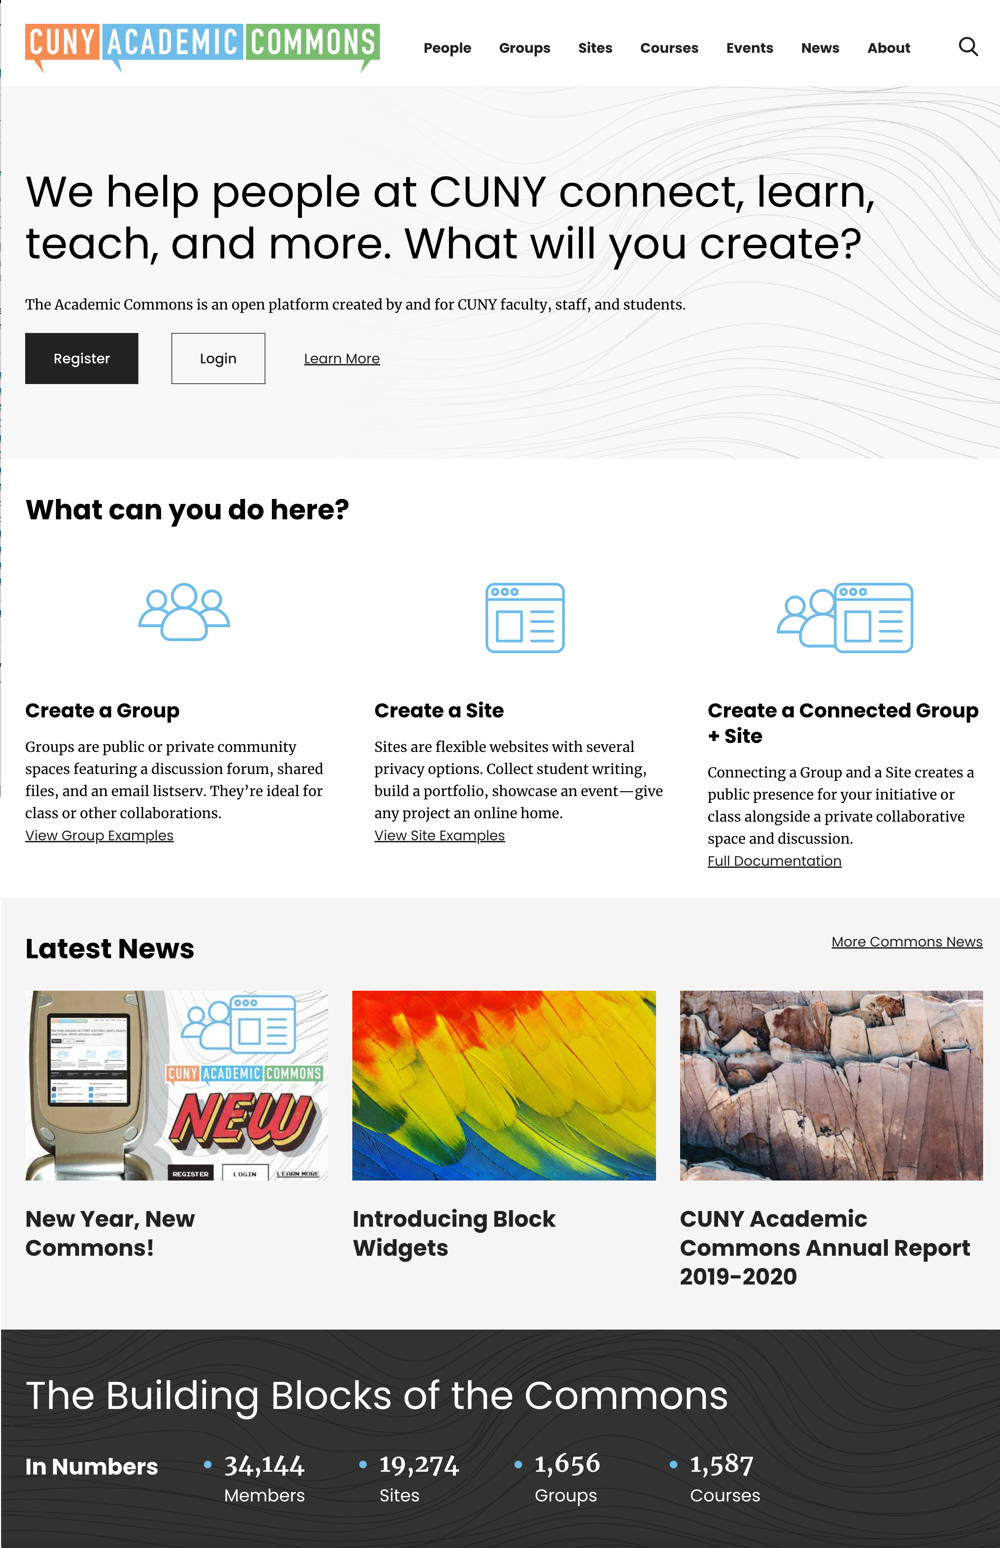 The Building Blocks of the Commons are Sites, Groups, and Members. Each has an underlying tool set designed to connect members, to create content, to teach and learn, to collaborate and publish research, or post assignments. Members have incremental control over their privacy and email notifications.
The bottom half of the home page is dynamic. We feature two new and exciting sites and groups and list the last four active public sites and groups. We also show the most recently active members.
Here is a screenshot of the bottom half of the home page:
The Building Blocks of the Commons are Sites, Groups, and Members. Each has an underlying tool set designed to connect members, to create content, to teach and learn, to collaborate and publish research, or post assignments. Members have incremental control over their privacy and email notifications.
The bottom half of the home page is dynamic. We feature two new and exciting sites and groups and list the last four active public sites and groups. We also show the most recently active members.
Here is a screenshot of the bottom half of the home page:
 The Commons home page changes dramatically when you login. It becomes your personalized home page.
When you are logged into the Commons, you’ll find the Commons home page is personalized for you.
The Commons home page can be accessed from any where on the site by going to the top left hand corner and clicking on the “CUNY Academic Commons” hyperlink, or by going to “https://commons.gc.cuny.edu” or the short link “https://cuny.is“.
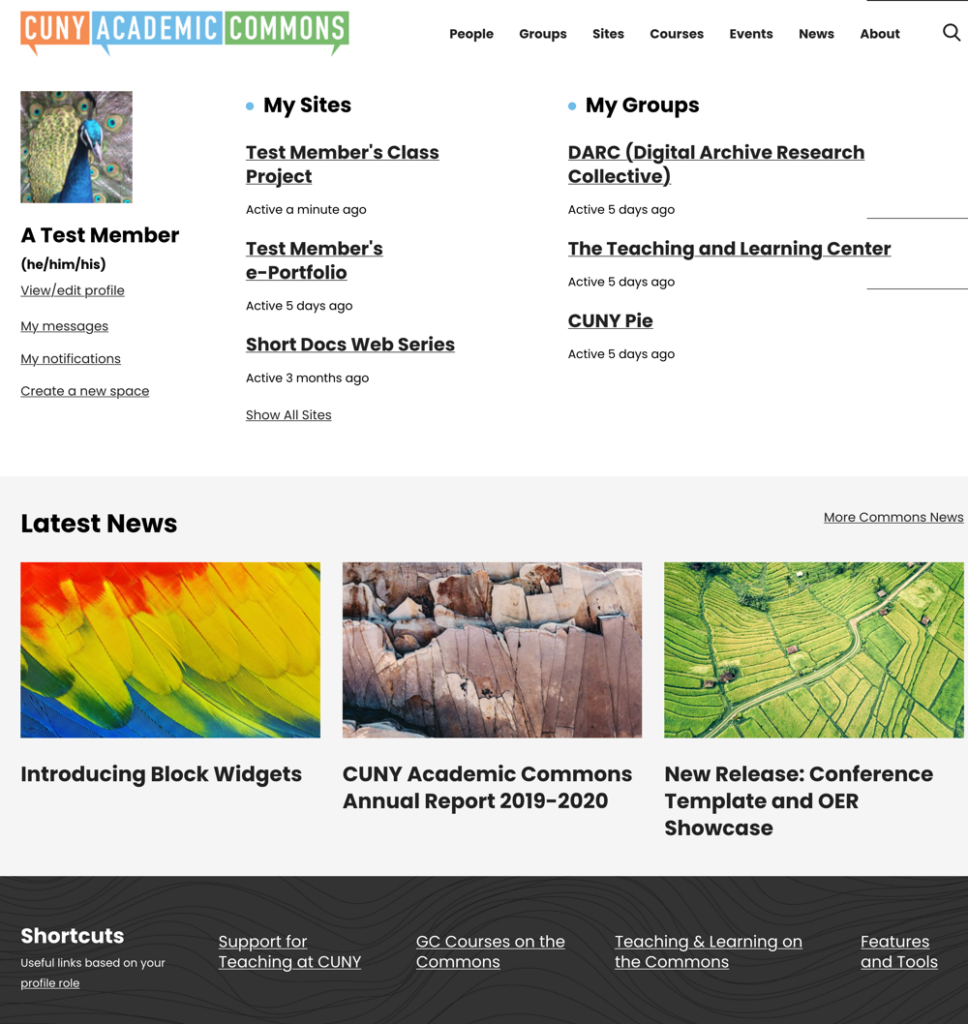
Here you can access hyperlinks to all your stuff: your profile, messages, notifications, groups, and sites. There is also a convenient “Create A New Space” hyperlink that will take you to the Commons Creation Portal where you can create a group, a site, or a group + site.
If you have more than three groups or sites, click on the “Show All” and you will see all your groups or sites.
Further down, you will see the “Latest News” on the Commons, as well as a list of “Shortcuts.” The shortcuts are based on your role and your campus(es) which you provided when you registered.
Here is a screenshot of the top part of a personalized home page:
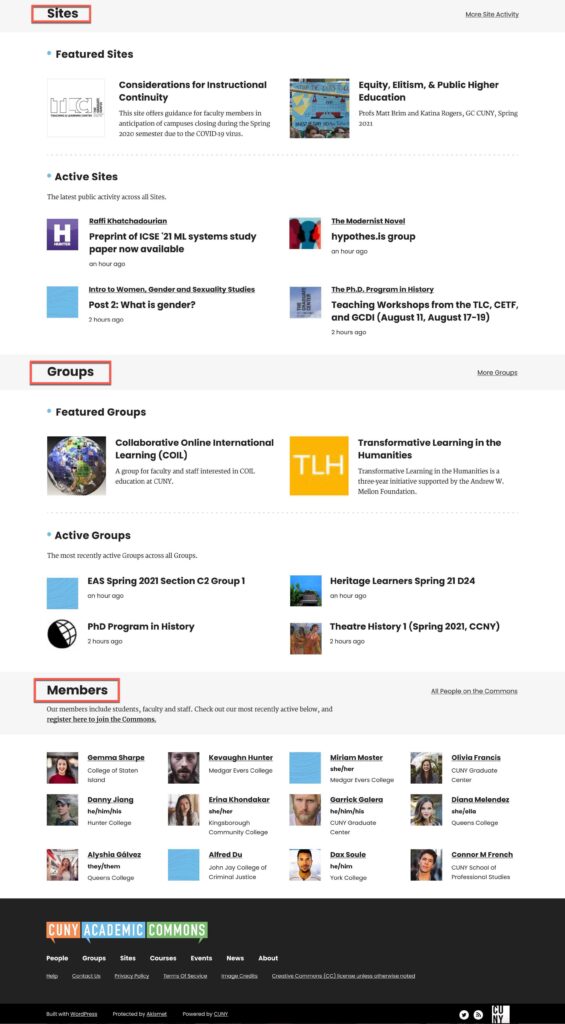
The home page also aggregates activity, both site-wide and on the campuses you are associated with. The first section shows the latest activity on the Commons. Further down, the home page features new and exciting groups and then groups across CUNY and then groups on your campus(es).
Sites are likewise surfaced, according to last active.
And finally, we see the last active members on the entire Commons, and on your campus(es).
Here is a screenshot of the lower portion of the personalized home page:

Forgot Your Password?
To reset your password, go to https://commons.gc.cuny.edu/wp-login.php?action=lostpassword and enter either your username or email address. Click on Get New Password. You will receive an email with a link to a page where you can reset your password.
Security Settings
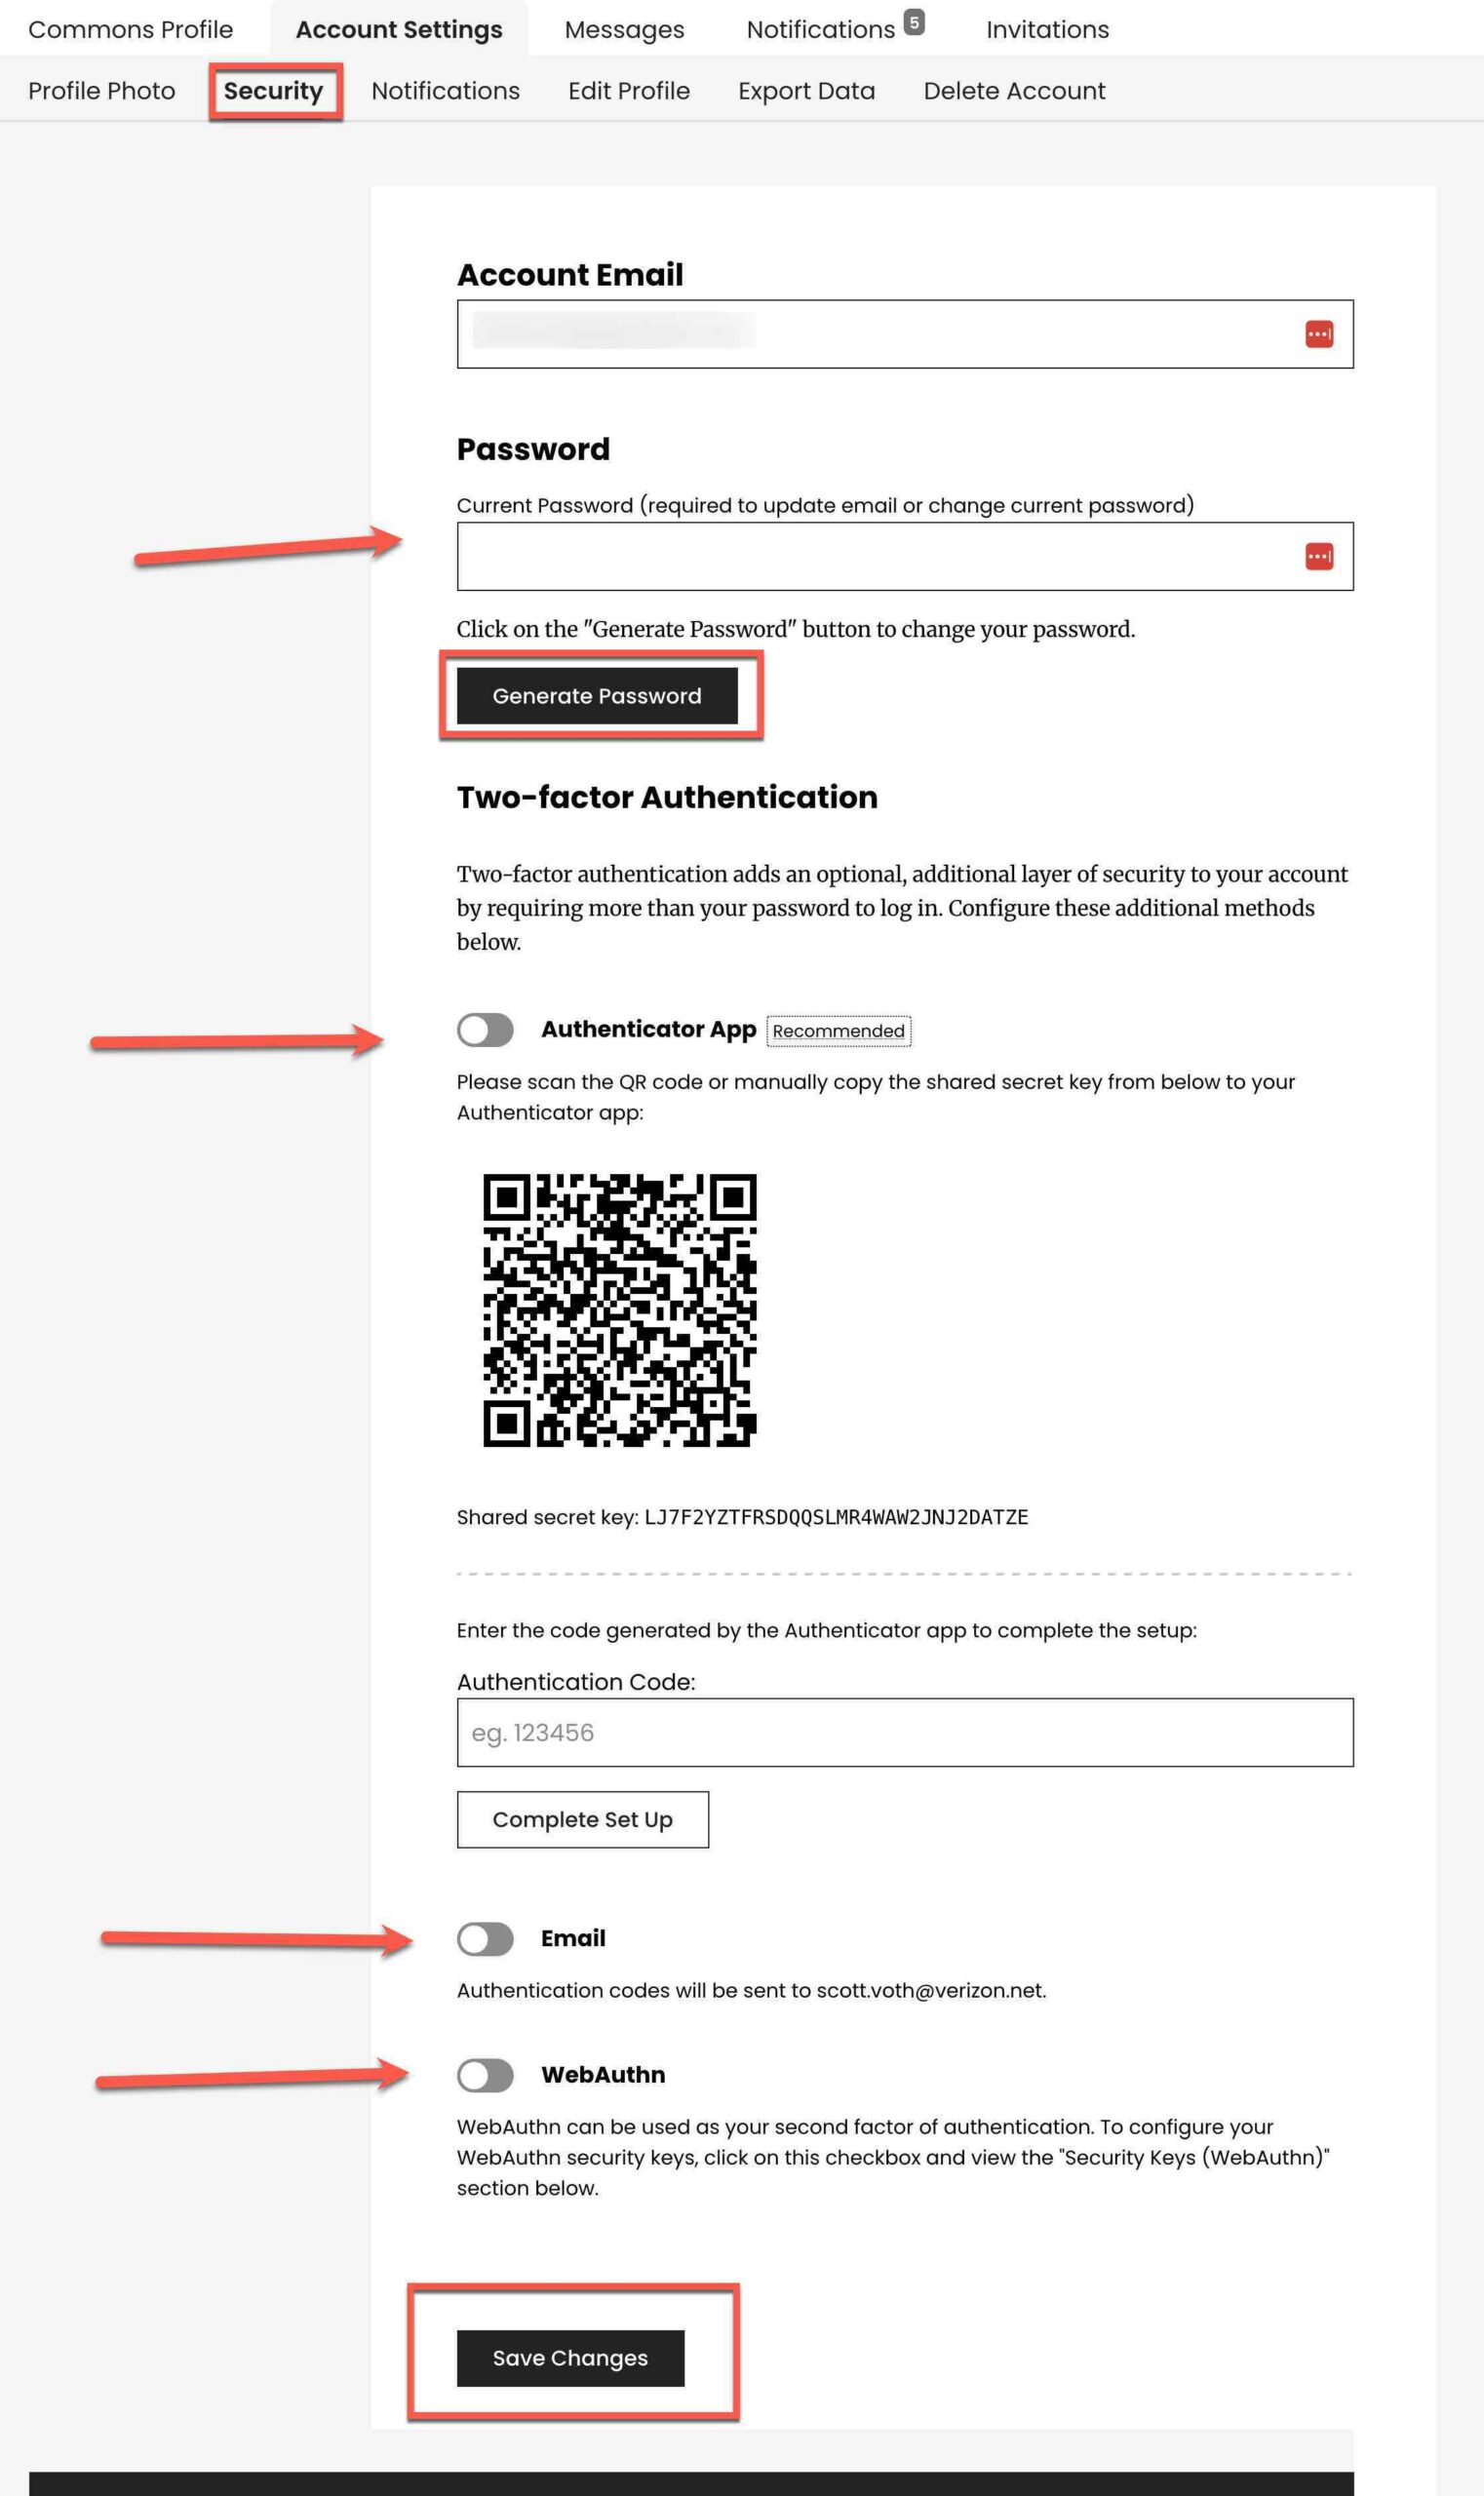
To access the Security screen below, go to the top black navigation bar, hover over your avatar in the upper right hand corner. A dropdown menu will appear. Scroll down the My Settings and select Security.
Changing Your Account Email
You can change your Account Email on this screen to the one you prefer. Simply over type your existing email with the one your prefer. Click on Save Changes and an email will be sent to this email address to ensure it is valid. You will need to respond to this email to verify the address is correct.
Your account email is used for notifications on the Commons. It is also used when you forgot your password or when you use Two-Factor Authentication (see below).
Changing An Existing Password
To change your password or to optionally enable two factor authentication, log into the Commons and go to Account Settings>>Security. If necessary, re-enter your existing password. If you only want to change your password, click on the Generate Password button. If you don’t like the generated password you can over-write it to the password you prefer. Then click on the Save Change button. Your password is now changed.
Two-Factor Authentication (optional, but recommended)
Two-factor authentication (2FA) adds an extra layer of security when logging into the Commons. With 2FA, you have to log in with your username and password and also provide another form of authentication that only you know or have access to. The Commons supports 2FA during login and offers four different 2FA options, listed below.
Unless you own a security key, we strongly recommend using a Time-Based One-time Password (TOTP) application to configure two-factor authentication. TOTP is more reliable and portable than the email option, especially when you do not have internet access to check your email.
Enabling 2FA
Members can enable multiple 2FA options, but only one can be primary. It is a good idea to have backup ways to obtain your authentication code
- Email
Using this method, your authentication code will be delivered via email. If you’re unable to use a TOTP app, you can also authenticate with email. When configured as your primary 2FA option, an authentication code will be sent to your registered email address during login. This code will need to be entered in order to gain access to your Commons account.
To use this option:
-
- Enable the Email option.
- Click Save Changes.
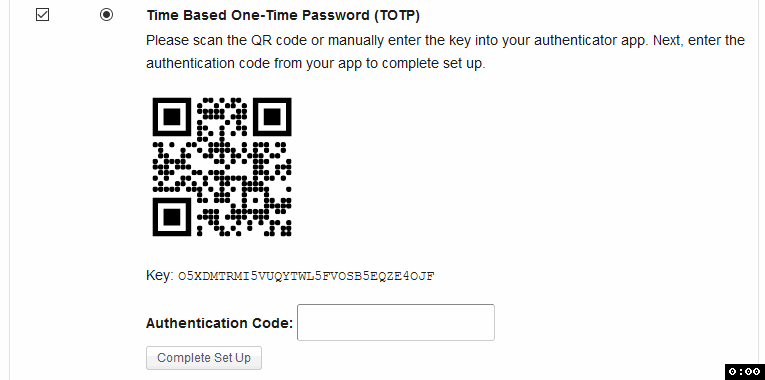
- Time-Based One-Time Password (the preferred method)
A time-based one-time password (TOTP) application automatically generates an authentication code that changes after a certain period of time. When configured as your primary 2FA option, you will be asked to enter this code from your TOTP app during login.
To use this option:
-
- Ensure you have downloaded a TOTP app onto your device. Popular cross-platform apps include Authy, 1Password, LastPass, Duo.
- Enable the Time-Based One-Time Password (TOTP) option.
- Scan the QR code with your TOTP app. After scanning, the app will display a six-digit code. (If you are unable to scan the QR code, find the Key field under the QR code and manually copy the key into your TOTP app.)
- Next, enter the six-digit code into the Authentication Code field and click on Complete Set Up.
- TOTP should now be set up as a 2FA option. If you haven’t set up recovery codes, it is highly-recommended to enable this option as well.
- Security keys
We support USB security keys as a form of two-factor authentication. (A security keys is a physical device that you carry with you and insert into a USB port one the computer you are accessing.) When configured as your primary 2FA option, you will be asked to enter your USB security key during login.
If you have a USB security key, you can register your key as a 2FA option by:
-
- Enabling the Security Keys option.
- This will toggle a “Security Keys” section after the 2FA table.
- Click on Register New Key and when prompted, insert your USB security key into your device.
- Your security key should now be displayed under the Security Keys section. If you haven’t set up recovery codes, it is highly-recommened to enable this option as well.
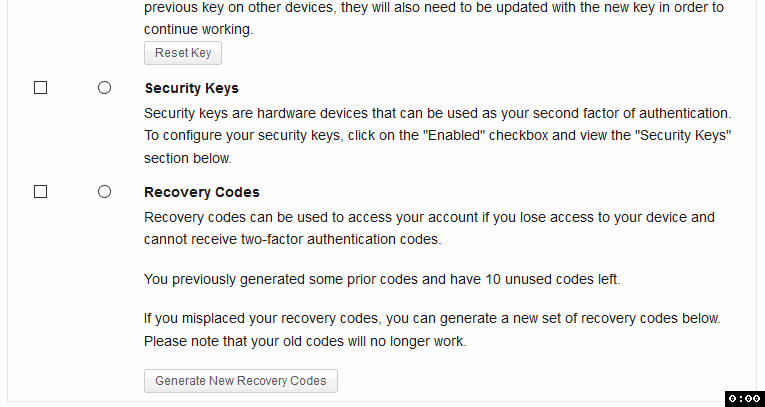
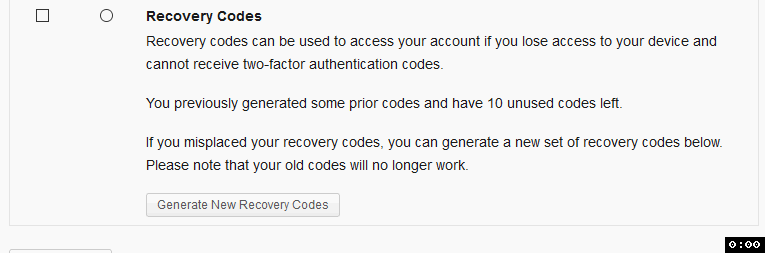
- Recovery Codes
It is highly-recommended to enable recovery codes if you have configured another 2FA option. This can help you get back into your account if you ever lose access to your other 2FA device(s).
To use this option:
- Enable the Recovery Codes option.
- Click on Generate New Recovery Codes.
- Copy or download the codes when they are displayed. These codes will only be displayed once. If you misplace your recovery codes, you can generate a new set of codes by clicking on the button again.
- Click Save Changes.
Password Best Practices
Courses on the Commons are created by Instructors choosing a “Group” or a “Site” or both.
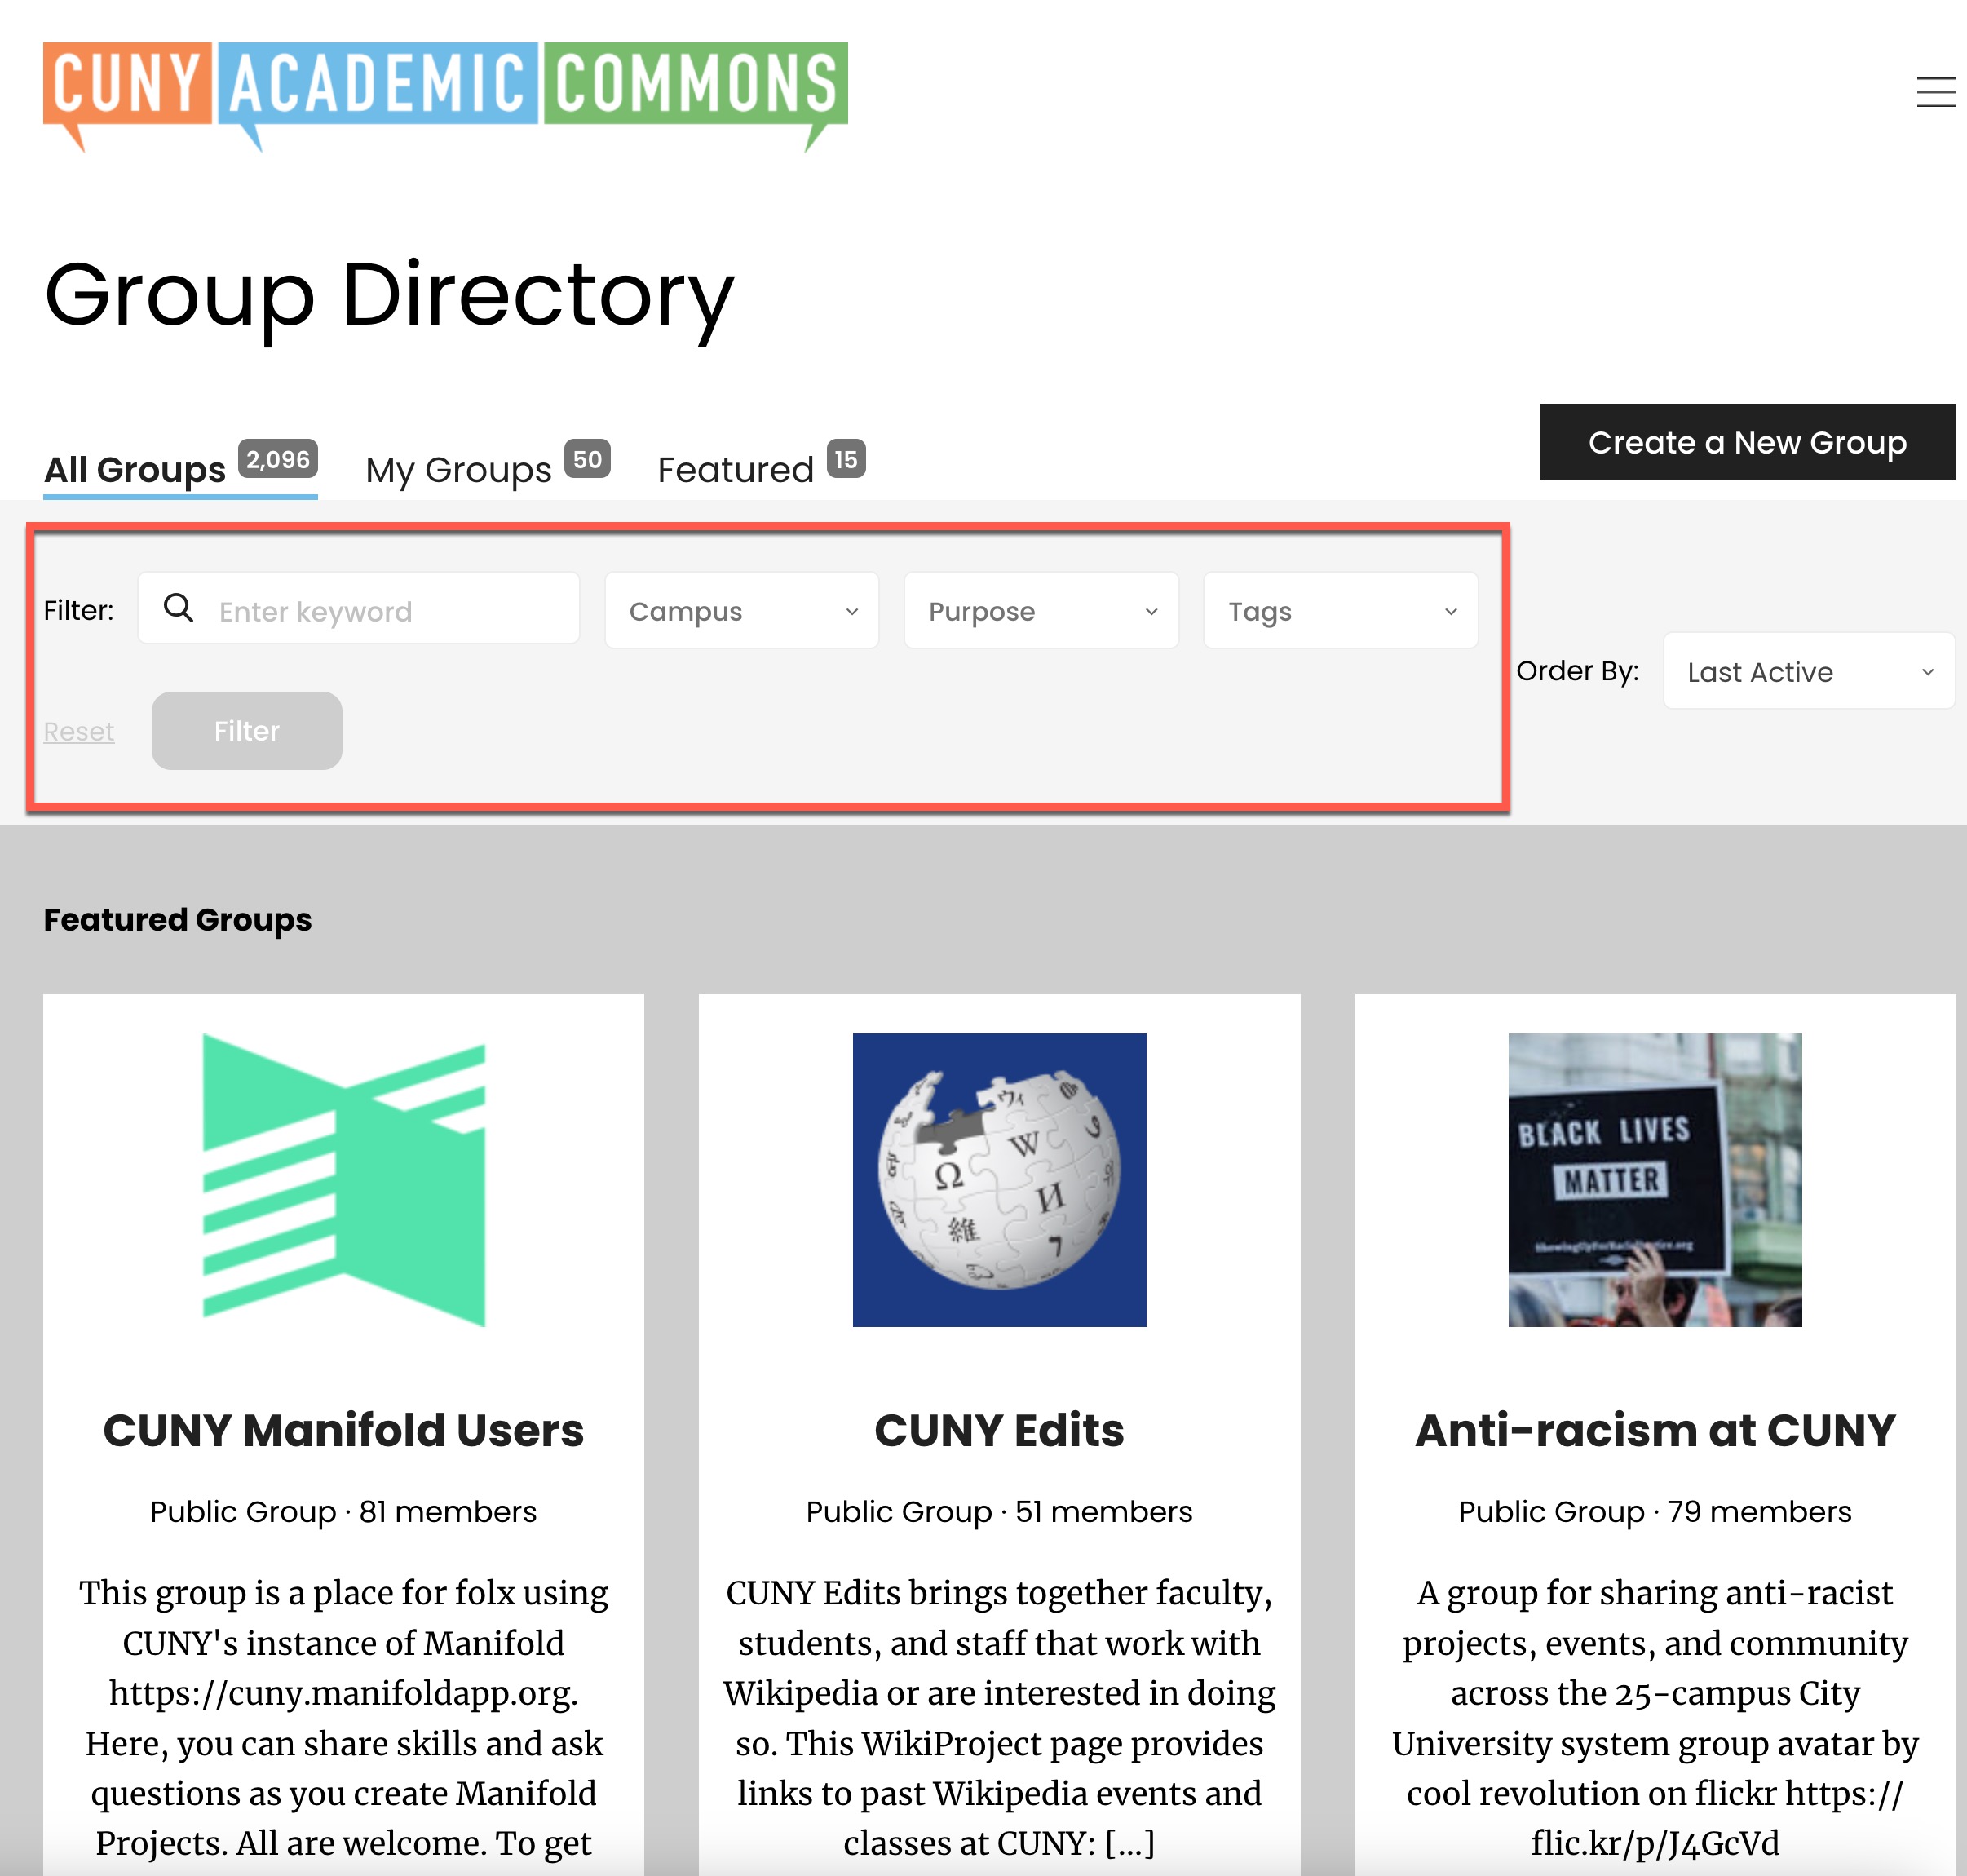
Go to the courses tab. This page list all courses taught on the Commons. Use the “Find A Course” section (highlighted below). You can search by keyword or Campus or Semester or Disciplinary Cluster. Be sure to click on Filter.
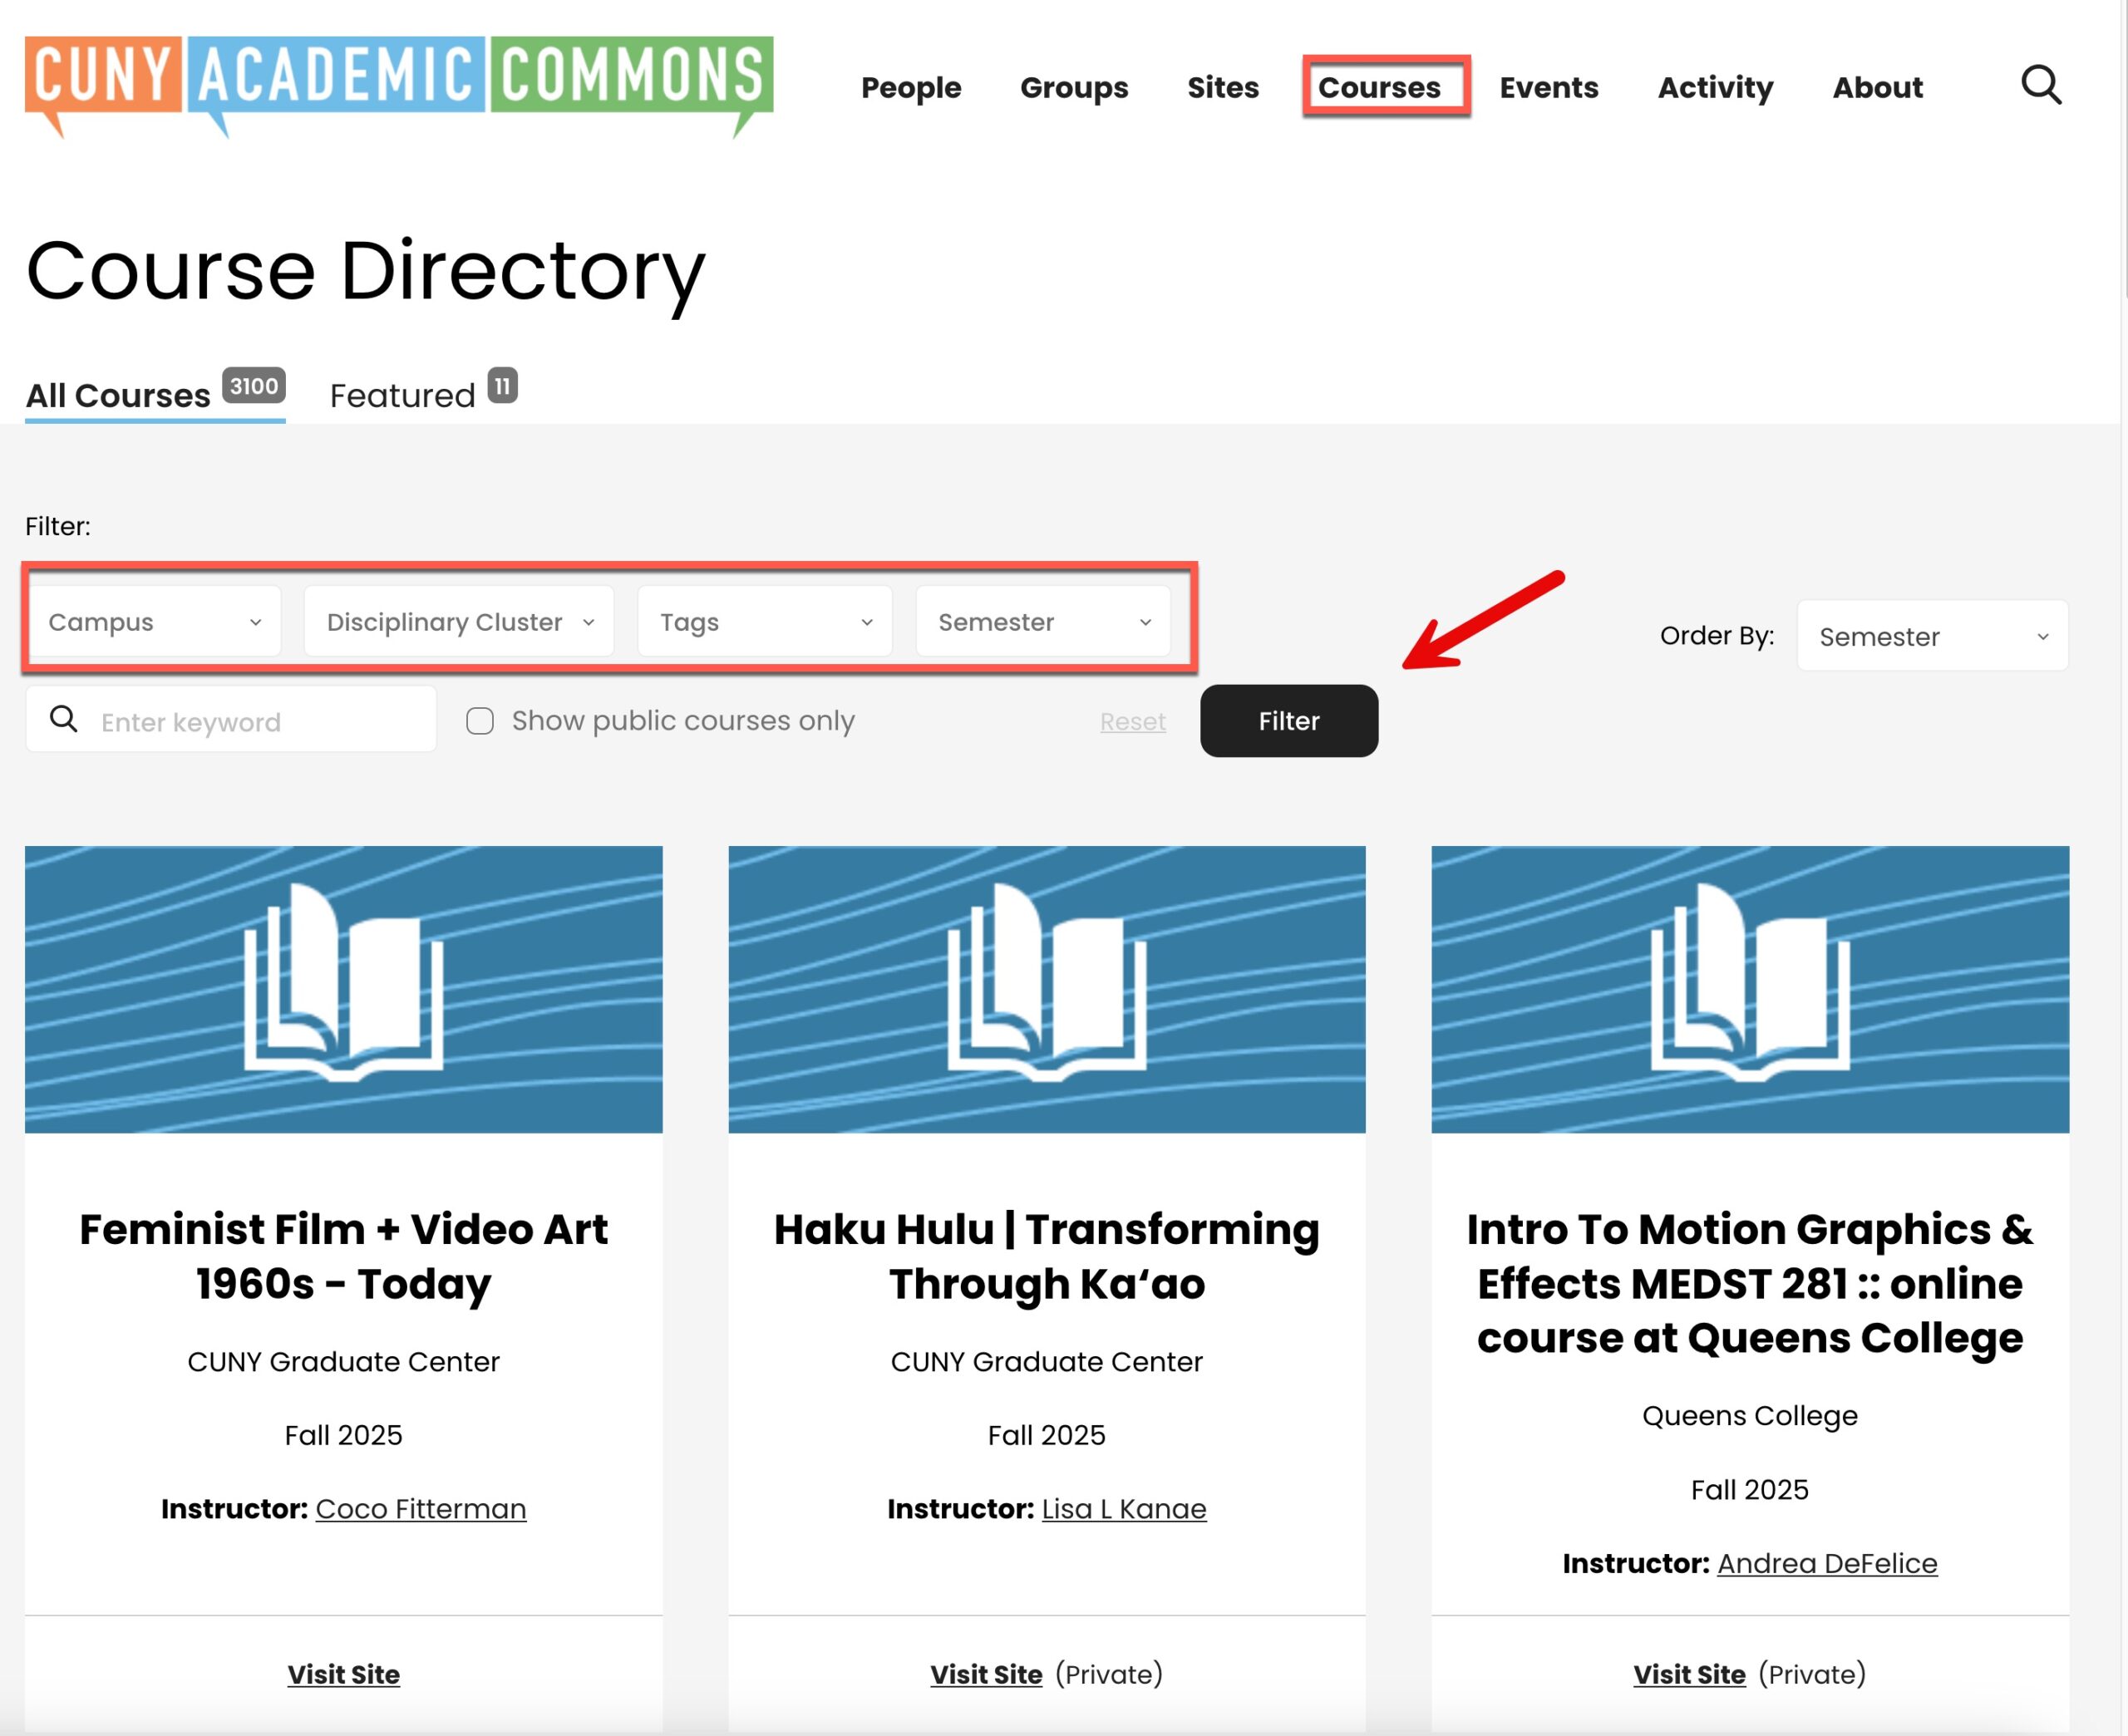
Once you have found your course (group or site), you will see a hyperlink to its “Site” or “Group” (or both) on the right side. Click and you will be taken to your class area(s).
If the site or group is private, you will need to “Request Membership” to join and view.
Make sure to bookmark your course group or site!
If you cannot find your Course in the Courses Directory you can also search for your course in the “Sites” and “Groups” directories (in the tab in the main Commons menu). Search in the Groups or Sites search bar (blue) not the Google search bar (red).
The dashboard is where you control everything about your site. Here you will enter content as “pages” or “posts,” and control how that content is displayed. You’ll probably set up widgets in your sidebar, add images, videos, and menus. To get to your dashboard, you will need to be logged into the Commons. There are several ways to get to your dashboard: In this example, “Canvas Testing” is the name of the site. If I click on that, I will be taken to the Dashboard. If I click on “New,” I can create a new page or post. If I click on “Edit Page” I will be taken to the edit screen for the current page. All these take you to the Dashboard, but to different places. (We will talk about “Customize” later. That will not take you to the Dashboard.) So now you see the WordPress dashboard – don’t let it intimidate you. There are many options, but you will get familiar with them quickly.
![]()

The site you just created is under construction – so you’ll probably want to make it private until you get familiar with how content is created. Go to Settings>>Reading and you should see something like this: Under “Site Visibility” choose the last option. When your site is ready to launch, come back to this setting and choose an option that is more appropriate.
While we are on the “Reading Settings” screen, look at the first option called “Your Homepage Displays.” Here you decide what your home page will look like. Will it be a dynamic collection of posts (i.e. a “blogroll”) that appears in reverse chronological order? Or will your homepage be a static page which you design? If you choose the latter, you can still create a dynamic page that shows your blogroll, but it will not be your homepage. It could be an option on your menu – maybe called “Blog.” In this case you would have a website that also includes a blog. To do this, create a empty page (Pages>>Add New) and name it “Blog.” Then select it as the “Posts page” in the drop down, above. Full Text or Summary? When your posts are displayed as a collection (i.e. in your “blog roll”) do you want your readers to see the full article, or do you want them to see a summary of the article (i.e. an “excerpt”) ? This setting depends on your theme. For example, for the “Twenty Seventeen” theme, it has no effect. Other themes will will display the first 20 or so words in your post, or the “Excerpt” that you enter on the edit post screen. You can also specify the max number of posts that should be displayed in your post collection.
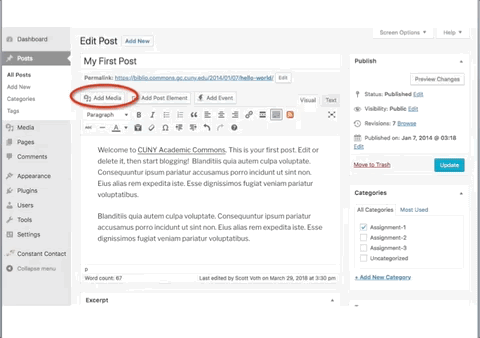
The easiest way to create a post is to click on the “+ New” link on the black toolbar at the top of your site. (You can explicitly choose “Post” although it is the default. You can alternatively choose “Page” or “Media” to create other content types) No matter if you are on the front-end or back-end of your site, clicking on “+ New” will take you to a form where you can enter your Post Title and Content. Click on “Add Media” to add an image. Be sure to click “Save as Draft” or (if you are done) “Publish.” To view your post, click on the “View Post” hyperlink at the top of the page. To edit your post, click on the “Edit Page” button on the black toolbar.![]()
In almost all respects, posts and pages have identical functionality – you can add text, images, featured images, videos, links, tables, and maps to both. Just start typing to add content, and remember to save your changes. You can “Save as a Draft” or “Publish.” If you “Publish,” and then make changes, you can “Preview Changes” without clicking on “Update.” But please remember to click on “Update” to finalize your change. Click on “View page” to go to the “front-end” to see what your saved new content looks like. Here is the what the screen looks like when you are editing “Sample Page.” The middle circle shows the WordPress toolbar. Here you can bold or italicize text, create bulleted or numbered lists, center text, or flush it left or right. On the “Sample Page” or “Hello World” post, experiment with what you can do. When you highlight a section with your mouse, see what each of these options do.
To create a hyperlink: Watch the process below:

The most common scenario is that you typing in text and all of a sudden want to add a picture. So that picture could wrap around your text on the the right or left, or break your text and appear in the center. Those are your options. This scenario assumes that you have rights to the image and that the image is compressed. Click on “Add Media.” You will be asked if the image already exists in your Media Library or if you want to add a new one. If you want to add a new one, you will need to locate it on your computer and upload it to your site. Most normally you do this all in one shot: To have text wrap around the image, choose left or right alignment. When centering an image, use large or original size. If too big, WordPress automatically resizes it to your post or page width. Text will not wrap around a centered image. Watch the process below:
As we noted before, your posts will display in reverse chronological order. If you want to order them differently, you can use the “Publish” option on the edit post screen and change the publish date of your post.

You can also make a post “sticky” so that it always appears as the first post in your collection. You can also change the status of posts – switch them back to draft status, for example, or make them private or password protected. (You can also use a plugin called “Simple Custom Post Order” to adjust the order of posts.)
Each page or post has one optional “Featured Image.” You set this featured image on the edit screen. See below: Where this featured image is displayed is theme dependent. For example, the “Twenty Seventeen” theme displays it as a full screen image above your page or post. Some themes display it as the small “thumbnail” image when you list your pages or posts. Some display it in the summary or “excerpt” of your post. You might want to experiment with your theme to see where featured images appear.

Do you want your readers to be able to comment on your content? You can control this globally on the Dashboard at Settings>>Discussion (see screenshot below). Please ensure that you don’t allow comments to be entered without moderation (i.e. an Admin’s approval). You may become a victim of unpredictable spam. Discussion on Specific Pages or Posts You can also individually enable discussion on a page or post by using this setting on the edit screen: What are trackbacks and pingbacks? See below: Trackbacks (from WP Codex) Pingbacks (from WP Codex)

In 2019, WordPress introduced the “Block” Editor, with the intention that it would replace the “Classic” Editor. On the Commons, we give you the choice of which to use. See below: To use the Block Editor, you need to think of everything in a page or post as a block – paragraphs, images, lists, embeds, short codes, columns, cover images, etc. – and each block has numerous properties that determine how it appears on the page. Blocks can be moved up and down or added anywhere you want without the use of custom code. The Block Editor opens up many possibilities, but it may take a little time to get used to it. See more about Block Editing. The good news is that you can always fall back on the Classic Editor.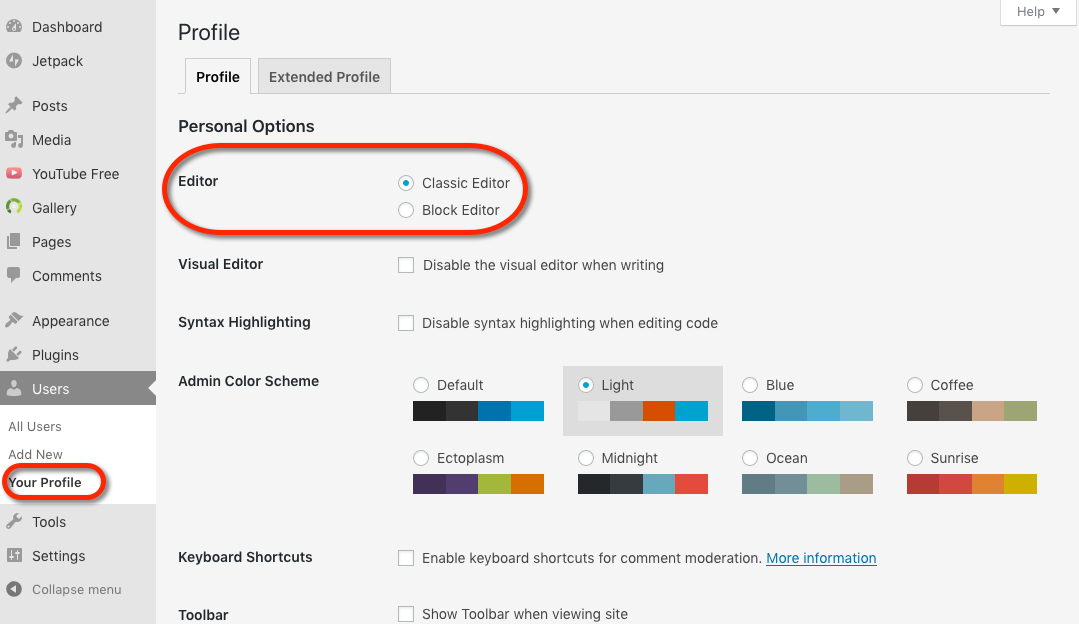
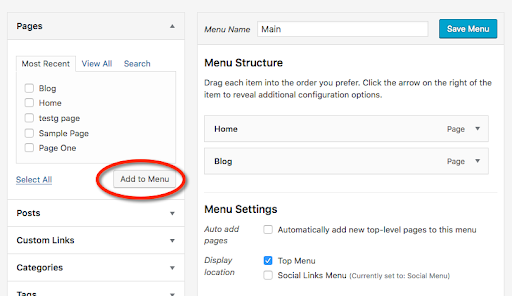
Navigational menus are essential for modern websites, and WordPress lets you set up any number of menus. However, most themes only display two or three. Go to Appearance>>Menus to get started. You should see something like the screenshot below. To get started with Menus, create a new one. Give it a name of your choosing and save. Now you have a menu to work with. Where should this menu appear? The “Twenty-Seventeen” theme we are using provides two “Display locations” (see “Menu Settings’) : “Top Menu” and “Social Links Menu.” For now, check the Top Menu and Save. Now you have a menu, but with no items in it. What do you want to add? Notice that there are there are five main types of menu dropdowns: Pages, Posts, Custom Links, Categories, and Tags. When you click on anyone of them, you will see the content that you have that can be added to the menu. So for example, if you click on “Pages” you will see something like this: In this example, we’ve checked “Home” and “Blog” and they have been added to the Menu Structure. Posts work the same – you will see all the posts you have and you can add any of them by checking the box and clicking on “Add to Menu.” Custom Links let you enter any URL that you want, give it a title, and it will appear in the menu. This could be a page or post on your site, or a link to an external site. The Categories and Tags dropdowns are great ways to automatically segregate your content. Suppose you create a category (or tag) called “Assignments” and another called “Reflections.” You can create a menu item that shows all posts that have been categorized or tagged in that way.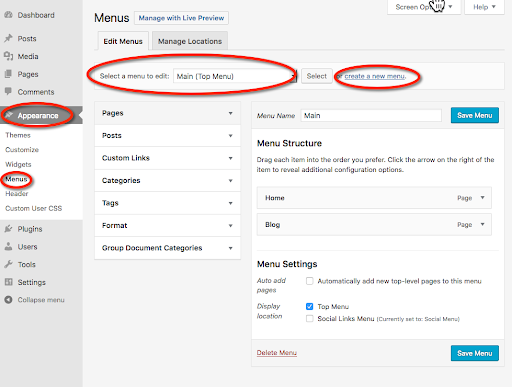
Menu items can have sub-items and those sub-items can also have items beneath them. (It is best not to have too many levels of nesting.) To re-order and “parent” menu items, just drag and drop. Watch the process below:
Widgets are blocks of static or dynamic content that can be placed in your sidebar or your footer. On your Dashboard, go to Appearance>>Widgets to see the list of those available. Find a widget that you like and drag it to a “widgetized” area. The number of widgetized areas you have, and their placement, depends on your theme. Here we chose to display the five most popular groups on the Commons on the post sidebar: And here is what is now displayed:

Good Luck! Feel free to contact us for help!
Any member of the Commons can send a customized email invitation, either to the Commons itself (for non-members) or to a site or group that the member belongs to. Either enter the invitee’s username (if already a member of the Commons) or their CUNY email. The recipient can simply click on a hyperlink to begin the acceptance process.
If you are teaching a class, you can enter a list of the emails of your students and do the process in one shot.
Hover over your avatar in the top right corner of your browser screen, and scroll down to the “Send Invites” option. You can also get to “Send Invites” through the Dashboard of your Group or Site.
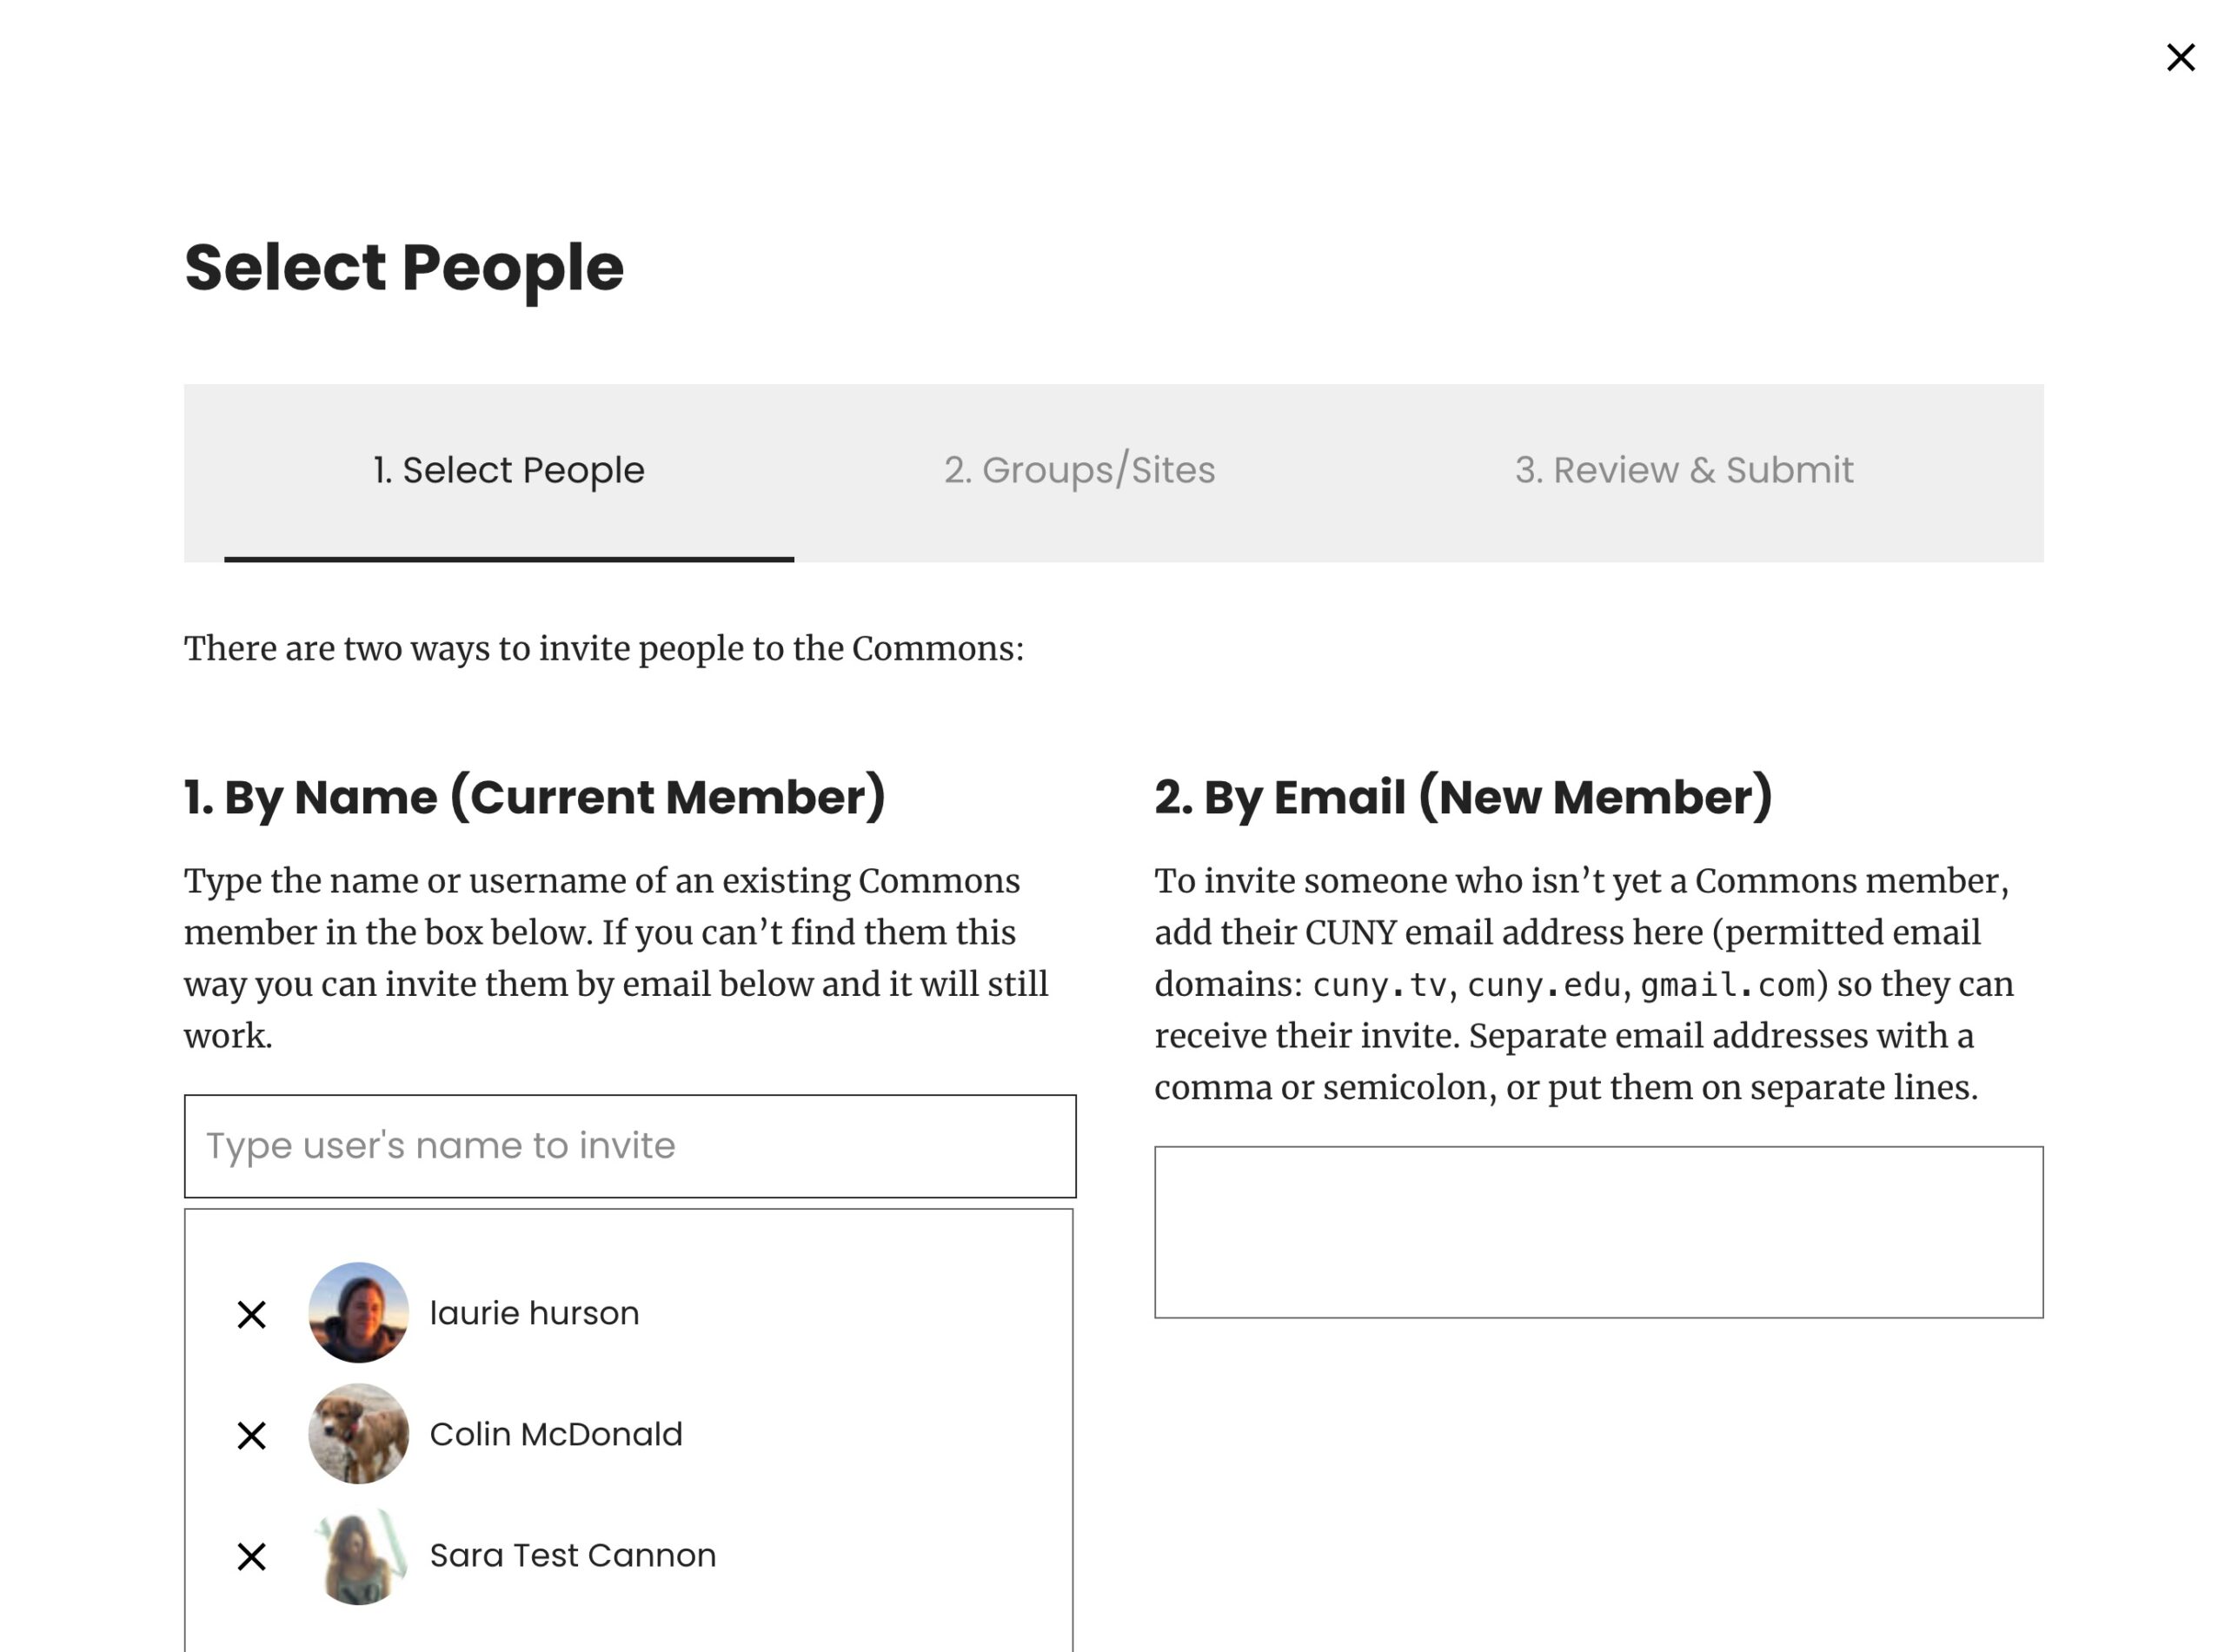
You will see the screen below, Step 1 “Select People.” Here you have two options. If you know that your colleagues have already joined the Commons, you can type their usernames in the “Invite by Name” field (you’ll see it populate as you type). Or you can fill in your colleague’s email addresses, one per line, in the “Invite by Email” field.
Then click Next.
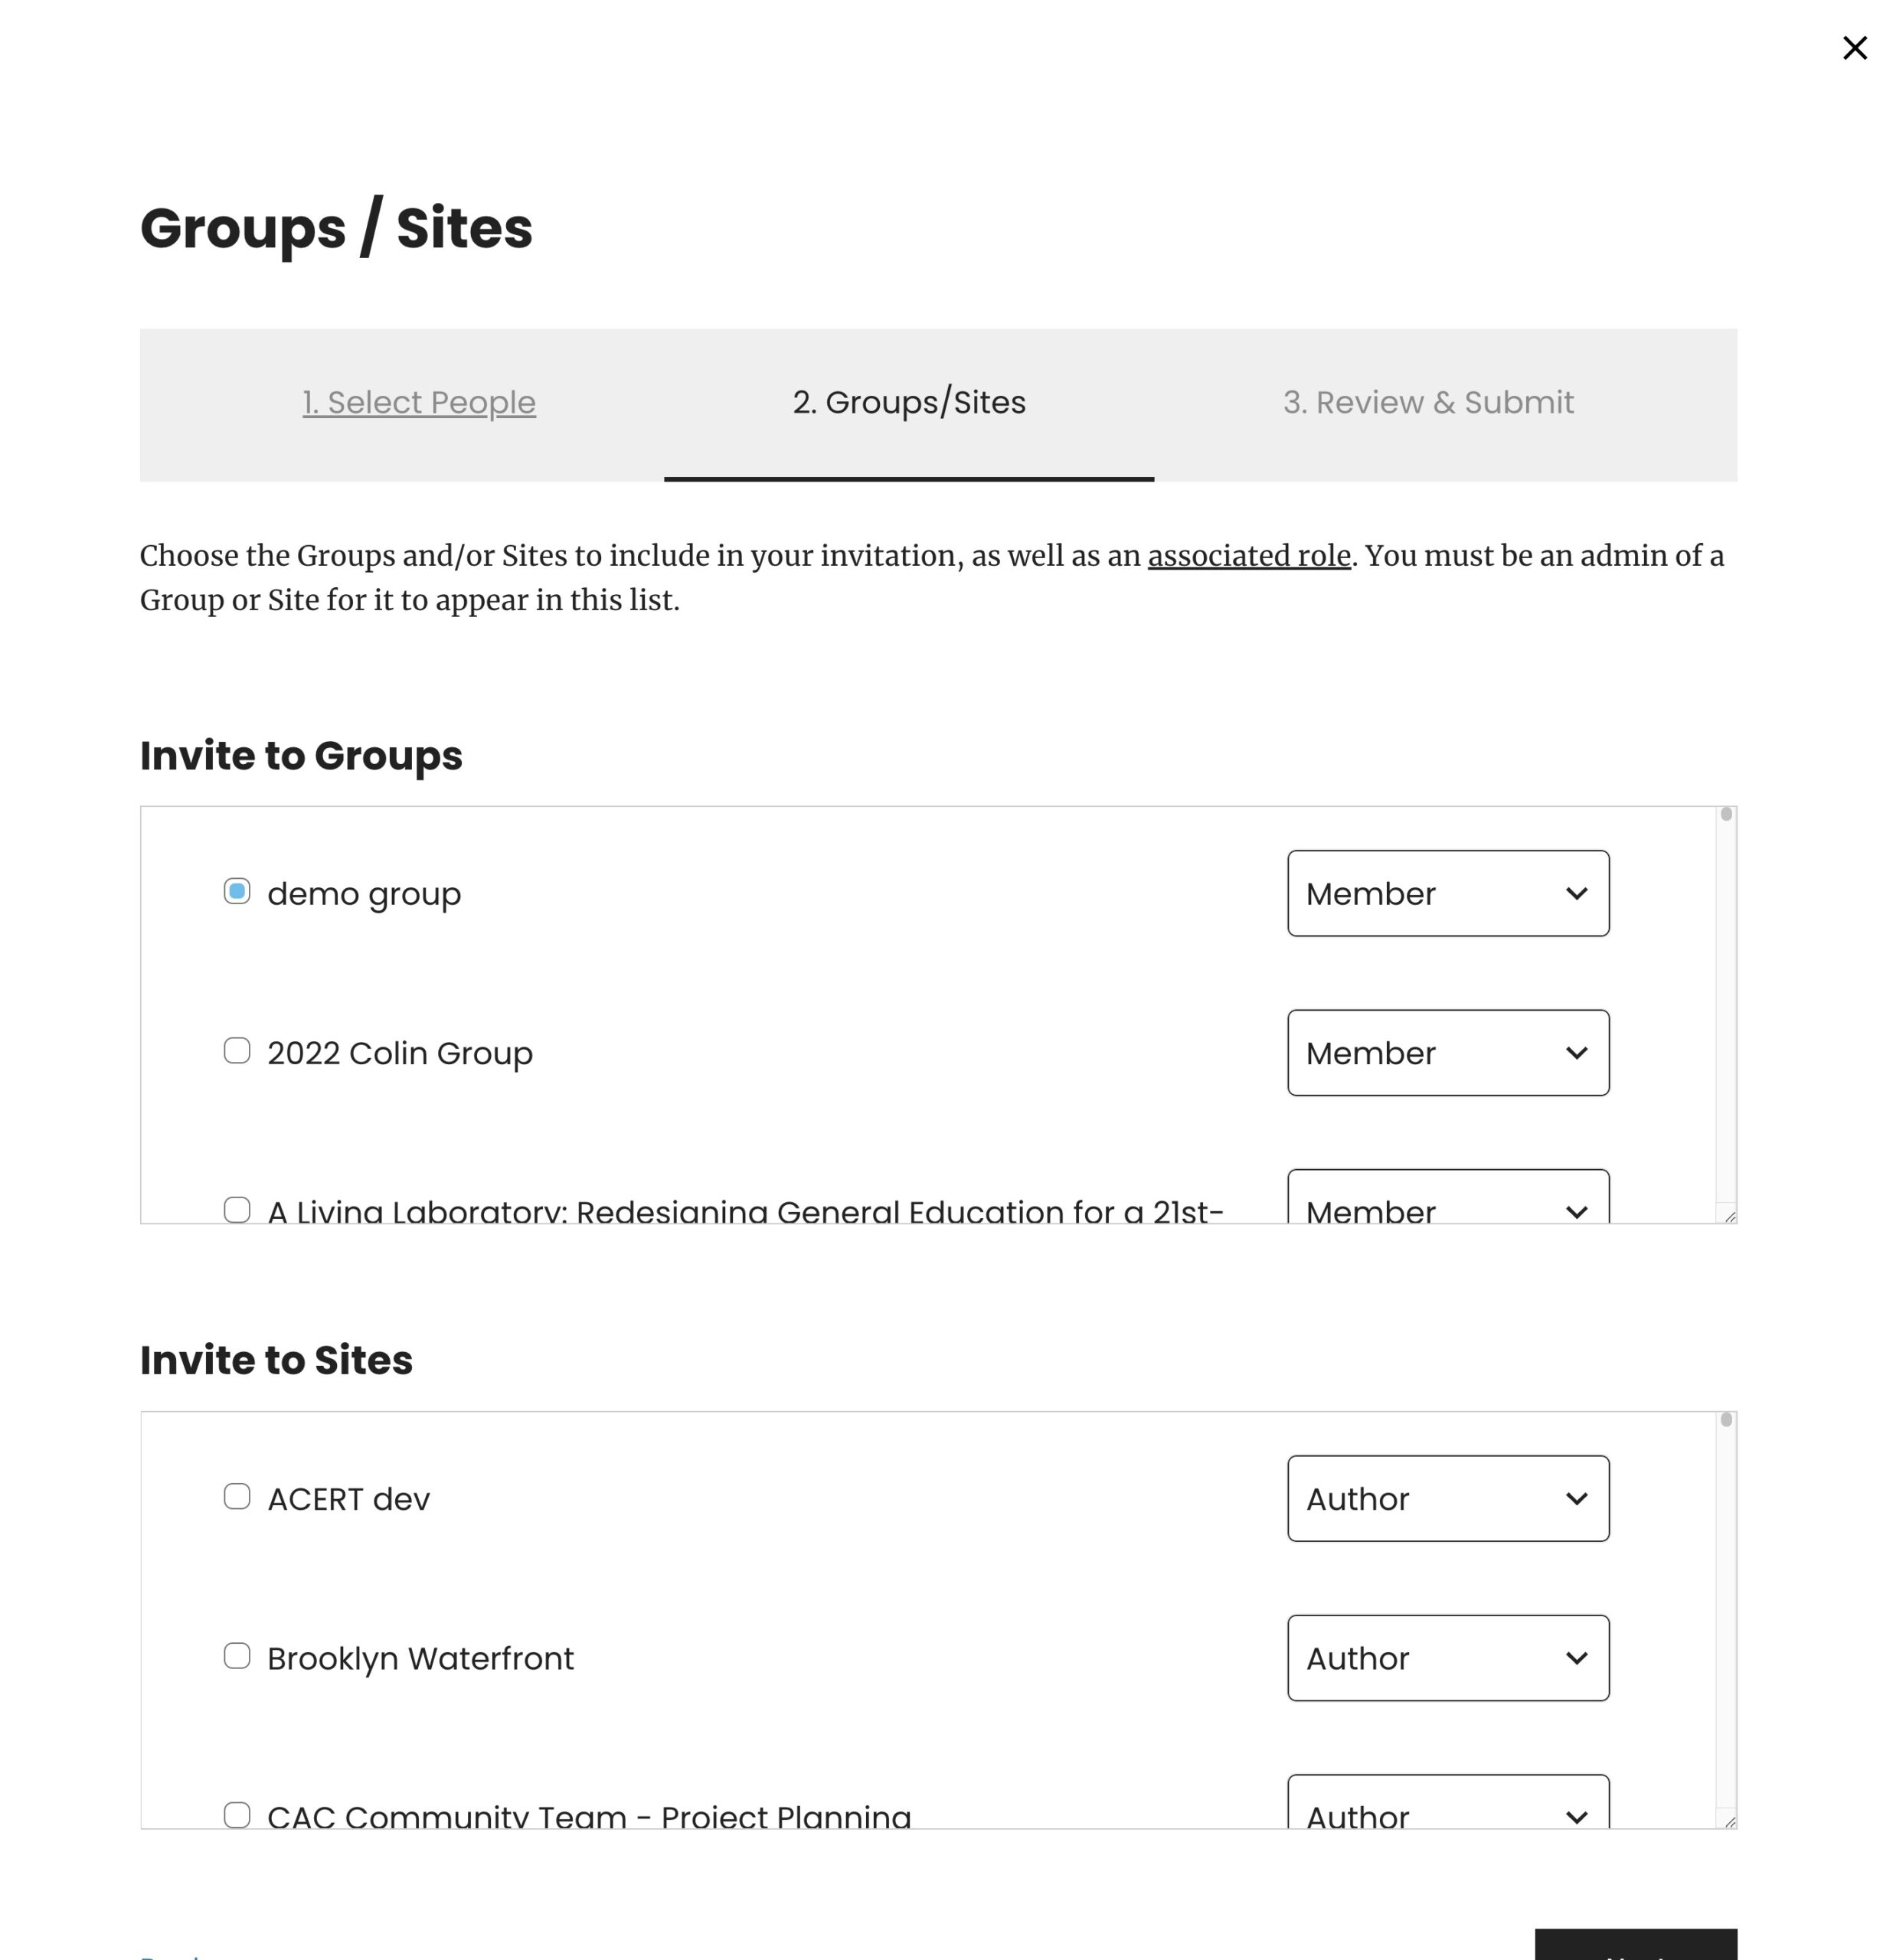
Step 2 “Membership” will allow you to connect the invitation to one or more of your groups or sites. Click the box next to the names of the groups or sites, and set the role of the person you’re inviting on the right. (More information about Roles can be found here.)
Click Next again.
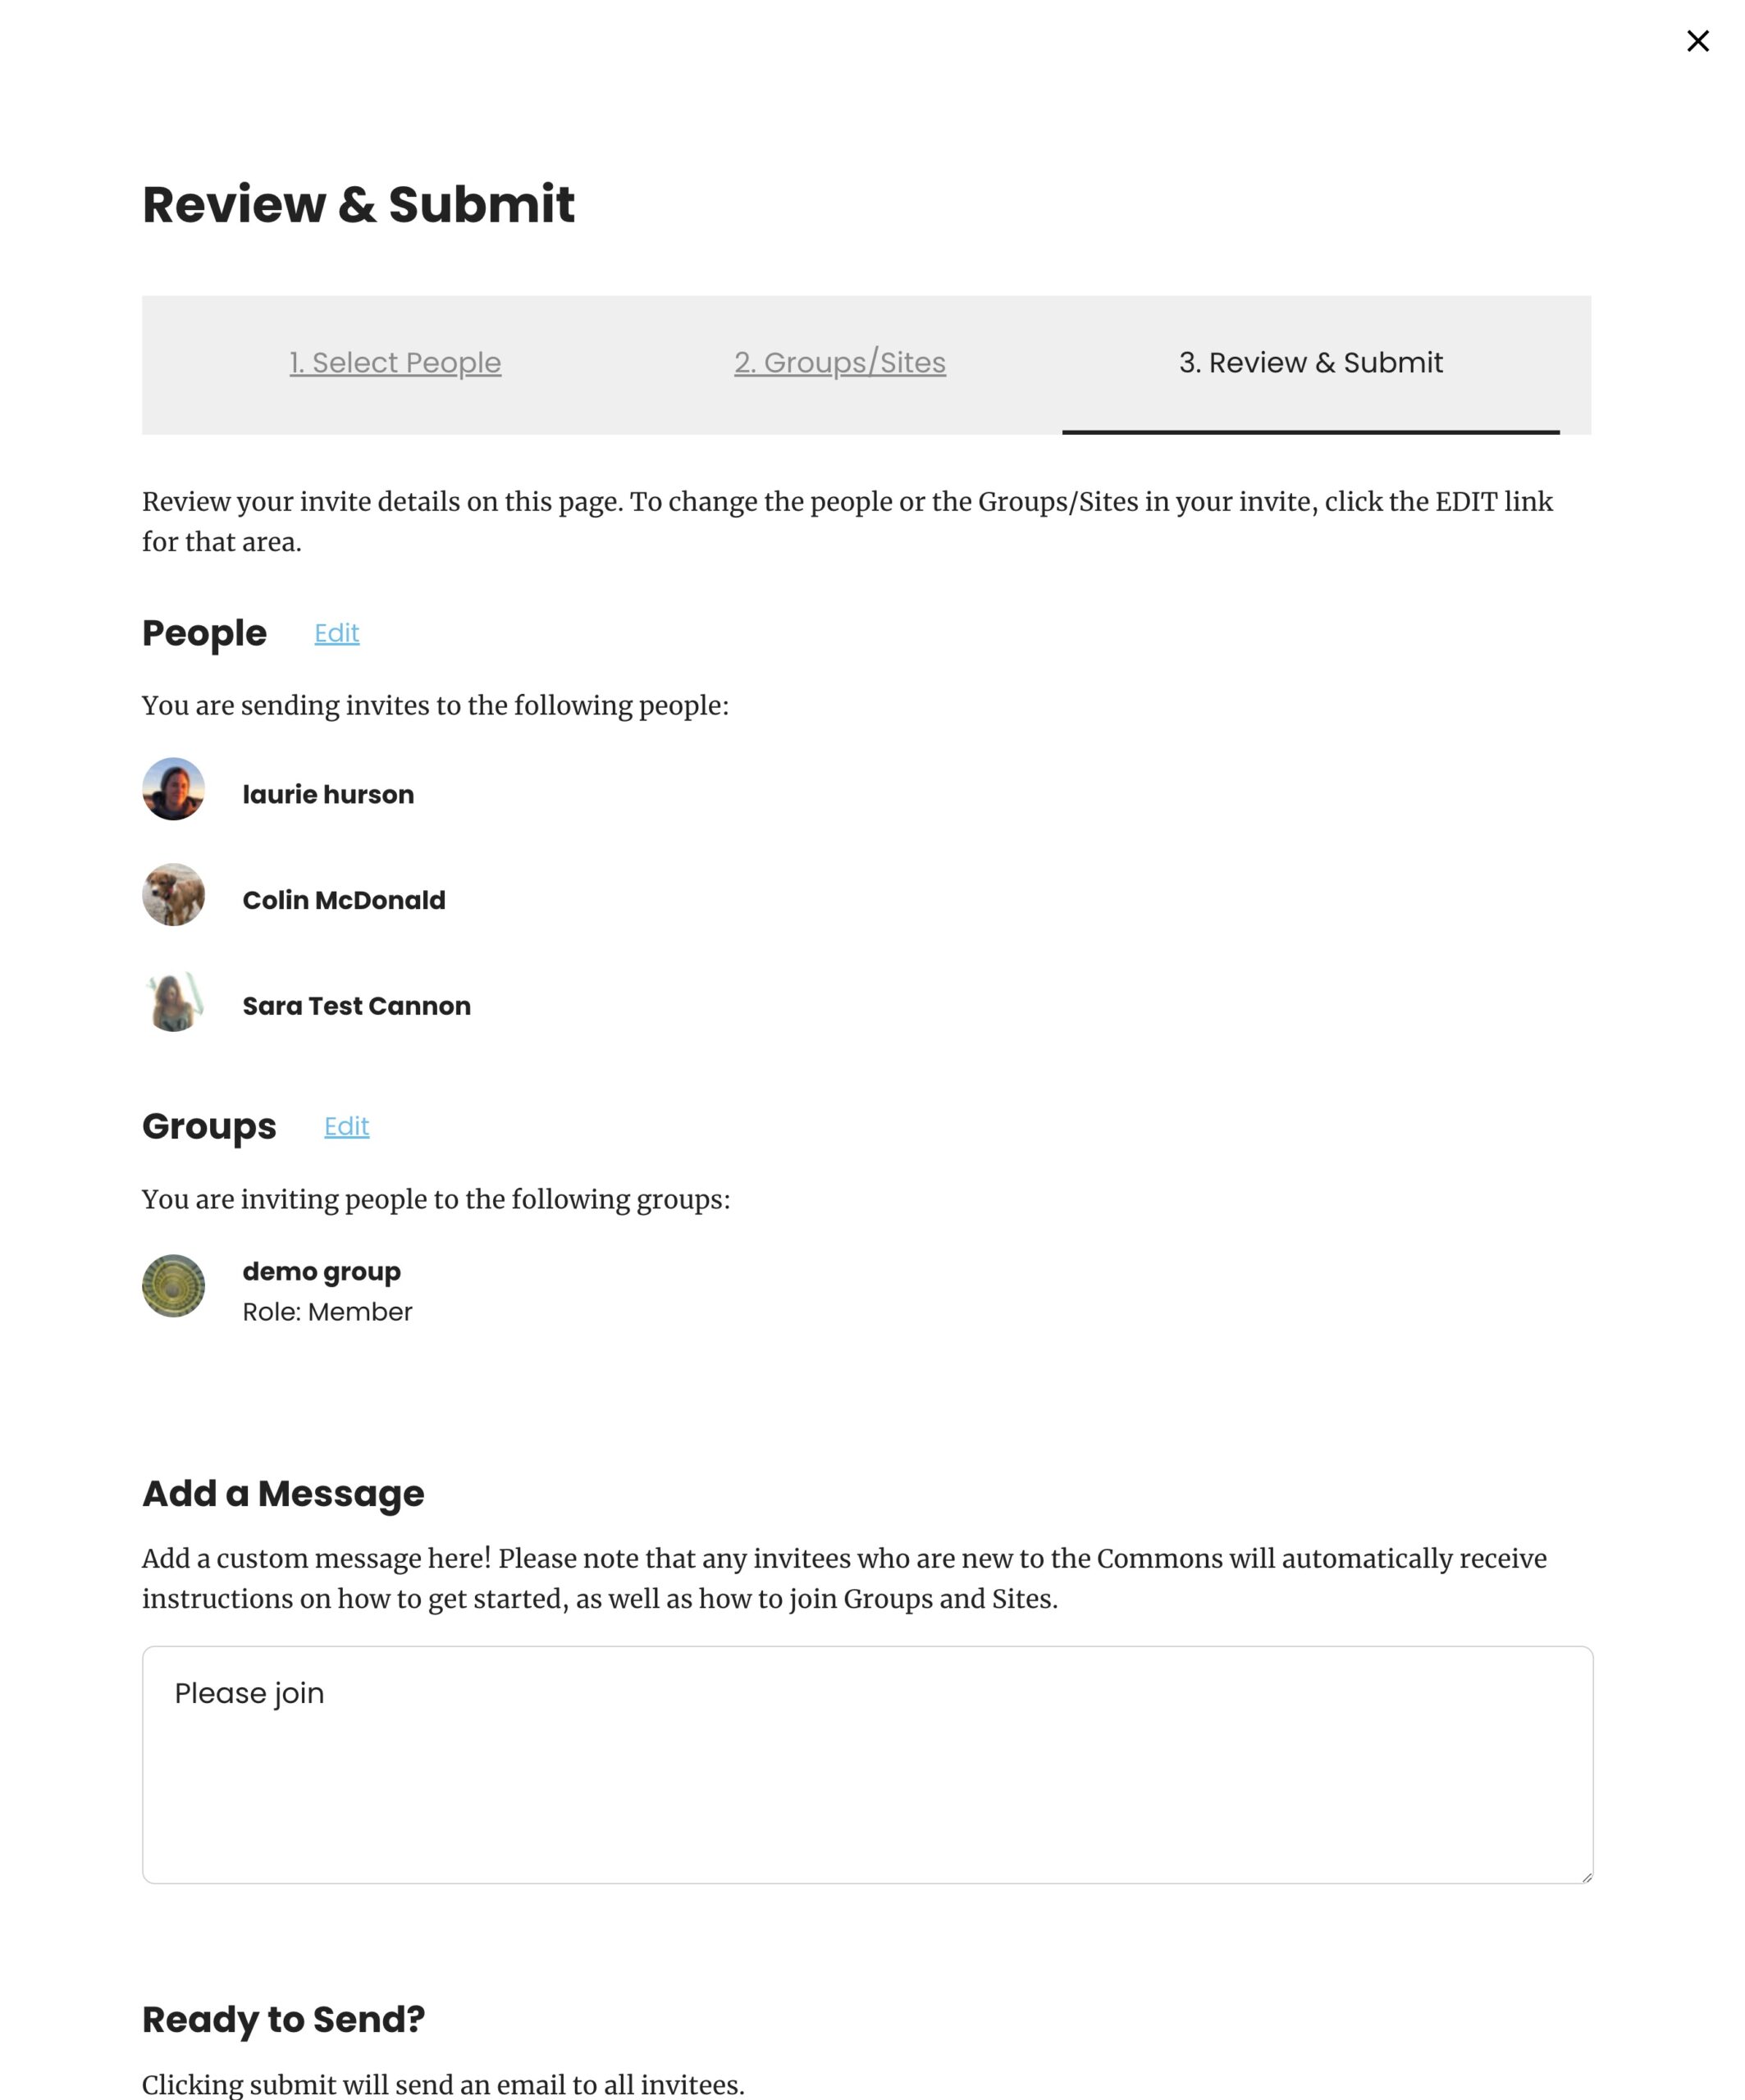
Step. 3 “Review and Submit” shows you who you have invited and where. Use the “Add a Message” box so that your recipient will immediately know what the email is about .
Click Submit.
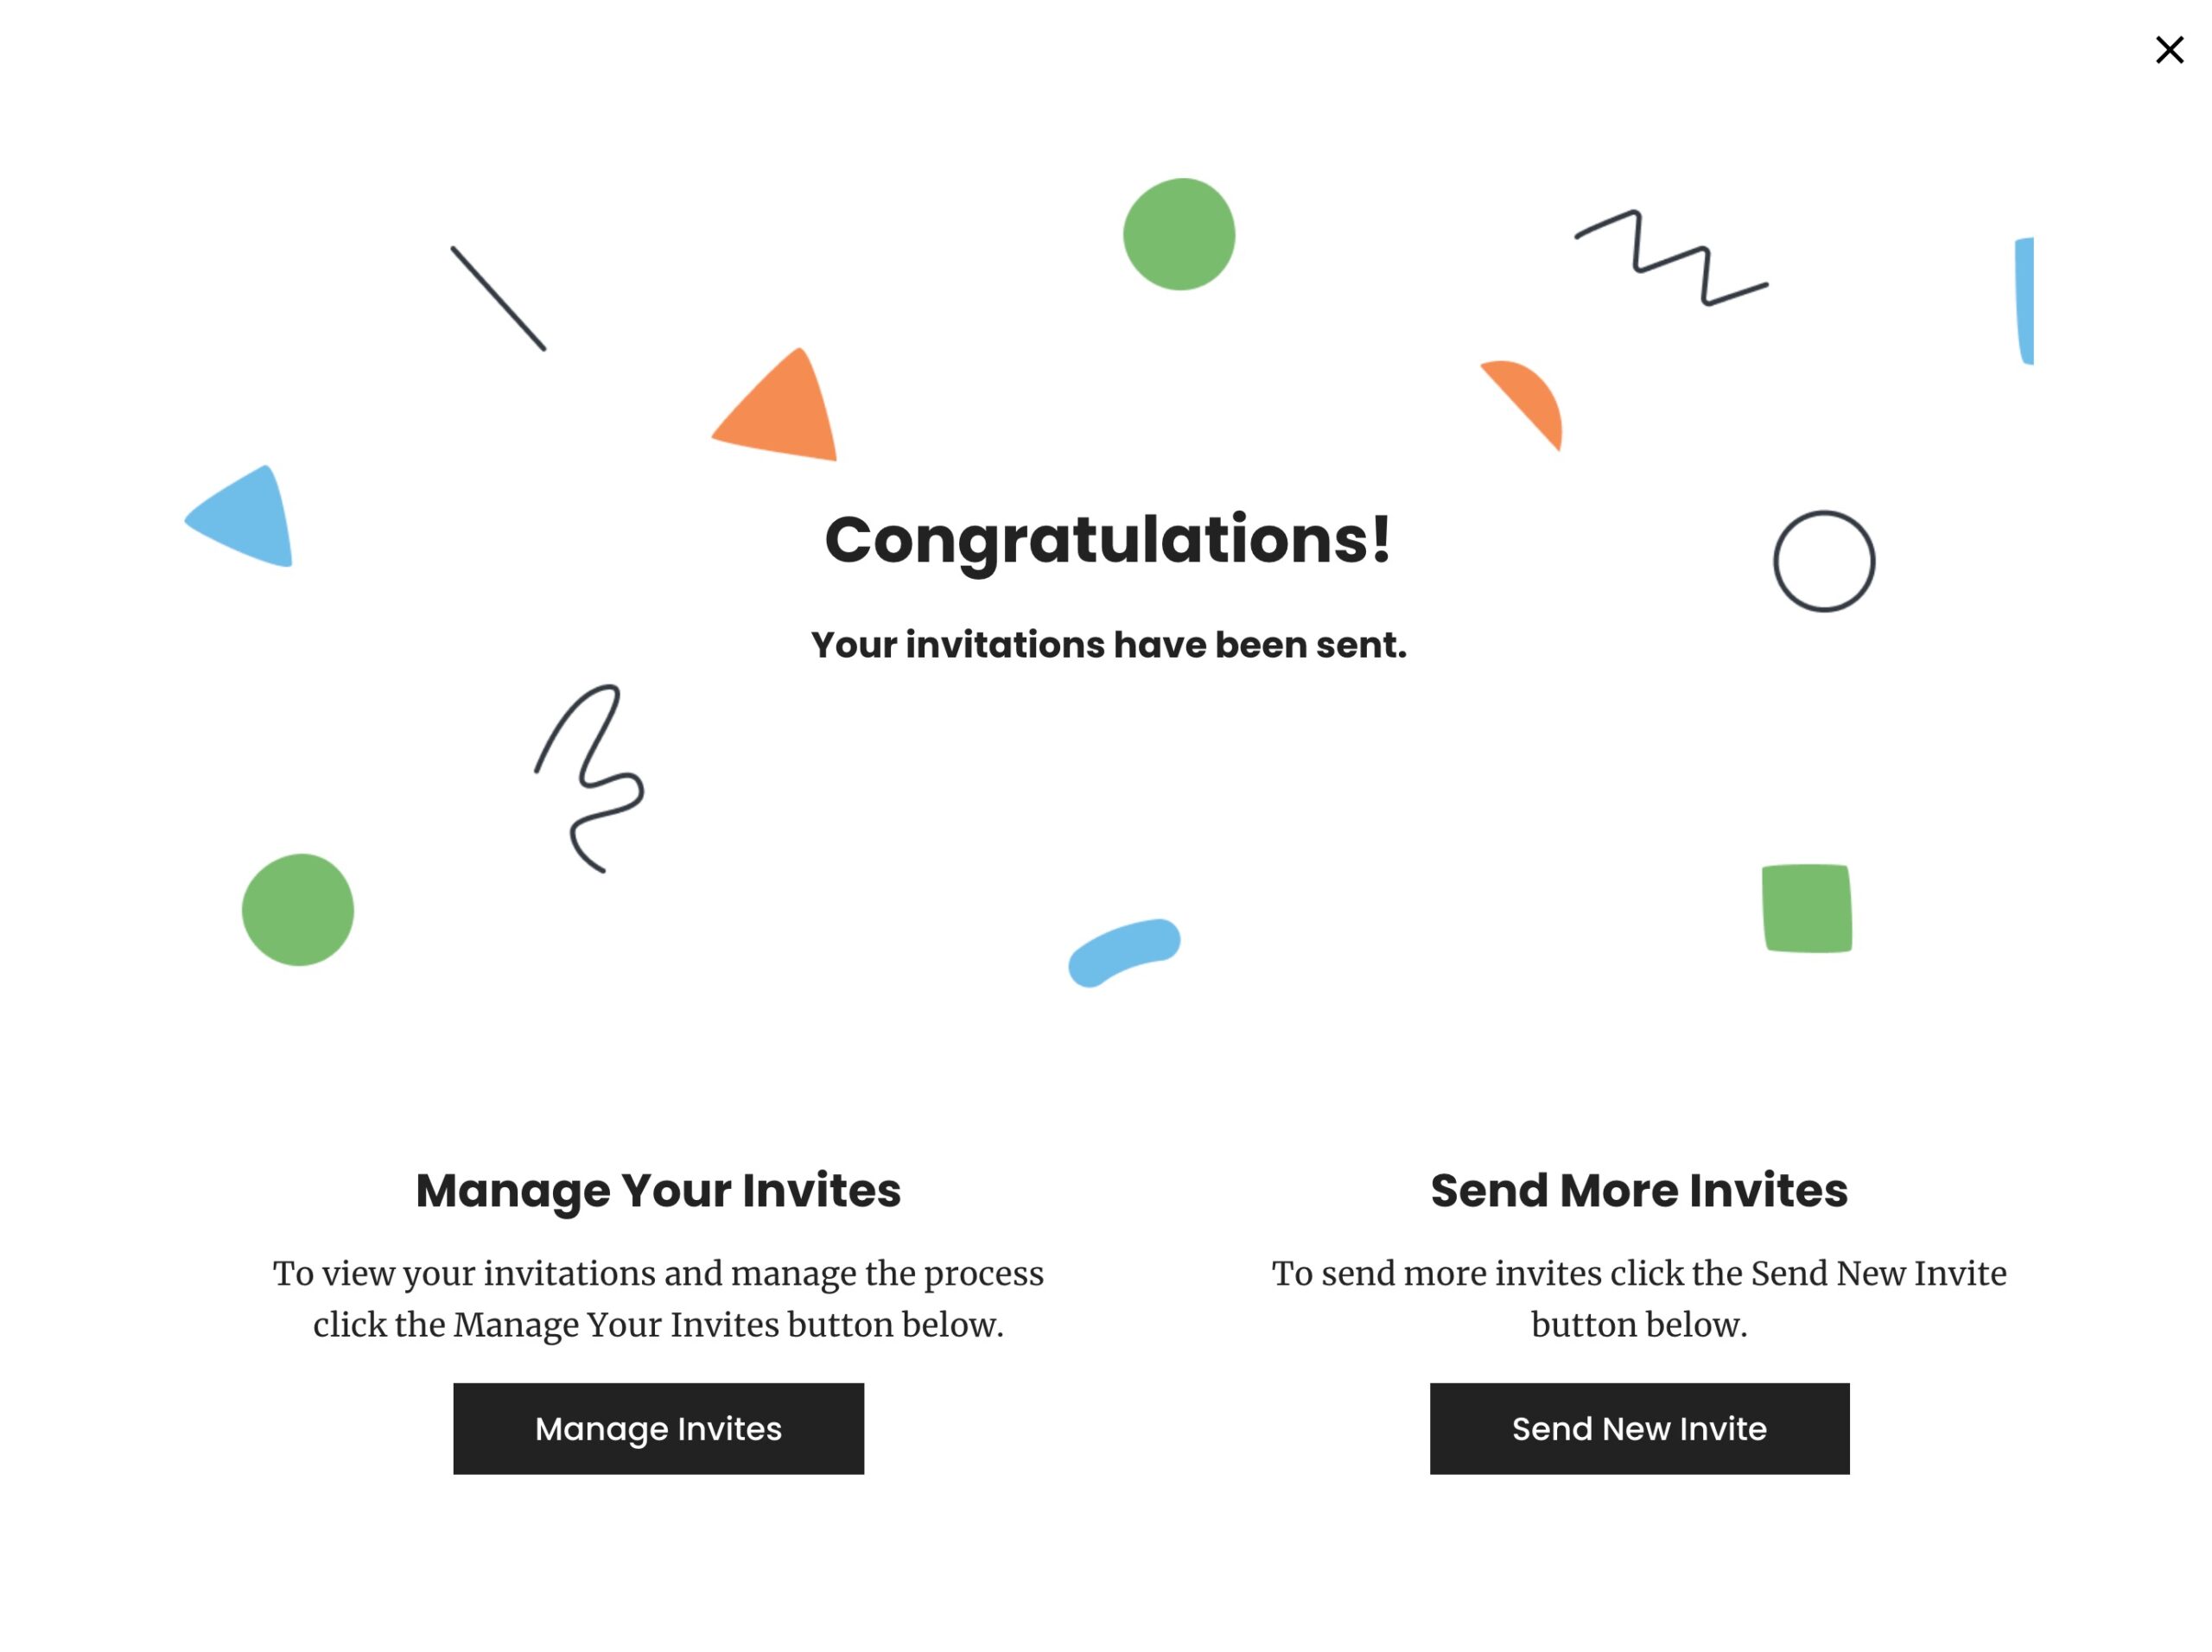
Your invitees will have an email automatically sent to them, with the subject line: “Invitation on the CUNY Academic Commons.”
Please let us know if you have any difficulties or questions at the Commons help desk – [email protected].
Need More Help? Send Us A Message
We care about your experience! Email us at [email protected] so we can respond to your questions and requests.