
teaching-learning
Where Can I Find Directions On How To Use The Commons?
Your professor should explain how s/he will use the Commons for your class. Approaches can vary dramatically. Once you understand if your are expected to use a group and/or a site, you can use our Help pages and Quick Guides.
For help with WordPress, please review WordPress Basics.
How Do I Join My Course Group Or Site?
When you register for a class, your professor will have your CUNY email and will send you an invitation to join the course group and/or site. If you haven’t received the invitation, check your spam folder. Make sure you are accessing your CUNY email address.
If this does not solve the problem, ask your professor to send another invitation, and to track it.
If you are not already a member of the Commons, you will first need to join the Commons, and then join your course site and/or group.
Click here for a downloadable Quick Guide for Joining a Group or Site
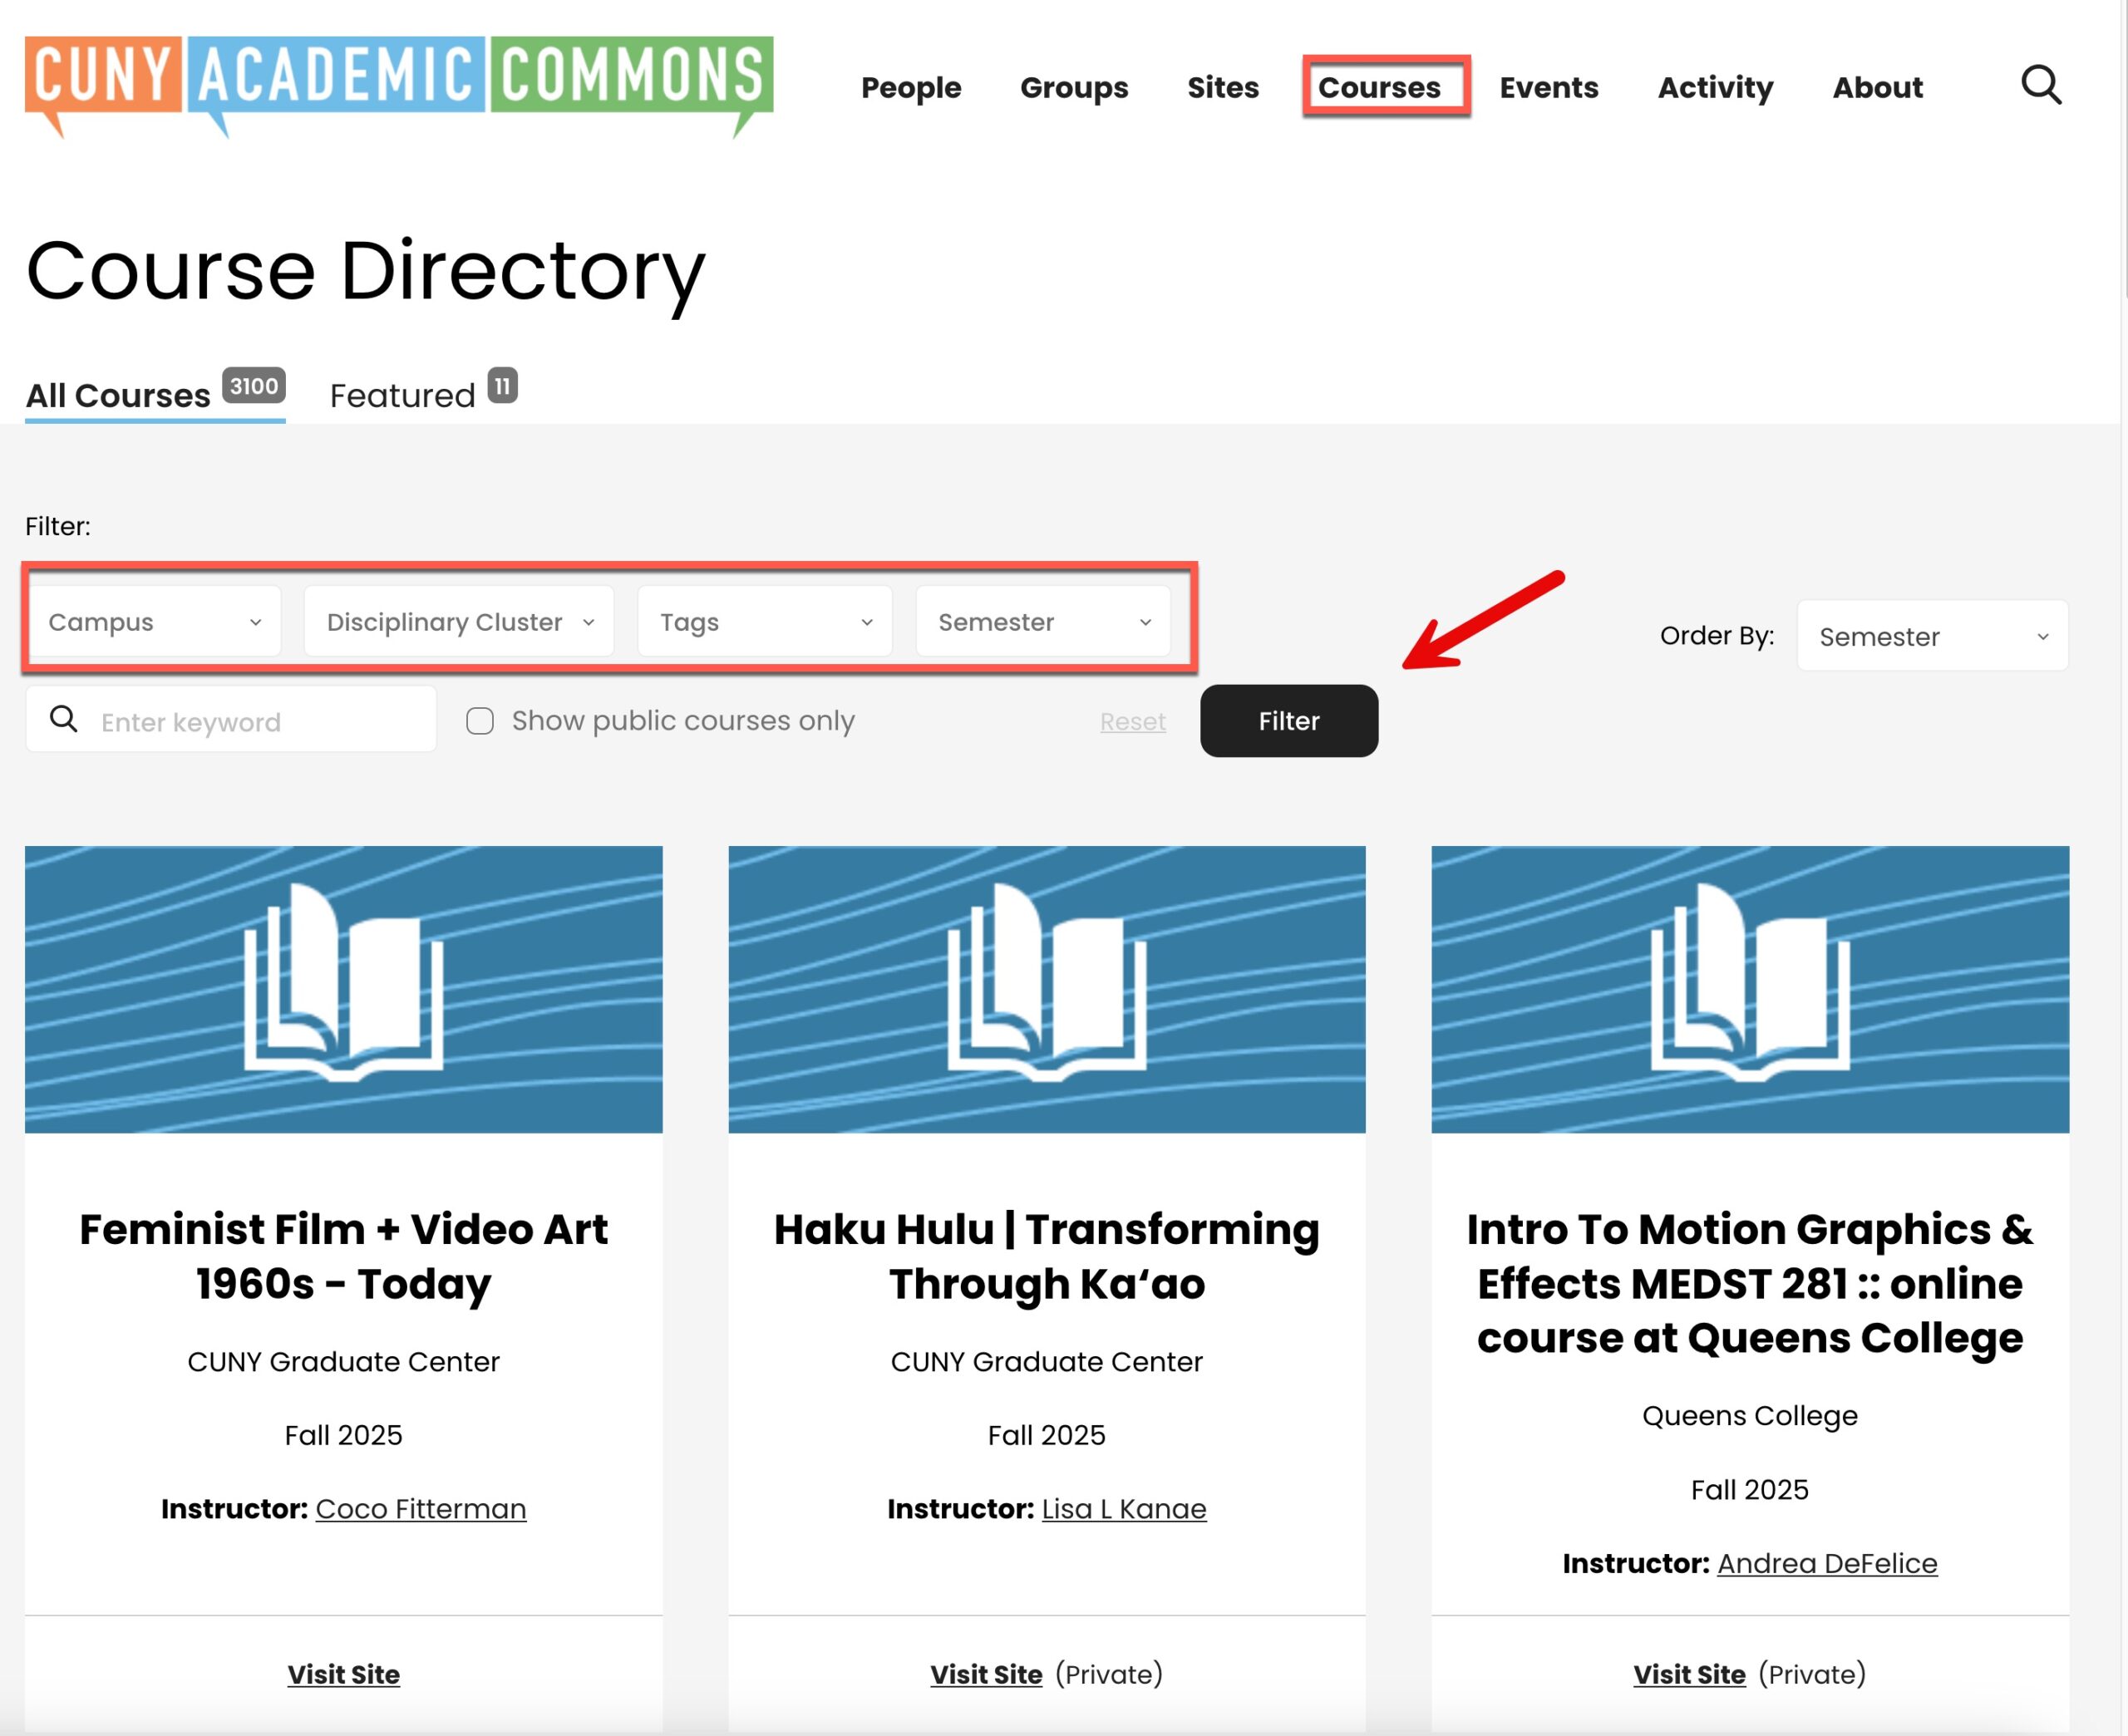
How Do I Find My Course?
Go to the “Courses” tab and use the filters to search for your course.
How Do I Create A Post?
In order to post, you must have a Commons account and be an Author on the site where you will be posting. You must be logged in to post.
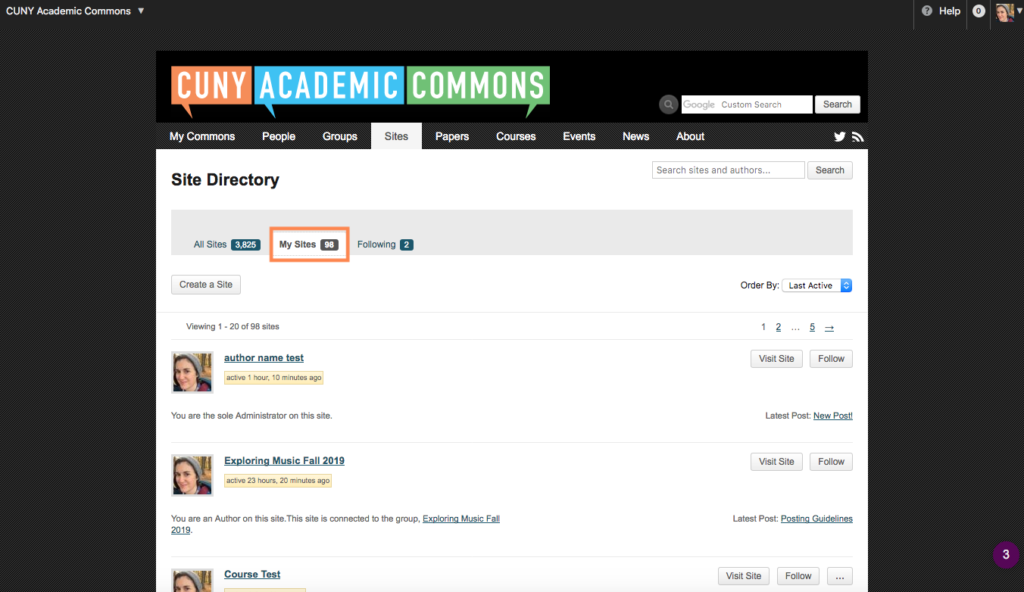
Log in to the Commons and go to site where you will be posting. You can find the site by clicking “Sites” in the Main Menu and then clicking “My Sites”.
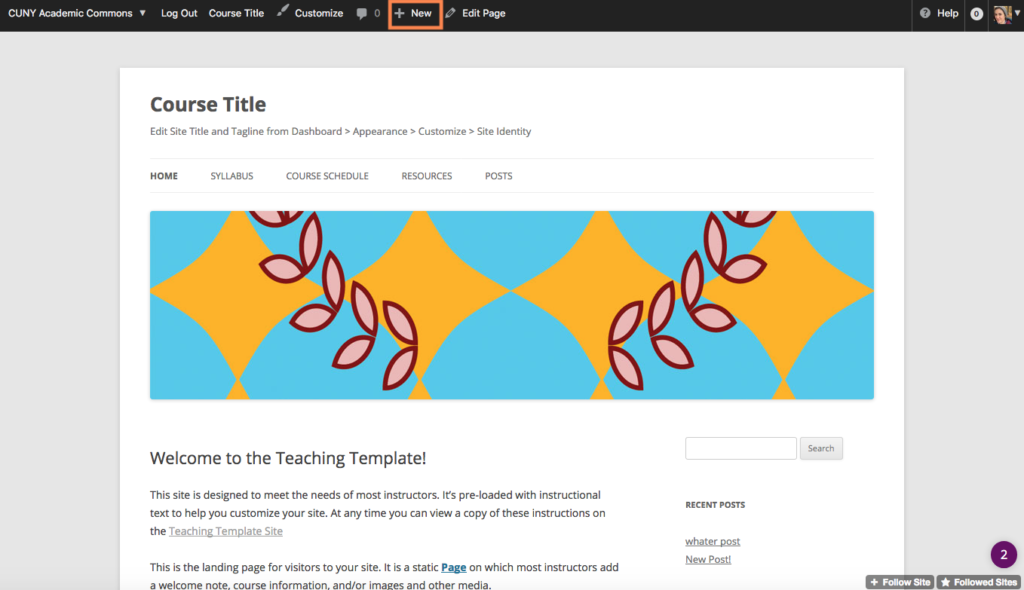
Once you are on the site, you can create posts in one of two ways.
Option 1: When you get to the site, locate the black admin bar at the top of the page. Click “+New”.
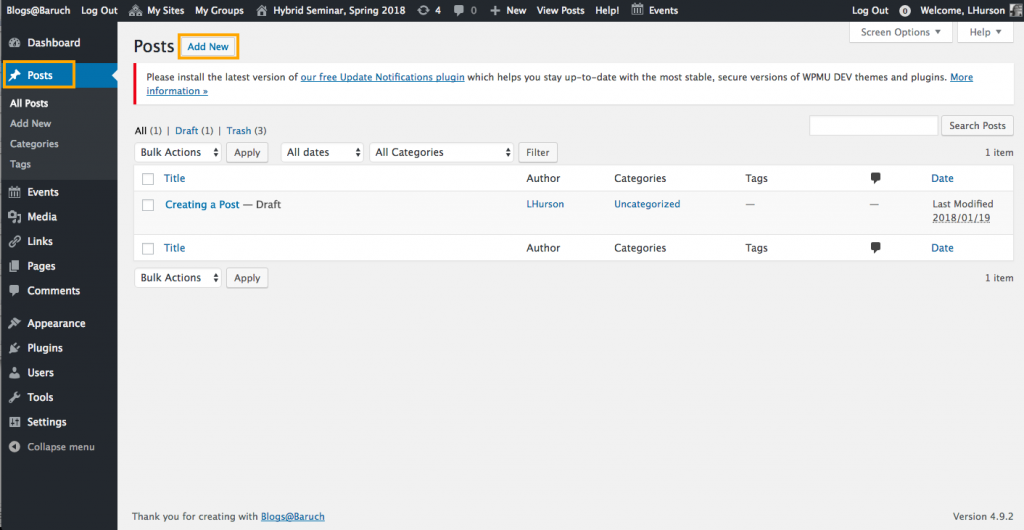
Option 2: In the dashboard of the site where you will be posting, visit the “Posts” area and click the “Add New” button on the top left.
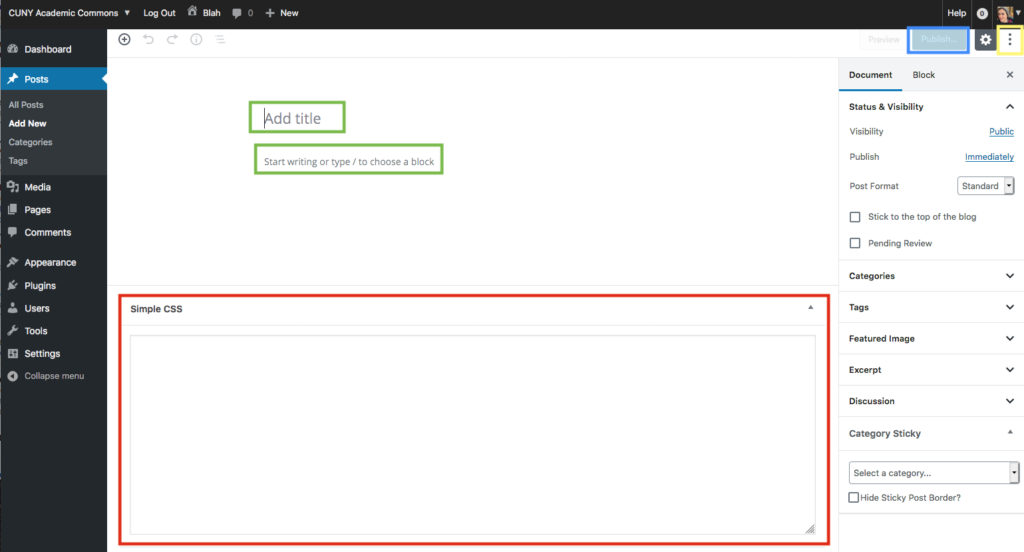
There are two Editor layouts. To post in the Block Editor (below), add a title and post content (green boxes below). Make sure not to write in the “Simple CSS” area (red box) because this will not be visible to the post reader. Once your post is complete, click Publish (blue box). If you’d like to switch to the classic editor click the three dots (yellow box) and select classic editor.
In the Classic Editor, add a post title and content. If needed, select the post “category” from the Categories section of the right sidebar.
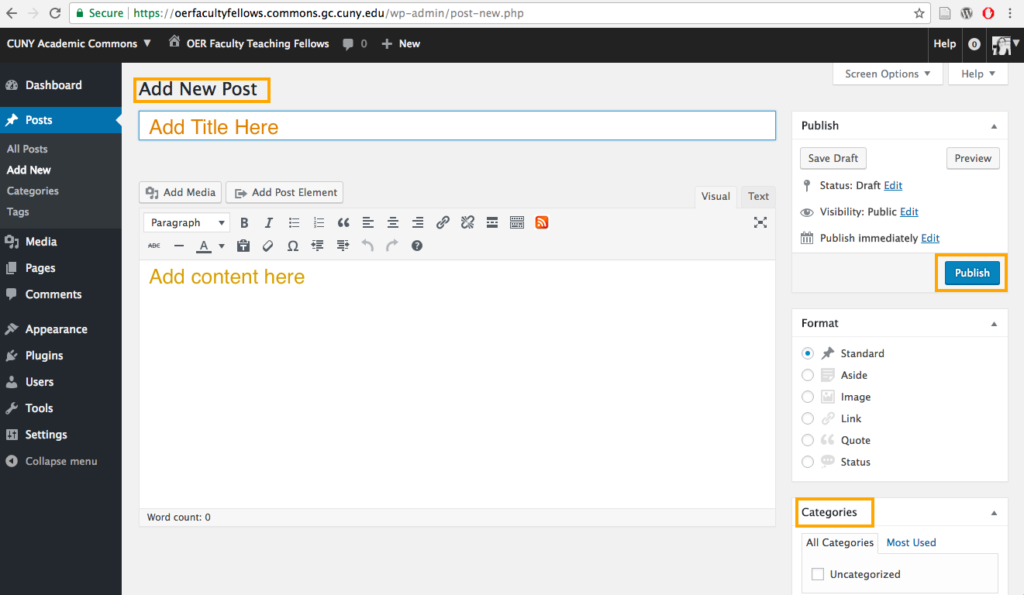
Once your have written your post, click “PUBLISH” on the right and the post will go live.
You’re done!
How Do I Make My Site Visible To My Professor?
To adjust the privacy settings on your individual or group site go, on your WordPress dashboard to Settings >> Reading.
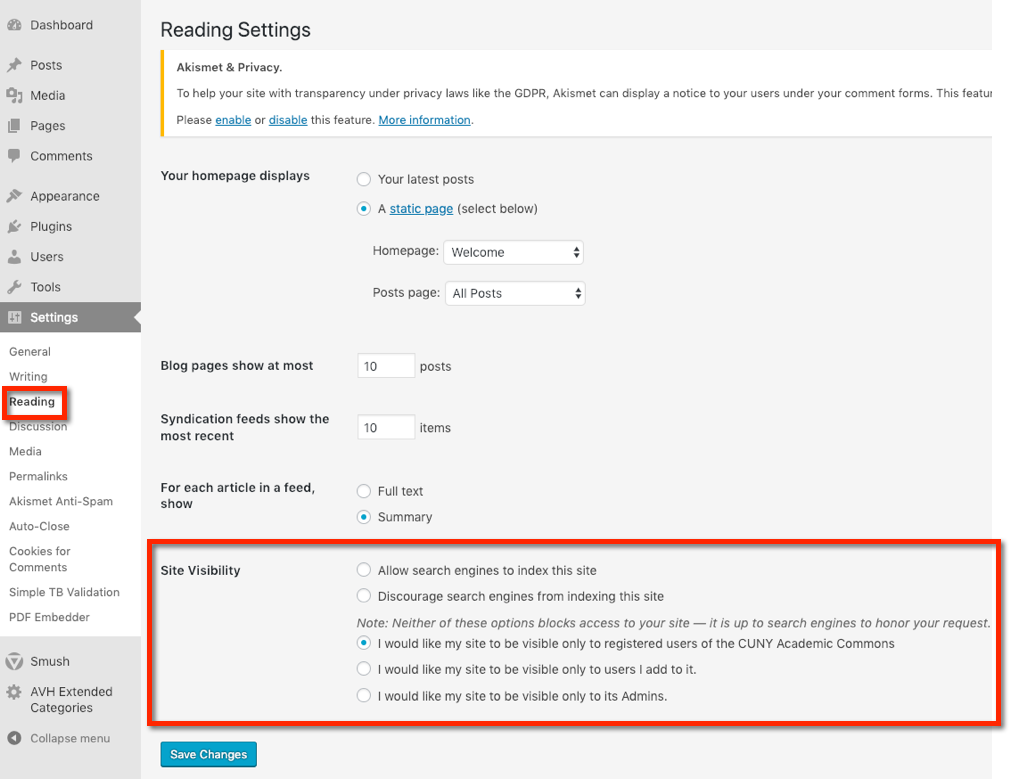
Select one of the five visibility options.
To make your site open to everyone on the web, choose “Allow search engines to index this site.”
On the other end of privacy, especially if your site is in development, you might choose “I would like my site visible only to its Admins.”
See more about site privacy settings.
What is the difference between a page and a post?
A post is a chronological, journal style entry that has a date and time. A page is a more static type of entry and has the feel of a traditional website. If your site is a “blog” you probably will want your homepage to display your most recent posts. If your site is more of a traditional web site, you might want to assign one of your pages as your homepage.
How Do I Turn In An Assignment?
If your assignment is to create content on the Commons, the concept of “turning in” your work most probably means to make your comment or post visible to your professor and your peers. If you are commenting on a post, your comment will probably need to be approved by your professor first, and then it will be visible to everyone in your class.
Posts can be saved in Draft or Published right away. If you are done, make sure you hit “Publish.” Depending on your access level, the post will appear right away, or you will need your professor to approve it.
If your assignment is to create a site, make sure your professor can see it. See Site Privacy Settings.
I forgot my password, how can I reset it?
To reset your password, click on the “Lost your Password” hyperlink or go to https://commons.gc.cuny.edu/wp-login.php?action=lostpassword. You will be prompted to enter either your username or your email address. If using your email address, please enter your Account Email. Click on “Get new password.” You will receive an email with a link to a page where you can reset your password.
How do I upload a photo of myself to appear on my profile and other areas?
When you first register an account on the Commons, you are assigned a default profile photo (or if you are a WordPress.com user, your WordPress avatar). You will probably want to change this photo to something more personal – a headshot, a photo of your dog or cat, a landscape that speaks to you, or whatever you find might represent your presence on the Commons. This profile photo will be public, so if you are not sure what to use, you might want to leave it as the default.
To change your profile photo, you will need to have an image on your device that can be uploaded. Click or drop the image file as shown below:

The image you choose will probably exceed the size of Commons profile photos. In this event, you will be asked to crop it. Pick the most important part of the image and click “crop.” Remember, you can always go back to your original default image. You can also repeat the process as many times as you want.
How can I change my password?
Forgot Your Password?
To reset your password, go to https://commons.gc.cuny.edu/wp-login.php?action=lostpassword and enter either your username or email address. Click on Get New Password. You will receive an email with a link to a page where you can reset your password.
Security Settings
To access the Security screen below, go to the top black navigation bar, hover over your avatar in the upper right hand corner. A dropdown menu will appear. Scroll down the My Settings and select Security.
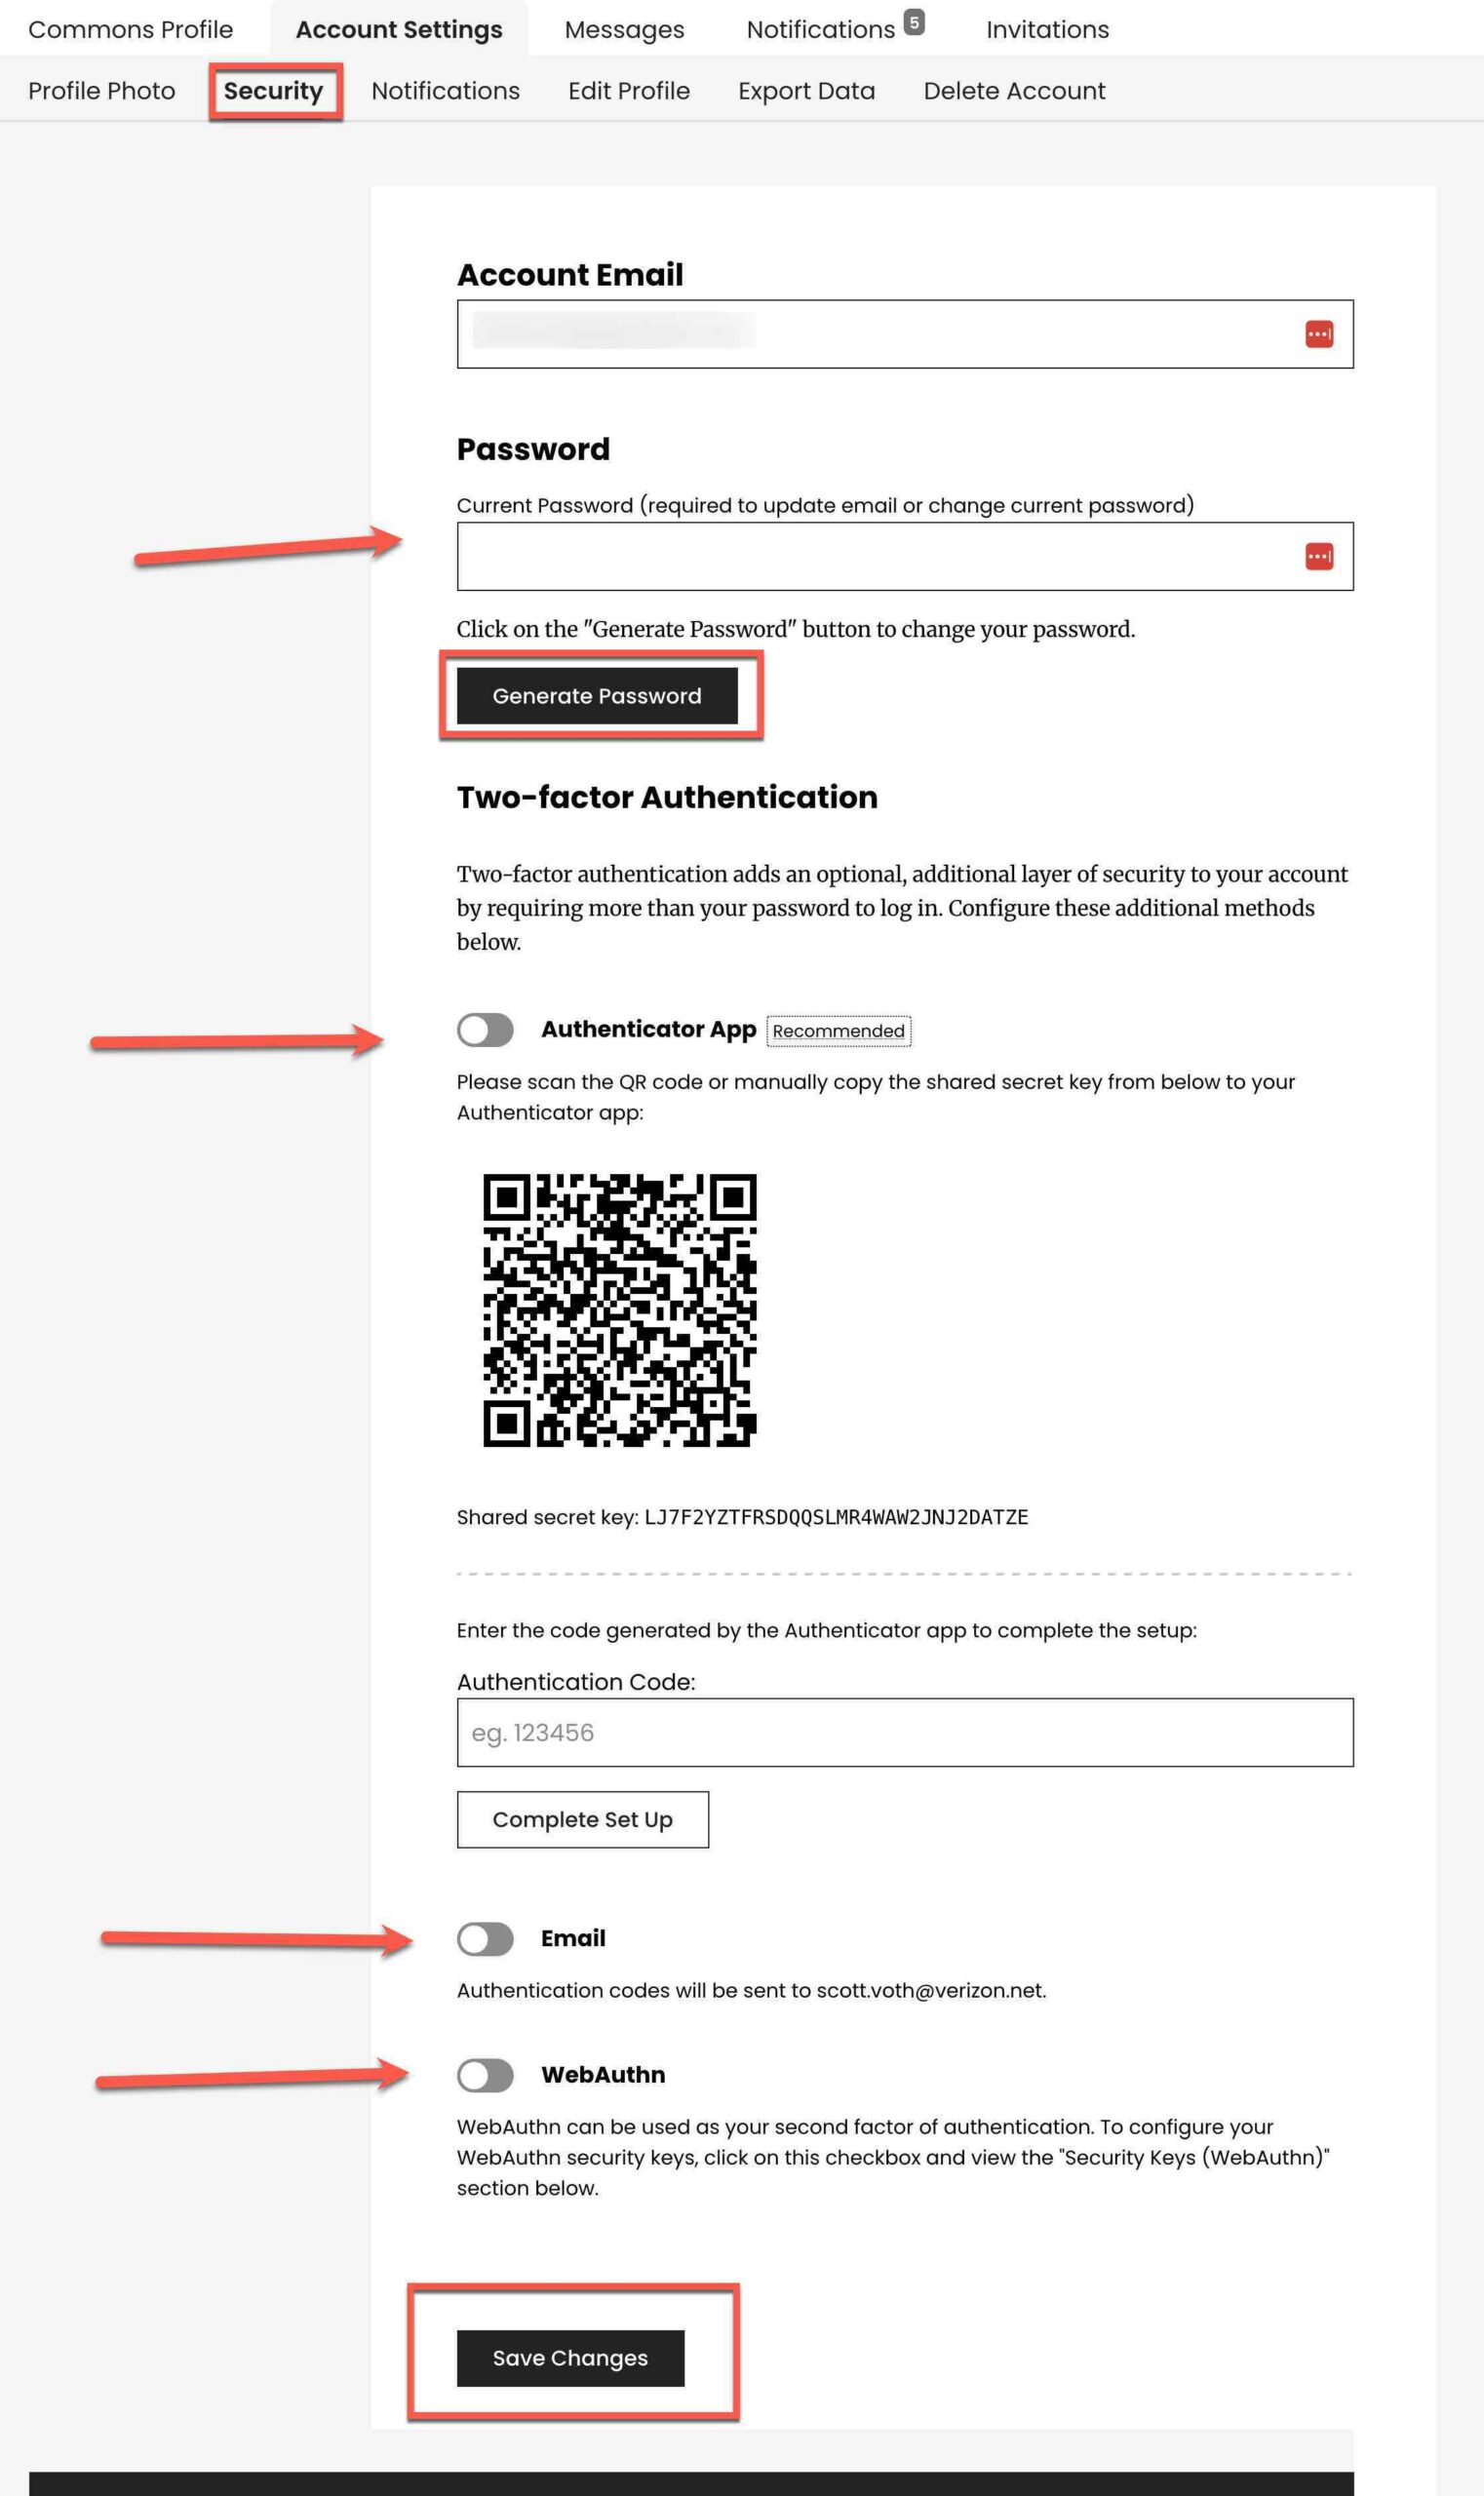
Changing Your Account Email
You can change your Account Email on this screen to the one you prefer. Simply over type your existing email with the one your prefer. Click on Save Changes and an email will be sent to this email address to ensure it is valid. You will need to respond to this email to verify the address is correct.
Your account email is used for notifications on the Commons. It is also used when you forgot your password or when you use Two-Factor Authentication (see below).
Changing An Existing Password
To change your password or to optionally enable two factor authentication, log into the Commons and go to Account Settings>>Security. If necessary, re-enter your existing password. If you only want to change your password, click on the Generate Password button. If you don’t like the generated password you can over-write it to the password you prefer. Then click on the Save Change button. Your password is now changed.
Two-Factor Authentication (optional, but recommended)
Two-factor authentication (2FA) adds an extra layer of security when logging into the Commons. With 2FA, you have to log in with your username and password and also provide another form of authentication that only you know or have access to. The Commons supports 2FA during login and offers four different 2FA options, listed below.
Unless you own a security key, we strongly recommend using a Time-Based One-time Password (TOTP) application to configure two-factor authentication. TOTP is more reliable and portable than the email option, especially when you do not have internet access to check your email.
Enabling 2FA
Members can enable multiple 2FA options, but only one can be primary. It is a good idea to have backup ways to obtain your authentication code
- Email
Using this method, your authentication code will be delivered via email. If you’re unable to use a TOTP app, you can also authenticate with email. When configured as your primary 2FA option, an authentication code will be sent to your registered email address during login. This code will need to be entered in order to gain access to your Commons account.
To use this option:
-
- Enable the Email option.
- Click Save Changes.
- Time-Based One-Time Password (the preferred method)
A time-based one-time password (TOTP) application automatically generates an authentication code that changes after a certain period of time. When configured as your primary 2FA option, you will be asked to enter this code from your TOTP app during login.
To use this option:
-
- Ensure you have downloaded a TOTP app onto your device. Popular cross-platform apps include Authy, 1Password, LastPass, Duo.
- Enable the Time-Based One-Time Password (TOTP) option.
- Scan the QR code with your TOTP app. After scanning, the app will display a six-digit code. (If you are unable to scan the QR code, find the Key field under the QR code and manually copy the key into your TOTP app.)
- Next, enter the six-digit code into the Authentication Code field and click on Complete Set Up.
- TOTP should now be set up as a 2FA option. If you haven’t set up recovery codes, it is highly-recommended to enable this option as well.
- Security keys
We support USB security keys as a form of two-factor authentication. (A security keys is a physical device that you carry with you and insert into a USB port one the computer you are accessing.) When configured as your primary 2FA option, you will be asked to enter your USB security key during login.
If you have a USB security key, you can register your key as a 2FA option by:
-
- Enabling the Security Keys option.
- This will toggle a “Security Keys” section after the 2FA table.
- Click on Register New Key and when prompted, insert your USB security key into your device.
- Your security key should now be displayed under the Security Keys section. If you haven’t set up recovery codes, it is highly-recommened to enable this option as well.
- Recovery Codes
It is highly-recommended to enable recovery codes if you have configured another 2FA option. This can help you get back into your account if you ever lose access to your other 2FA device(s).
To use this option:
- Enable the Recovery Codes option.
- Click on Generate New Recovery Codes.
- Copy or download the codes when they are displayed. These codes will only be displayed once. If you misplace your recovery codes, you can generate a new set of codes by clicking on the button again.
- Click Save Changes.
Password Best Practices
How do I change my display profile name?
After logging into the Commons, go to the top black navigation bar and select: Account Setting» Edit Profile. In the text box under “Full Name (required)” fill in your preferred name, then scroll down and select “Save Changes.” The Commons respects your privacy – if you choose not to use your real name, you may use an alias.

Is there a limit on how many sites I can create?
No. You can create as many Web sites on the Commons as you want.
How Do I Contact My Professor?
Ideally, your professor should have provided Contact Information, either on your Course Site or Course Group.