
The dashboard is where you control everything about your site. Here you will enter content as “pages” or “posts,” and control how that content is displayed. You’ll probably set up widgets in your sidebar, add images, videos, and menus. To get to your dashboard, you will need to be logged into the Commons. There are several ways to get to your dashboard: In this example, “Canvas Testing” is the name of the site. If I click on that, I will be taken to the Dashboard. If I click on “New,” I can create a new page or post. If I click on “Edit Page” I will be taken to the edit screen for the current page. All these take you to the Dashboard, but to different places. (We will talk about “Customize” later. That will not take you to the Dashboard.) So now you see the WordPress dashboard – don’t let it intimidate you. There are many options, but you will get familiar with them quickly. The site you just created is under construction – so you’ll probably want to make it private until you get familiar with how content is created. Go to Settings>>Reading and you should see something like this: Under “Site Visibility” choose the last option. When your site is ready to launch, come back to this setting and choose an option that is more appropriate. While we are on the “Reading Settings” screen, look at the first option called “Your Homepage Displays.” Here you decide what your home page will look like. Will it be a dynamic collection of posts (i.e. a “blogroll”) that appears in reverse chronological order? Or will your homepage be a static page which you design? If you choose the latter, you can still create a dynamic page that shows your blogroll, but it will not be your homepage. It could be an option on your menu – maybe called “Blog.” In this case you would have a website that also includes a blog. To do this, create a empty page (Pages>>Add New) and name it “Blog.” Then select it as the “Posts page” in the drop down, above. Full Text or Summary? When your posts are displayed as a collection (i.e. in your “blog roll”) do you want your readers to see the full article, or do you want them to see a summary of the article (i.e. an “excerpt”) ? This setting depends on your theme. For example, for the “Twenty Seventeen” theme, it has no effect. Other themes will will display the first 20 or so words in your post, or the “Excerpt” that you enter on the edit post screen. You can also specify the max number of posts that should be displayed in your post collection. The easiest way to create a post is to click on the “+ New” link on the black toolbar at the top of your site. (You can explicitly choose “Post” although it is the default. You can alternatively choose “Page” or “Media” to create other content types) No matter if you are on the front-end or back-end of your site, clicking on “+ New” will take you to a form where you can enter your Post Title and Content. Click on “Add Media” to add an image. Be sure to click “Save as Draft” or (if you are done) “Publish.” To view your post, click on the “View Post” hyperlink at the top of the page. To edit your post, click on the “Edit Page” button on the black toolbar.
In almost all respects, posts and pages have identical functionality – you can add text, images, featured images, videos, links, tables, and maps to both. Just start typing to add content, and remember to save your changes. You can “Save as a Draft” or “Publish.” If you “Publish,” and then make changes, you can “Preview Changes” without clicking on “Update.” But please remember to click on “Update” to finalize your change. Click on “View page” to go to the “front-end” to see what your saved new content looks like. Here is the what the screen looks like when you are editing “Sample Page.” The middle circle shows the WordPress toolbar. Here you can bold or italicize text, create bulleted or numbered lists, center text, or flush it left or right. On the “Sample Page” or “Hello World” post, experiment with what you can do. When you highlight a section with your mouse, see what each of these options do. To create a hyperlink: Watch the process below: The most common scenario is that you typing in text and all of a sudden want to add a picture. So that picture could wrap around your text on the the right or left, or break your text and appear in the center. Those are your options. This scenario assumes that you have rights to the image and that the image is compressed. Click on “Add Media.” You will be asked if the image already exists in your Media Library or if you want to add a new one. If you want to add a new one, you will need to locate it on your computer and upload it to your site. Most normally you do this all in one shot: To have text wrap around the image, choose left or right alignment. When centering an image, use large or original size. If too big, WordPress automatically resizes it to your post or page width. Text will not wrap around a centered image. Watch the process below: As we noted before, your posts will display in reverse chronological order. If you want to order them differently, you can use the “Publish” option on the edit post screen and change the publish date of your post. You can also make a post “sticky” so that it always appears as the first post in your collection. You can also change the status of posts – switch them back to draft status, for example, or make them private or password protected. (You can also use a plugin called “Simple Custom Post Order” to adjust the order of posts.) Each page or post has one optional “Featured Image.” You set this featured image on the edit screen. See below: Where this featured image is displayed is theme dependent. For example, the “Twenty Seventeen” theme displays it as a full screen image above your page or post. Some themes display it as the small “thumbnail” image when you list your pages or posts. Some display it in the summary or “excerpt” of your post. You might want to experiment with your theme to see where featured images appear.
Do you want your readers to be able to comment on your content? You can control this globally on the Dashboard at Settings>>Discussion (see screenshot below). Please ensure that you don’t allow comments to be entered without moderation (i.e. an Admin’s approval). You may become a victim of unpredictable spam. Discussion on Specific Pages or Posts You can also individually enable discussion on a page or post by using this setting on the edit screen: What are trackbacks and pingbacks? See below: Trackbacks (from WP Codex) Pingbacks (from WP Codex)
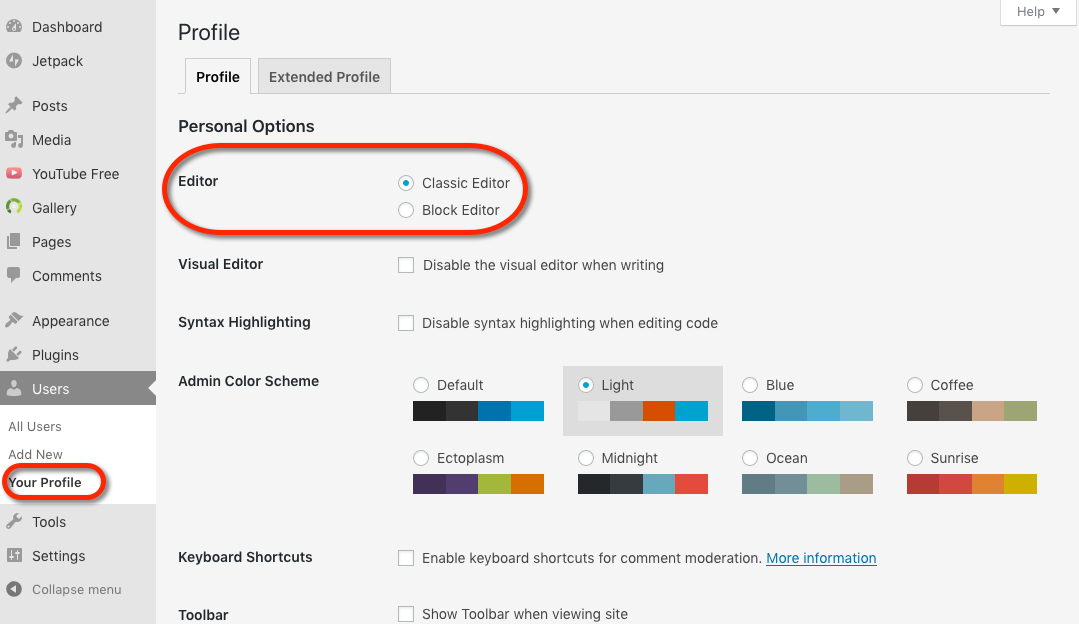
In 2019, WordPress introduced the “Block” Editor, with the intention that it would replace the “Classic” Editor. On the Commons, we give you the choice of which to use. See below: To use the Block Editor, you need to think of everything in a page or post as a block – paragraphs, images, lists, embeds, short codes, columns, cover images, etc. – and each block has numerous properties that determine how it appears on the page. Blocks can be moved up and down or added anywhere you want without the use of custom code. The Block Editor opens up many possibilities, but it may take a little time to get used to it. See more about Block Editing. The good news is that you can always fall back on the Classic Editor.
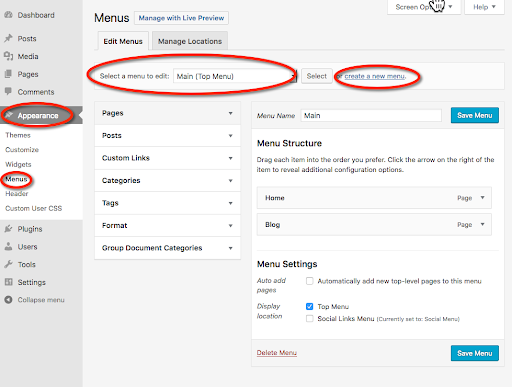
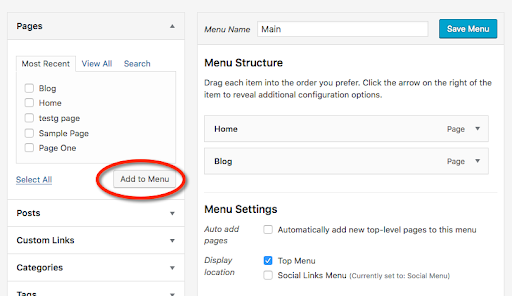
Navigational menus are essential for modern websites, and WordPress lets you set up any number of menus. However, most themes only display two or three. Go to Appearance>>Menus to get started. You should see something like the screenshot below. To get started with Menus, create a new one. Give it a name of your choosing and save. Now you have a menu to work with. Where should this menu appear? The “Twenty-Seventeen” theme we are using provides two “Display locations” (see “Menu Settings’) : “Top Menu” and “Social Links Menu.” For now, check the Top Menu and Save. Now you have a menu, but with no items in it. What do you want to add? Notice that there are there are five main types of menu dropdowns: Pages, Posts, Custom Links, Categories, and Tags. When you click on anyone of them, you will see the content that you have that can be added to the menu. So for example, if you click on “Pages” you will see something like this: In this example, we’ve checked “Home” and “Blog” and they have been added to the Menu Structure. Posts work the same – you will see all the posts you have and you can add any of them by checking the box and clicking on “Add to Menu.” Custom Links let you enter any URL that you want, give it a title, and it will appear in the menu. This could be a page or post on your site, or a link to an external site. The Categories and Tags dropdowns are great ways to automatically segregate your content. Suppose you create a category (or tag) called “Assignments” and another called “Reflections.” You can create a menu item that shows all posts that have been categorized or tagged in that way. Menu items can have sub-items and those sub-items can also have items beneath them. (It is best not to have too many levels of nesting.) To re-order and “parent” menu items, just drag and drop. Watch the process below:
Widgets are blocks of static or dynamic content that can be placed in your sidebar or your footer. On your Dashboard, go to Appearance>>Widgets to see the list of those available. Find a widget that you like and drag it to a “widgetized” area. The number of widgetized areas you have, and their placement, depends on your theme. Here we chose to display the five most popular groups on the Commons on the post sidebar: And here is what is now displayed:
Good Luck! Feel free to contact us for help!
![]()


![]()


WordPress Basics
Manage a Site
- Overview Of Sites
- Site FAQ
- Site Directory
- How To Create Or Clone A Site
- Accessibility on the Commons
- Site Metadata
- Adding Content
- Configuring Your Site
- Group Sites vs. Standalone Sites
- Statistics For Your Site
- Archiving Sites
- How To Delete A Site
How to Access the Dashboard (aka the ‘back-end’ of your site)
Making Your Site Temporarily Private
Blog or Website (or both)?
How to Create A Post The Quick Way
More About Adding Content
How to Create a Hyperlink
Inserting An Image
Reordering Your Posts
Featured Images
Discussion (i.e. Comments)
Classic Editor vs. Block Editor
Menus
Ordering Menu Items
Widgets