
Understandably, most admins wonder how many readers their site is attracting. On the Commons, there are three ways to quantify your readership on the Commons: Google Analytics, Jetpack Stats, and Clicky. By far the most powerful and complex is Google Analytics; however the learning curve for Google Analytics is steep. Commons members might instead choose to use Jetpack Stats or Clicky to more easily track site statistics. Clicky has a free plan that allows for up to 3000 pageviews per day, which is much better than Jetpack Stats’s 1000 pageviews per month. Conversely, JetPack Stats allows an unlimited number of sites to track; Clicky’s free plan only allows one site.
Google Analytics
Commons members need to set up Google Analytics on their own and plugin their Tracking ID or Measurement ID on their Commons dashboard at Settings>>General. Once set up, it can be used independently or integrated it into the WordPress dashboard using the Monster Insights plugin. (Directions for setting up GA/Monster Insights integration.) Google Analytics has extensive ways to measure activity and can break readership in many ways, including Page views, Unique Page views, Average Time per Visit, Bounce Percentage, and Exit Percentage.
If you are a power user of the Commons, Google Analytics may be for you.
Getting Started
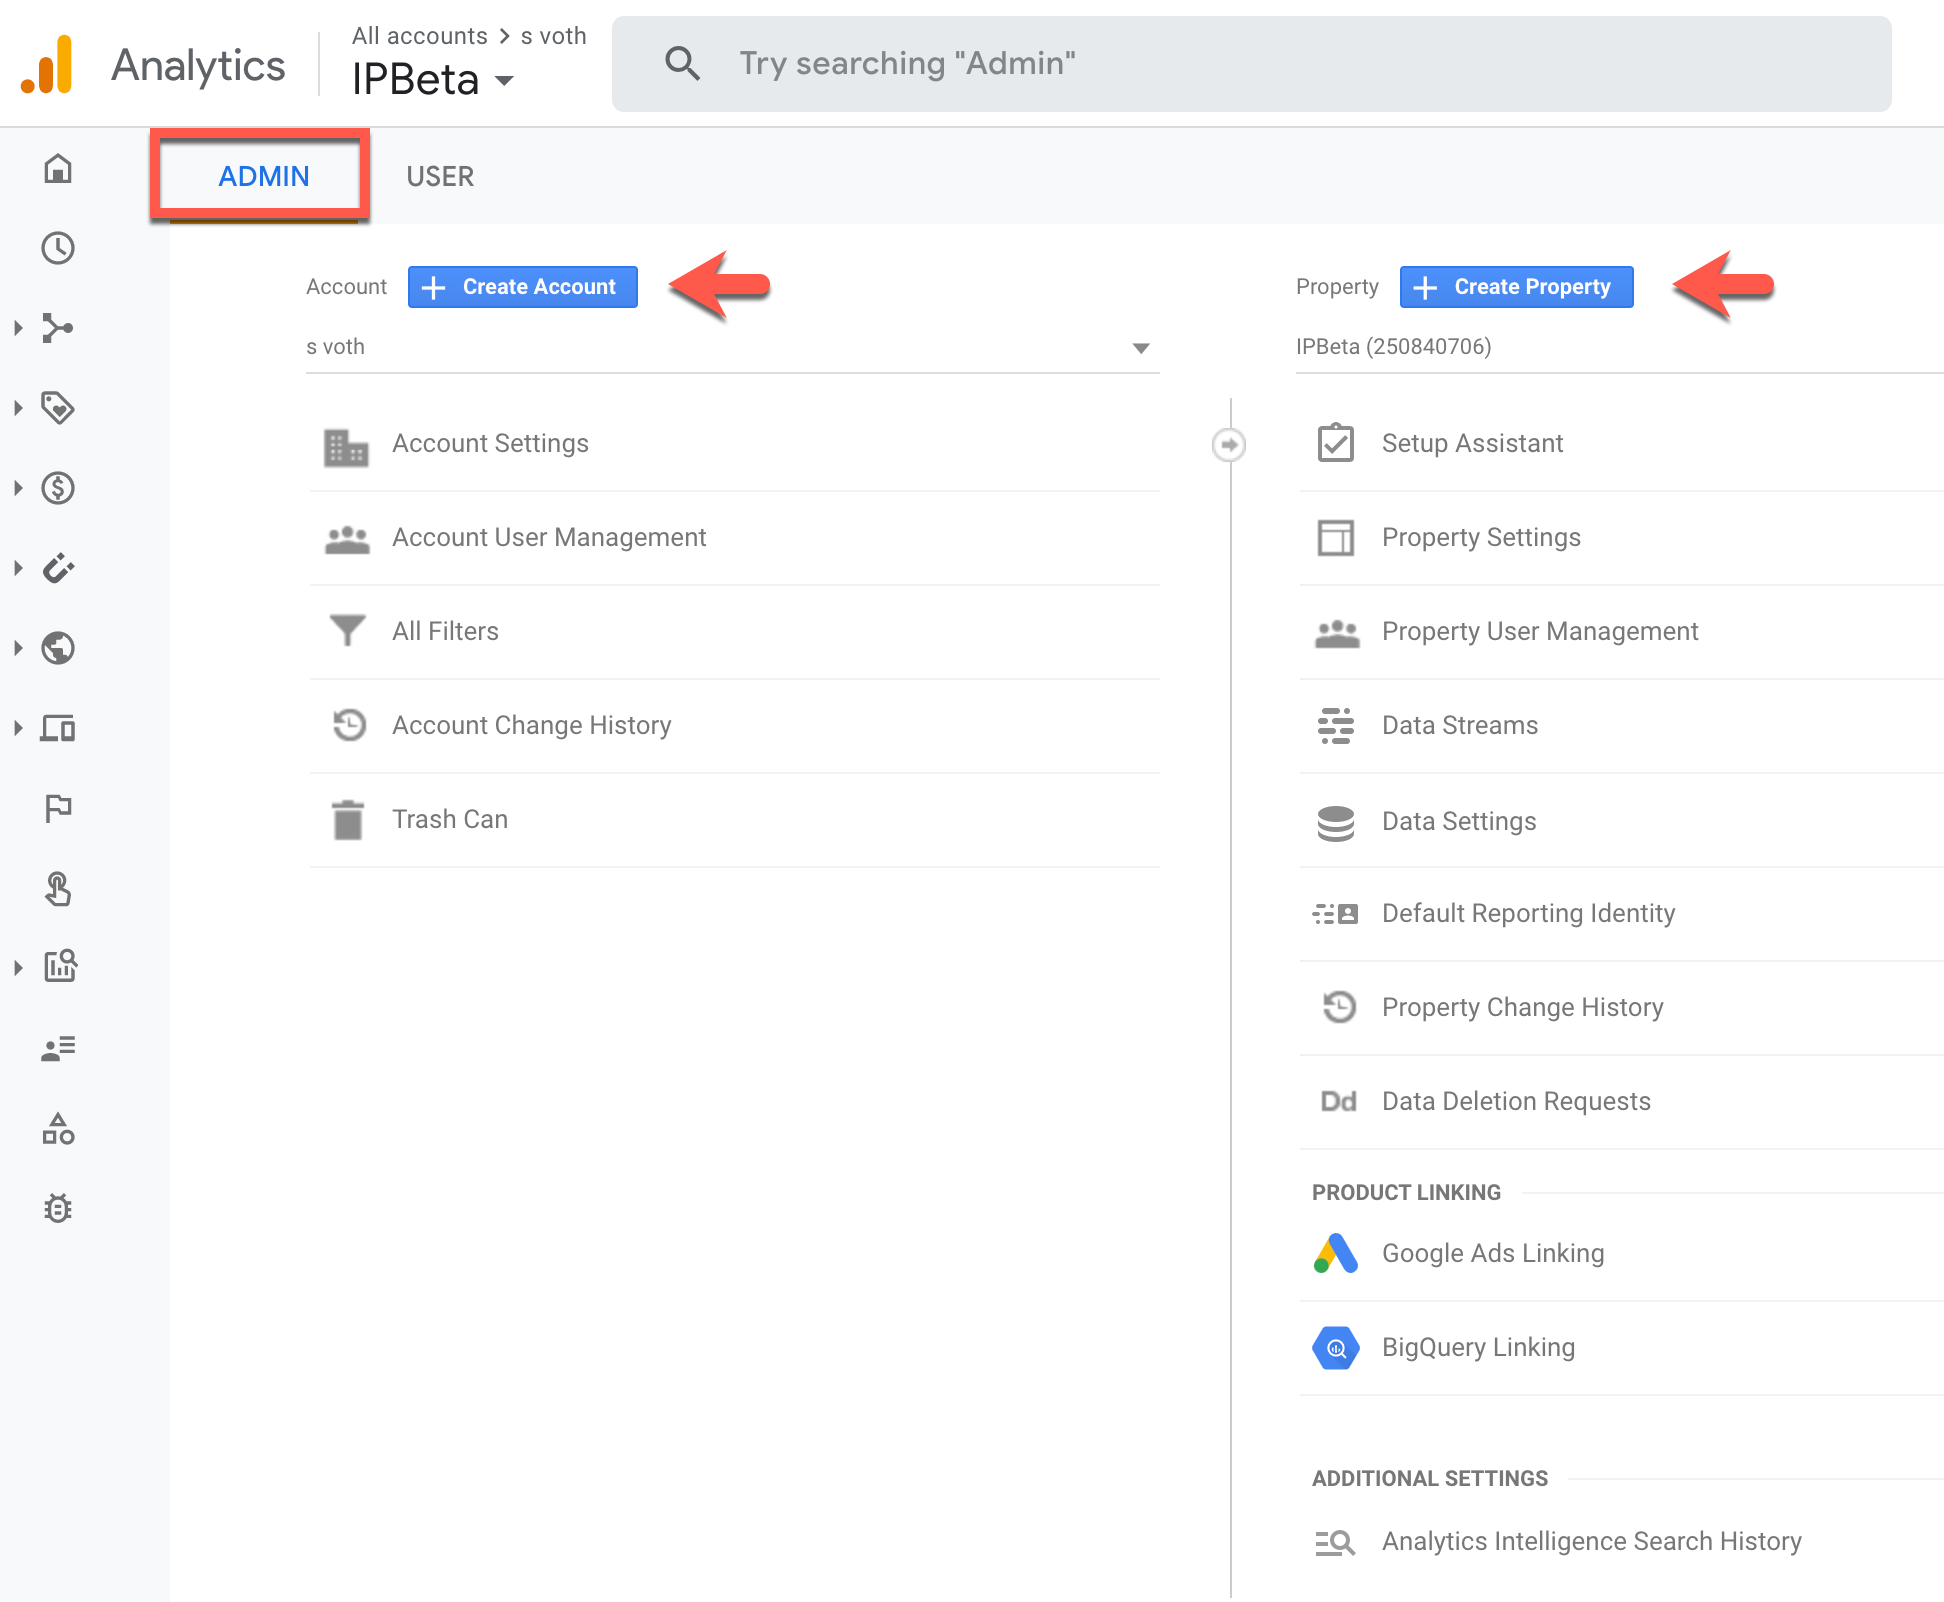
To use Google Analytics, you need to have a Google account. Follow this link to get started. To set up Analytics, click on Admin in the lower left hand corner of your screen. You should see a screen like this:
Important Terms
- Account – you can have one or more accounts (limit is 100). The only required field is a free form name.
- Property ID – each account can have one or more property IDs. The only required field is a free form name. You can also adjust the timezone here.
- Data Stream – each property ID must have at least data stream. This is where you will need to provide your site’s url.
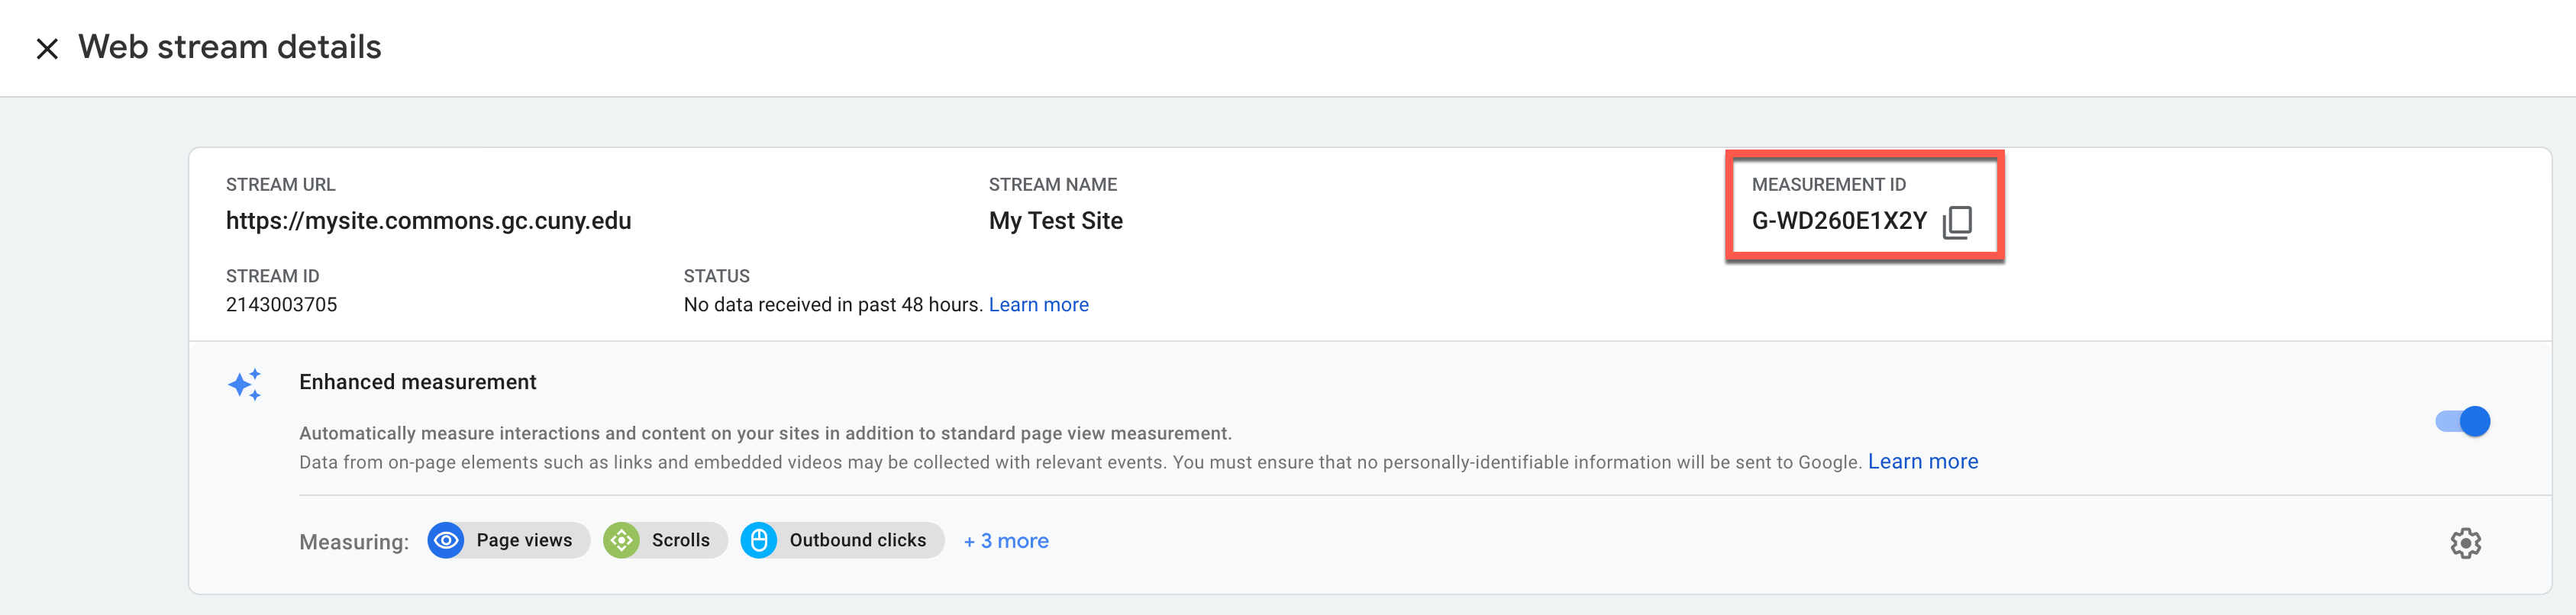
- Measurement ID – each data stream has one Measurement Id. The format is G-XXXXXXXXXX. In our example below, it is G-WD260E1X2Y
It is a matter of choice how you set up your analytics dashboard. Some members might have 2 or more sites on the Commons and choose to make each an account. Others in the same position may want to just have one account with 2 or more property IDs associated with their sites. Each site on the Commons can have only one Data Stream and one Measurement ID.
Data Stream Setup
At the end of the Property ID setup, you will need to choose a platform. See below. Choose Web.
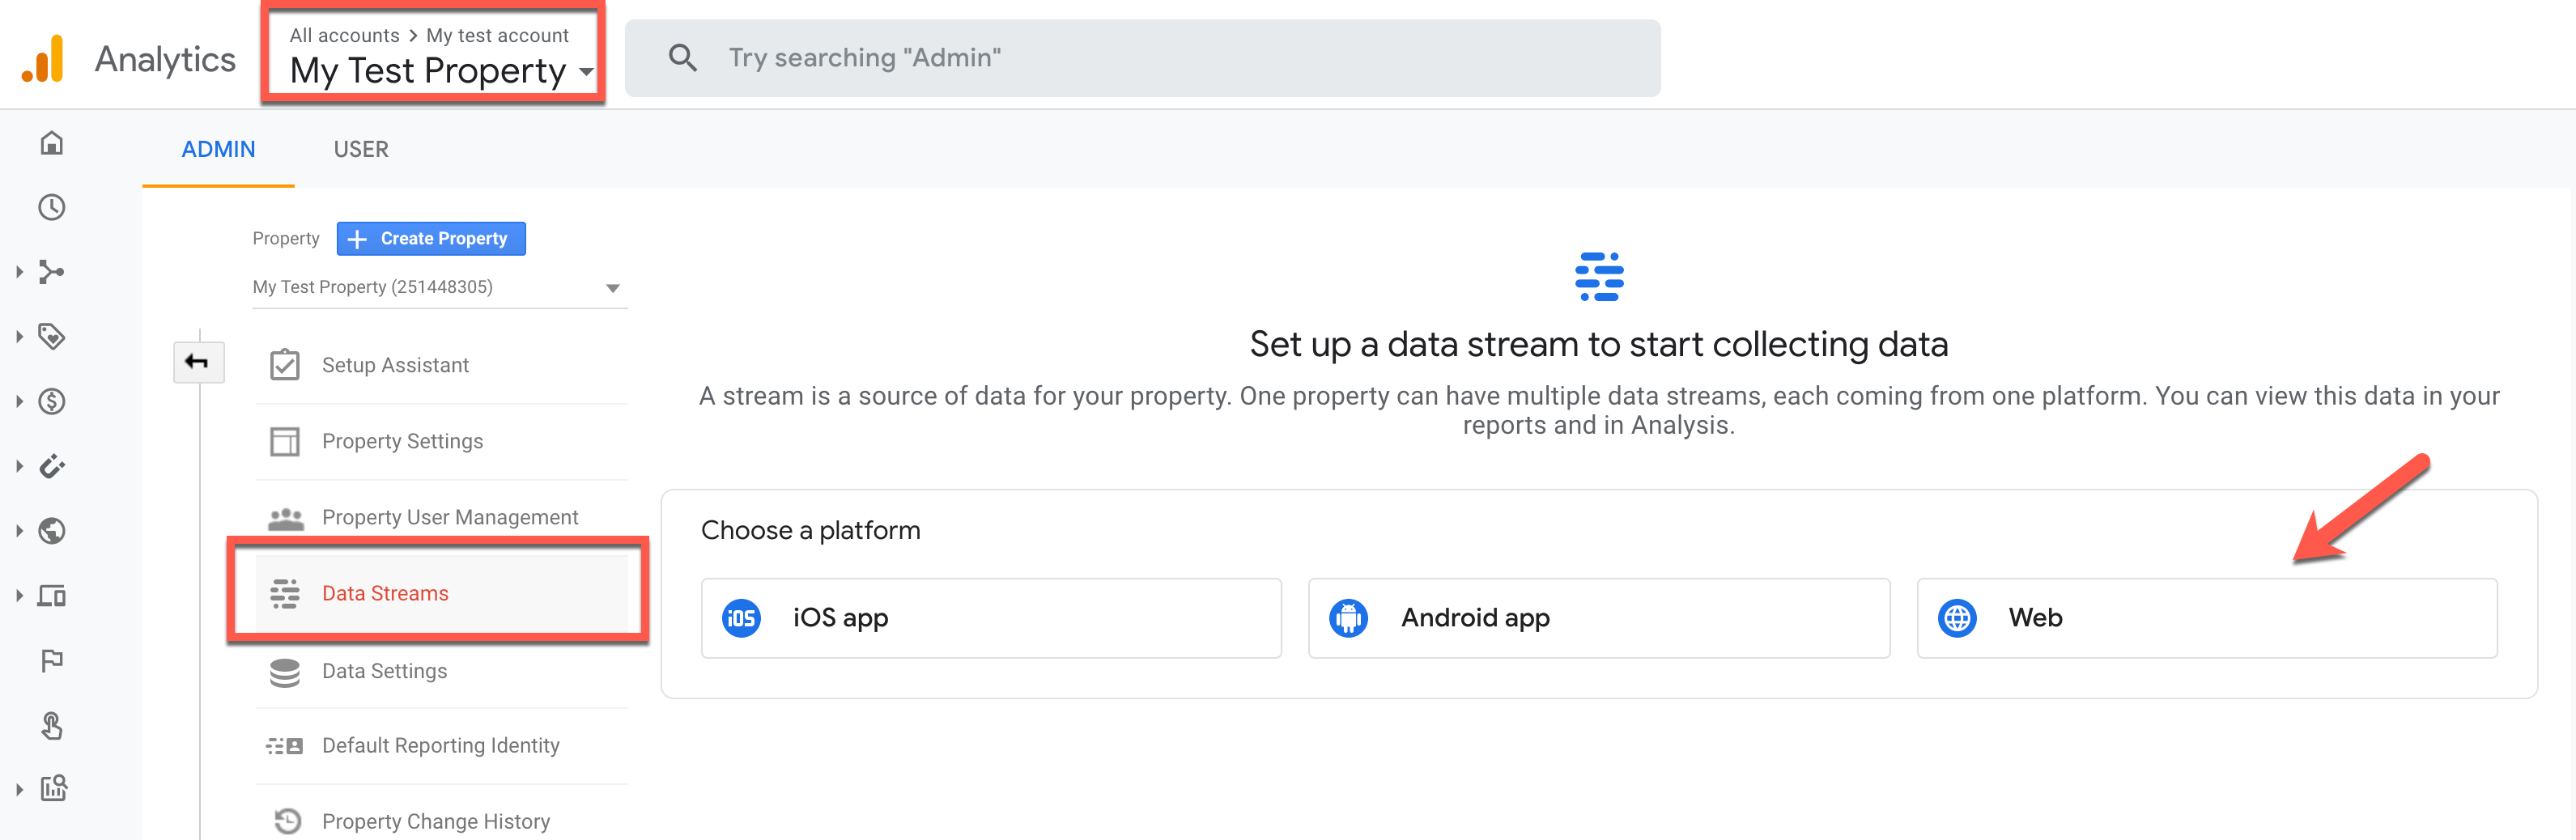
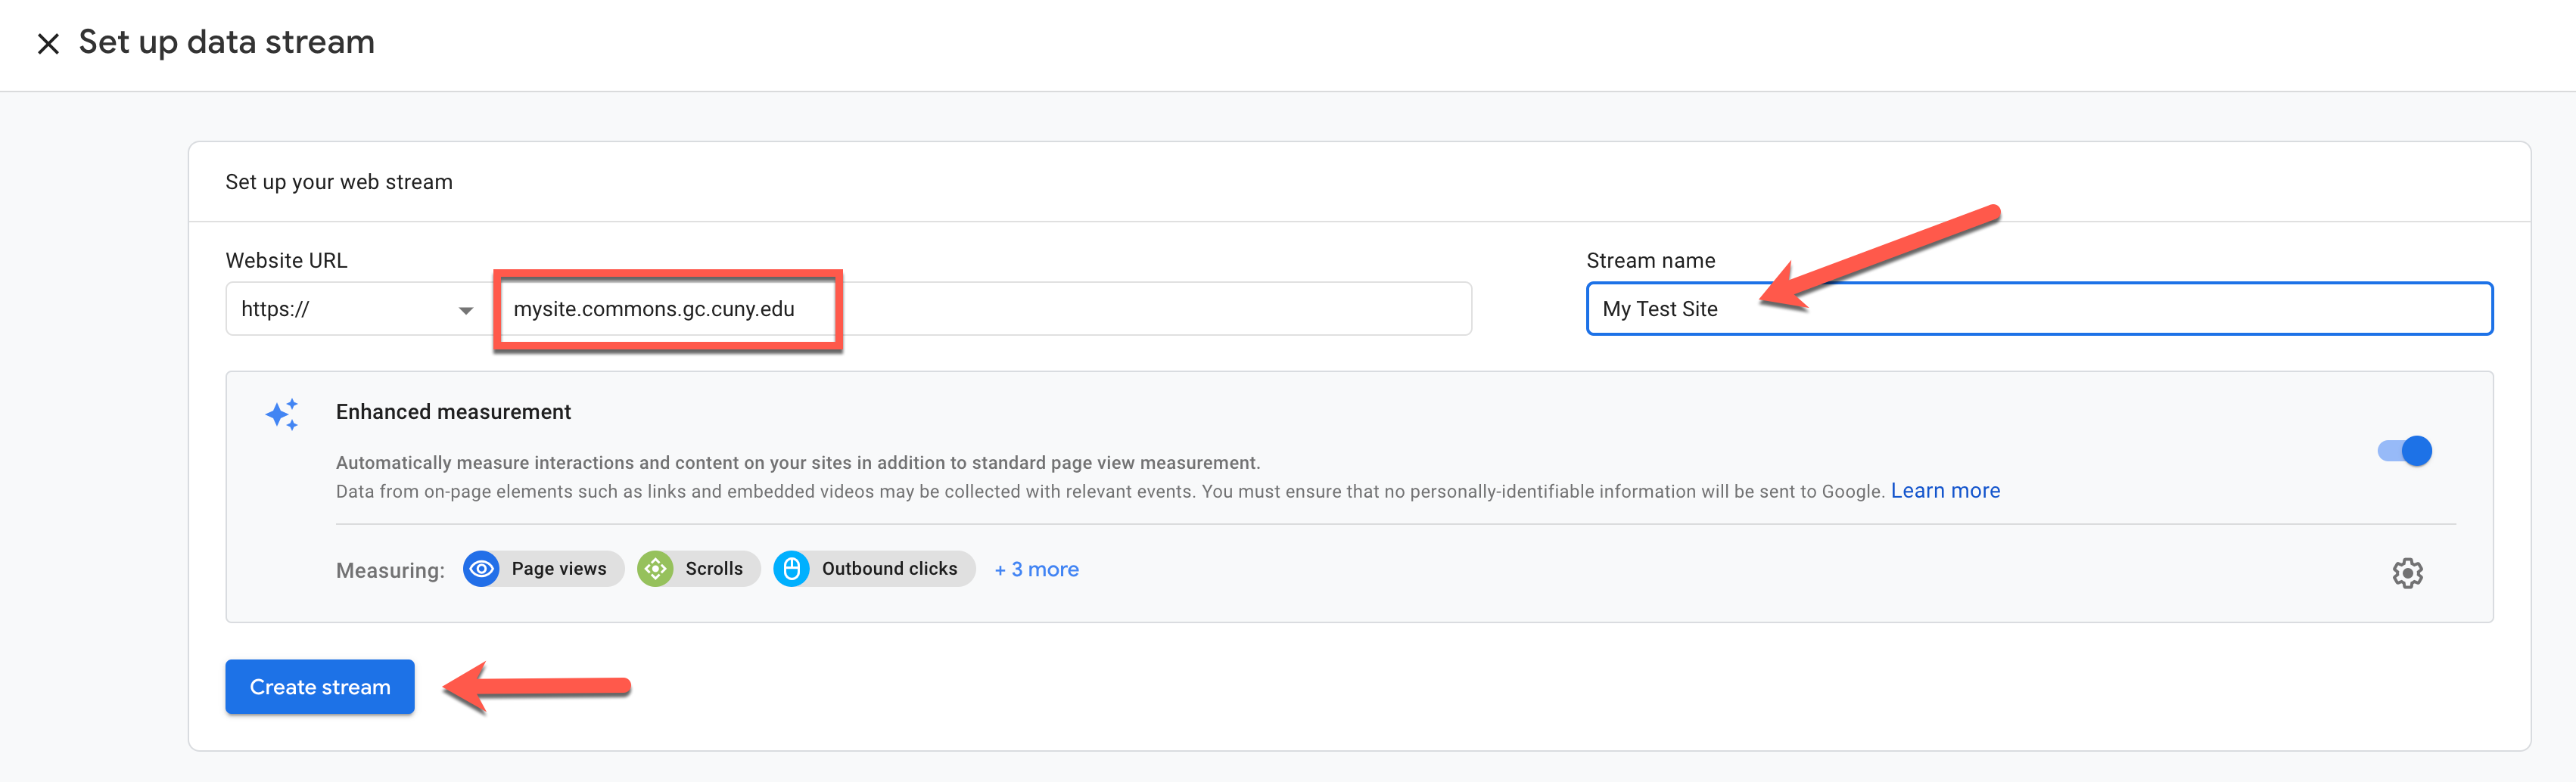
Once you choose Web, you should see the following screen. Fill in your site’s URL and give your data stream a name. (If you are using Domain Mapping, use your mapped URL, not your Commons URL.)
So now you have successfully created your data stream. You should see something like this:
Connecting Your Data Stream To The Commons
The next step is to add your data stream’s Measurement ID to your site on the Commons. Copy your Measurement ID and go to your site’s WP Dashboard, to Settings>>General. Paste it into the field marked Google Analytics ID:

Your setup is now complete. To test to see if it is working, go to your Commons site and click on a couple pages and posts. Do not leave the site. In another tab or another browser, go back to Google Analytics to the Realtime tab. This tab displays metrics on who is currently viewing your site. You should see at least 1 user. Sometimes it takes a little while to complete the set up. You should see something like this:

Here is a video that explains Google Analytics 4 Metrics
And One More Resource – https://www.clickminded.com/templates/agency/google-analytics-4-setup/
JetPack Stats
Jetpack is a plugin on the Commons. It is actually a collection of plugins developed by the WordPress team, one of which is called JetPack “Stats.” While not as powerful as Google Analytics, it provides excellent statistics that are easy to understand. It is relatively easy to set up – you need a free wordpress.com account before trying to activate the plugin on the Commons. It is a great alternative to Google Analytics.
Before trying to access JetPack Stats, please ensure that you have activated the Jetpack plugin. Follow these directions – How to set up Jetpack.
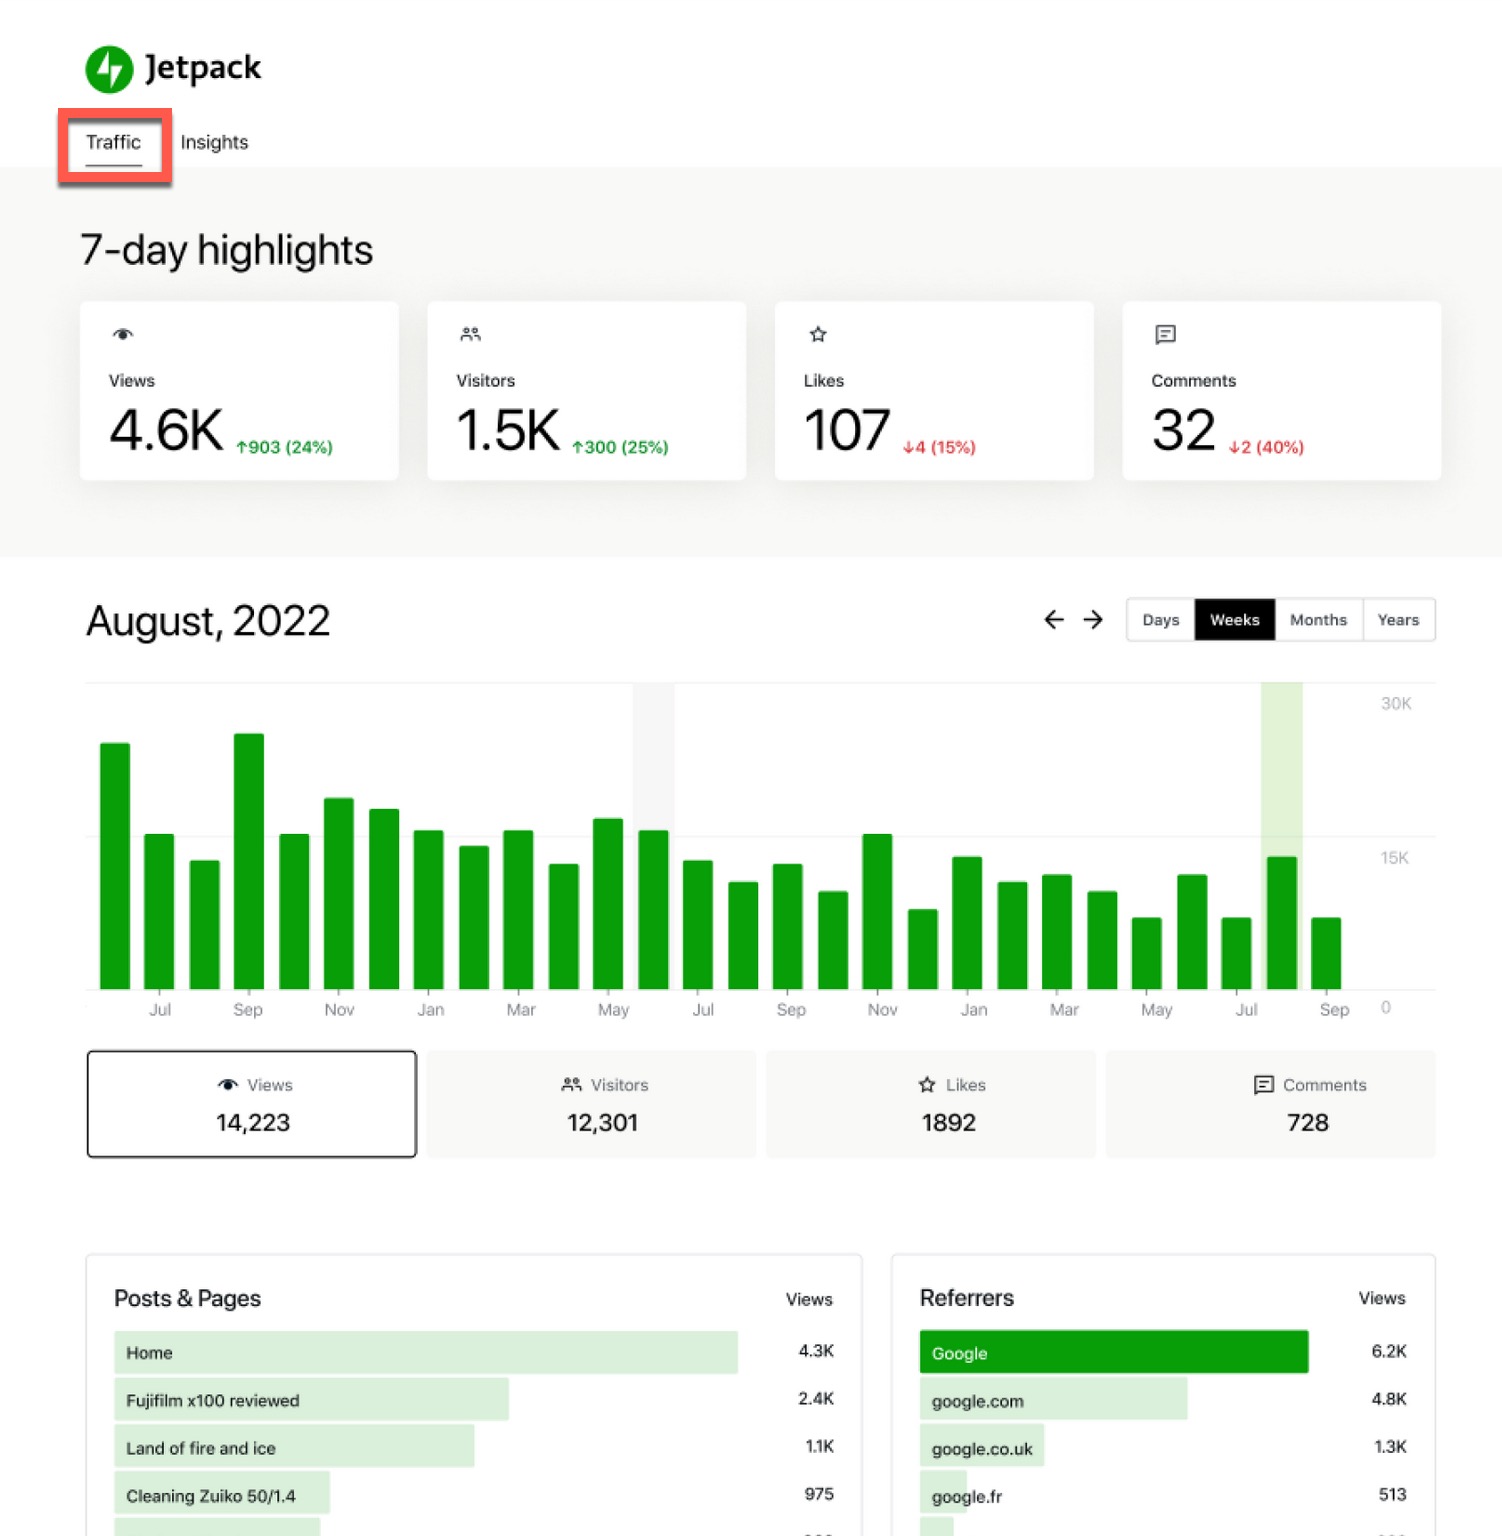
Jetpack provides a condensed synopsis of your site’s readership, breaking analytics down using two easy to access tabs, “Traffic” and “Insight.”
Traffic
As can be seen in the screenshot below, Traffic provides a 7-day highlight of the number of Views, Visitors, Likes and Comments your site has attracted, as well as a comparison of the previous 7-day totals.
When you scroll down, you can see historical statistics, broken down by either Days, Weeks, Months or Years. If you scroll down further, you can see the most popular pages and posts, as well as the views by referrer. (A referrer is the website that the user was on before clicking into your site.)
Insights
The Insights tab displays more historical statistics, displaying sections such as “Year in Review,” “All Time Highlights,” “Posting Activity” and “All Time Insights.” See the following screenshots to get an idea of what Insights provides:


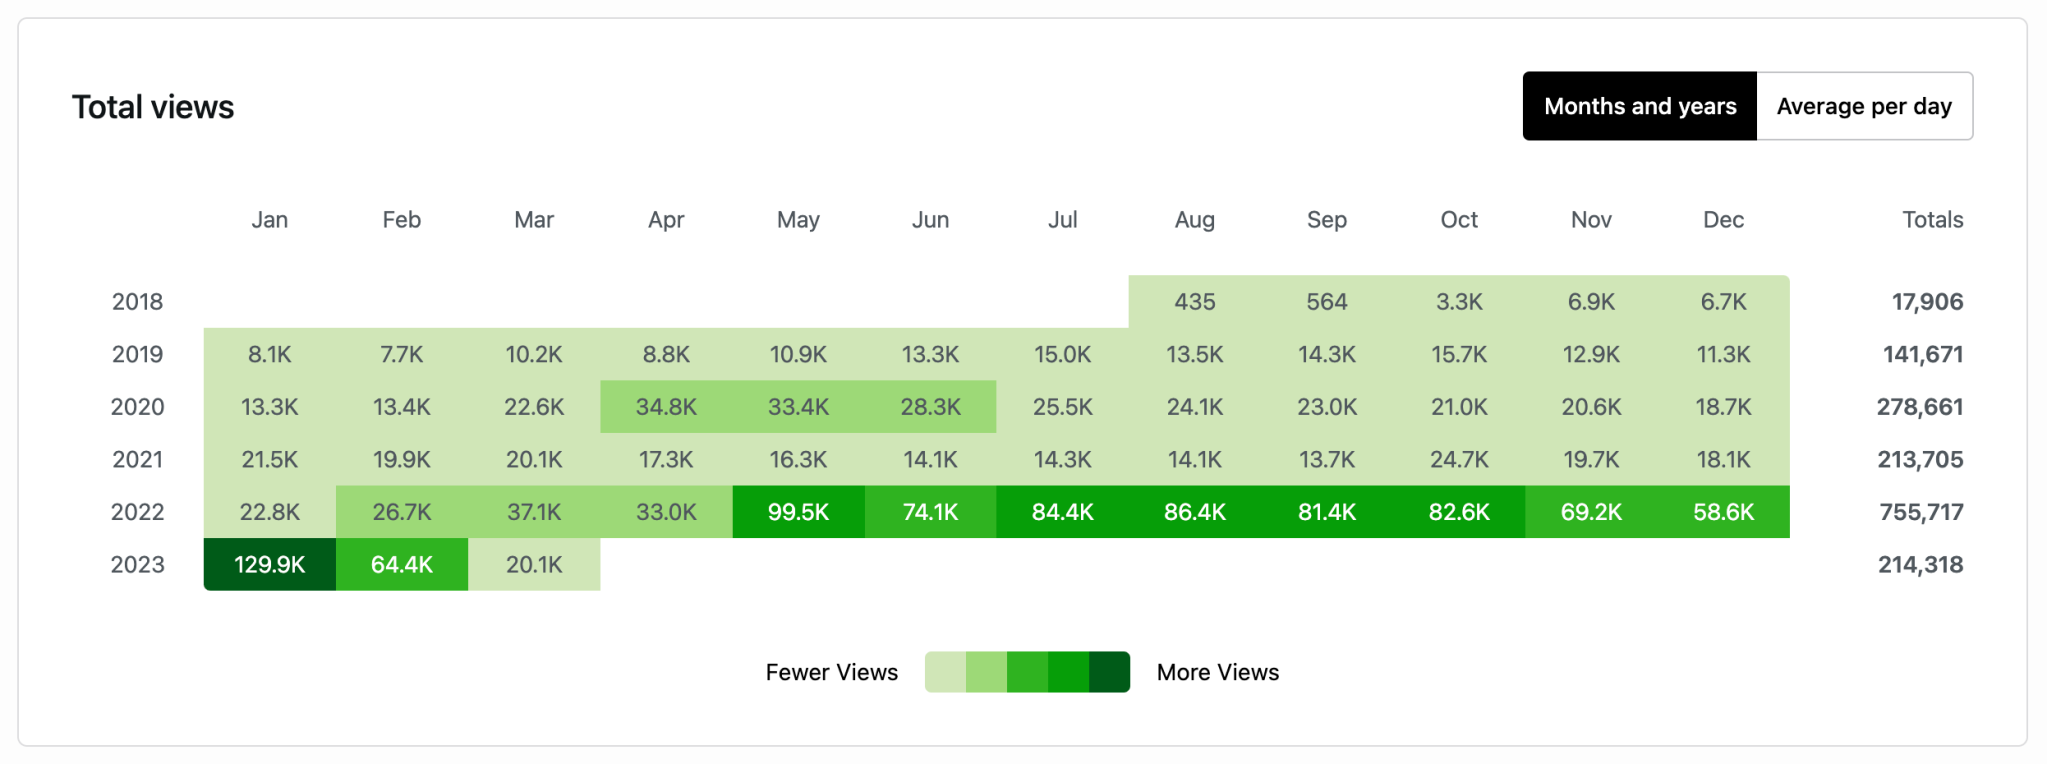
(Screenshots courtesy of JetPack documentation)
Clicky
Clicky is a plugin on the Commons. It is not as powerful as Google Analytics (or even JetPack Stats), but it is relatively easy to set up and provides the bare bones analytical needs. You need to set up an account on clicky.com, install the plugin, and connect it to your account.
Getting Started
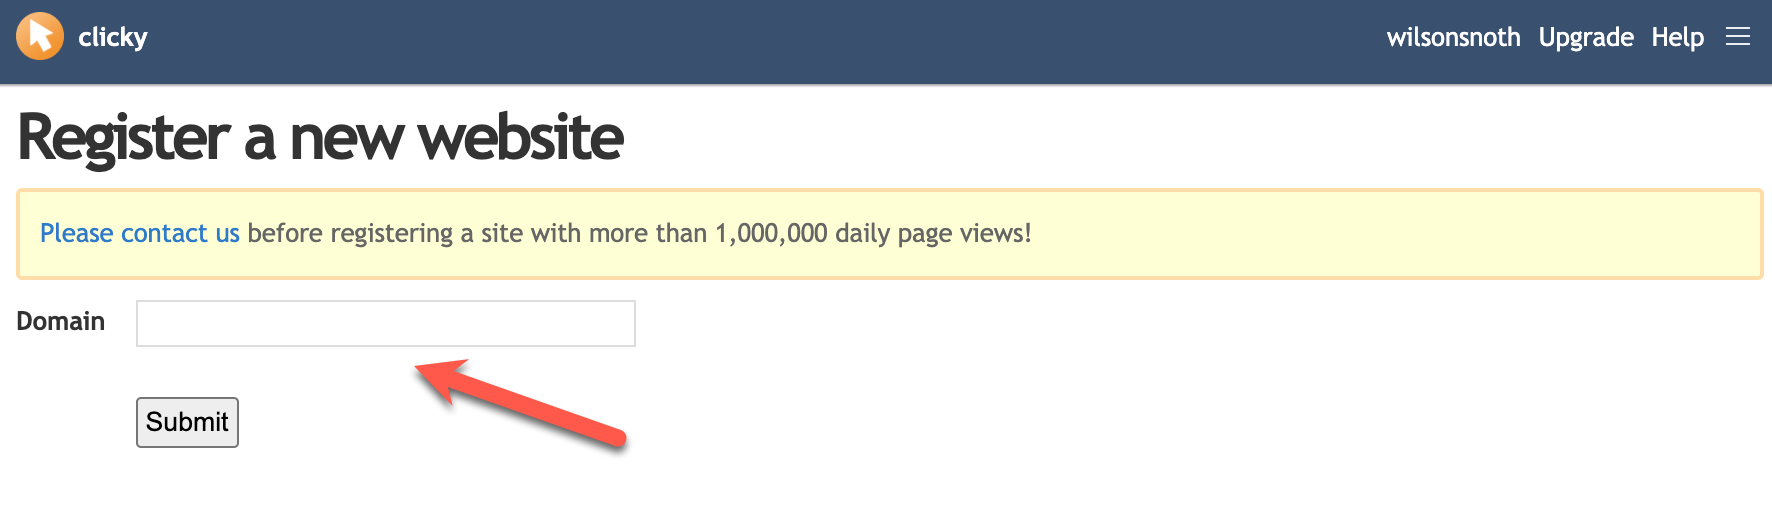
- Click on this link to Create a Clicky account

You should receive an email. Click on the link and register the URL of your Commons site. It should look something like this {sitename}.commons.gc.cuny.edu:
Clicky should respond with a long list of information. At this point, you can retrieve analytics directly from clicky.com by signing on to your account. If you want want to be able to conveniently see analytics directly on your site via a plugin – Click on the Info tab to get the Site ID and Site Key:
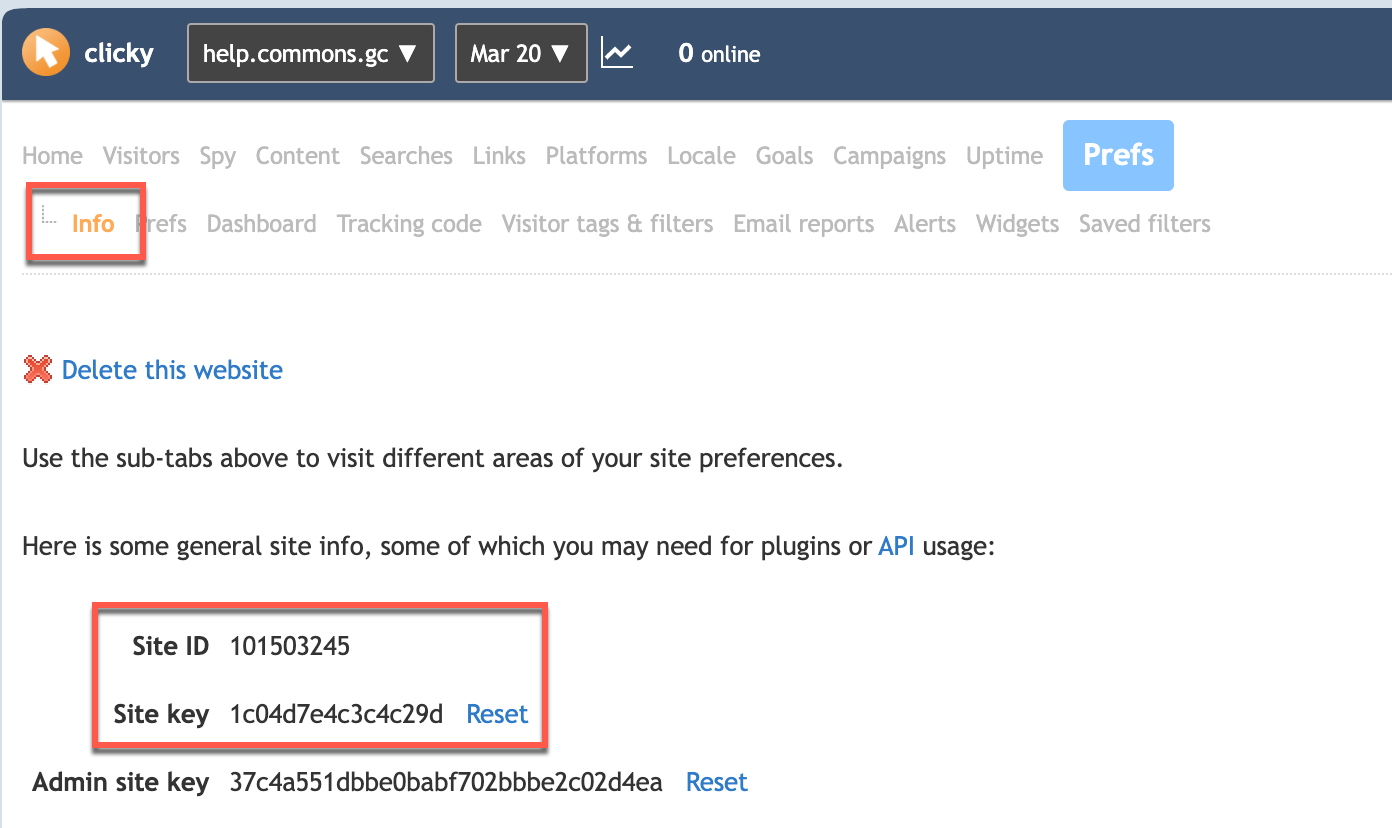
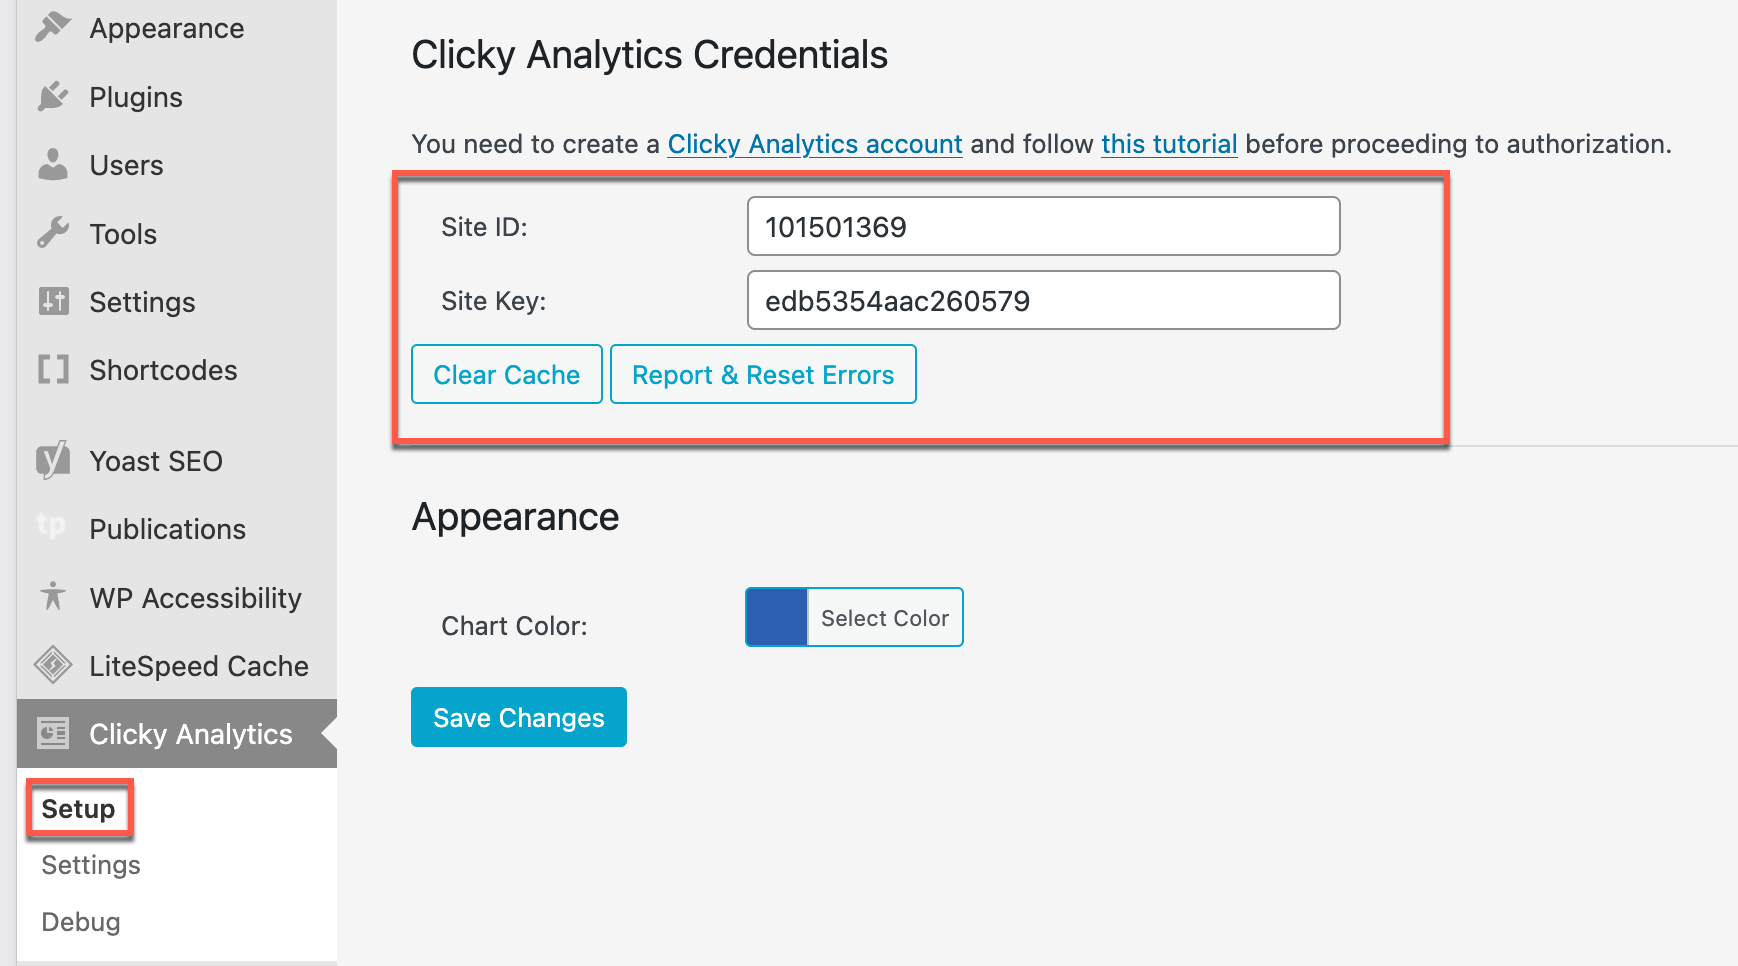
- On your site’s dashboard, install the Clicky Analytics plugin and go to Set Up. Fill in the Site ID and Site Key to complete the setup:
It might take some time (12-24 hours) for the connection to go live, but once id does, you can retrieve your site’s Analytics both from the back-end and front-end of your site.
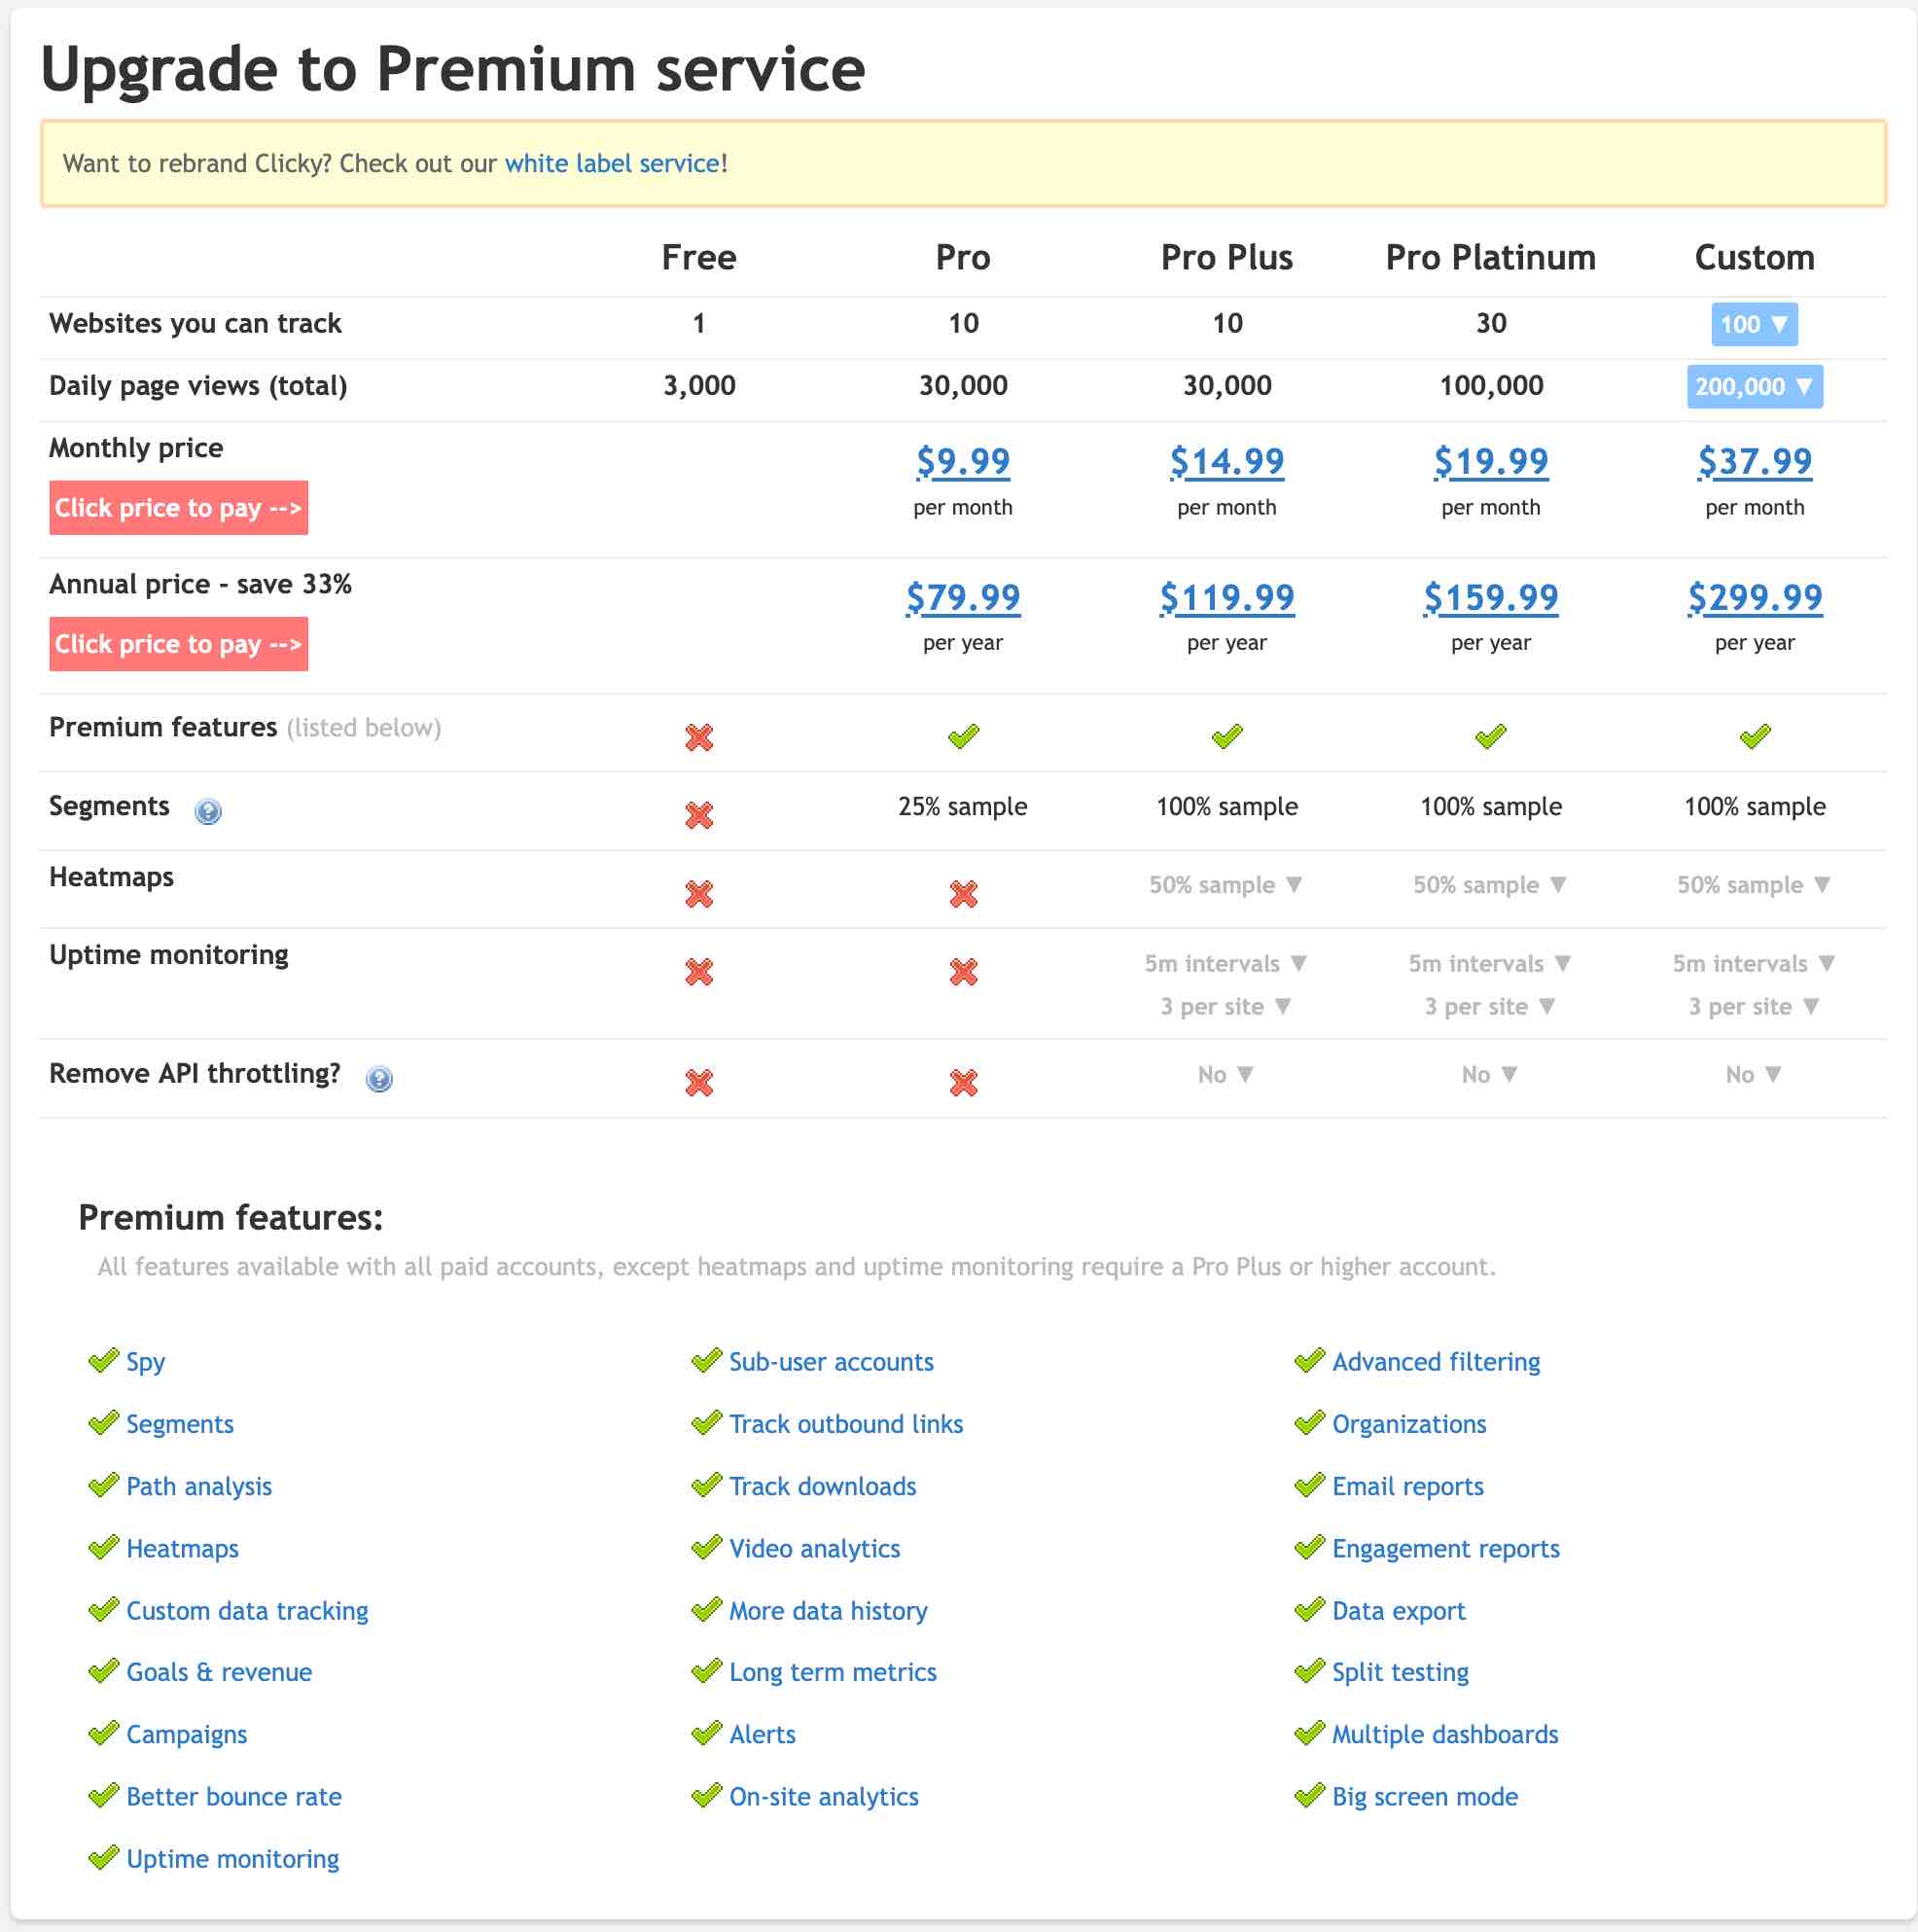
Clicky provides a free 7 day trial that exposes all its functionality. Afterwards, the free option is downgraded to a bare-bones, but simple analytic tool that probably provides what you need.
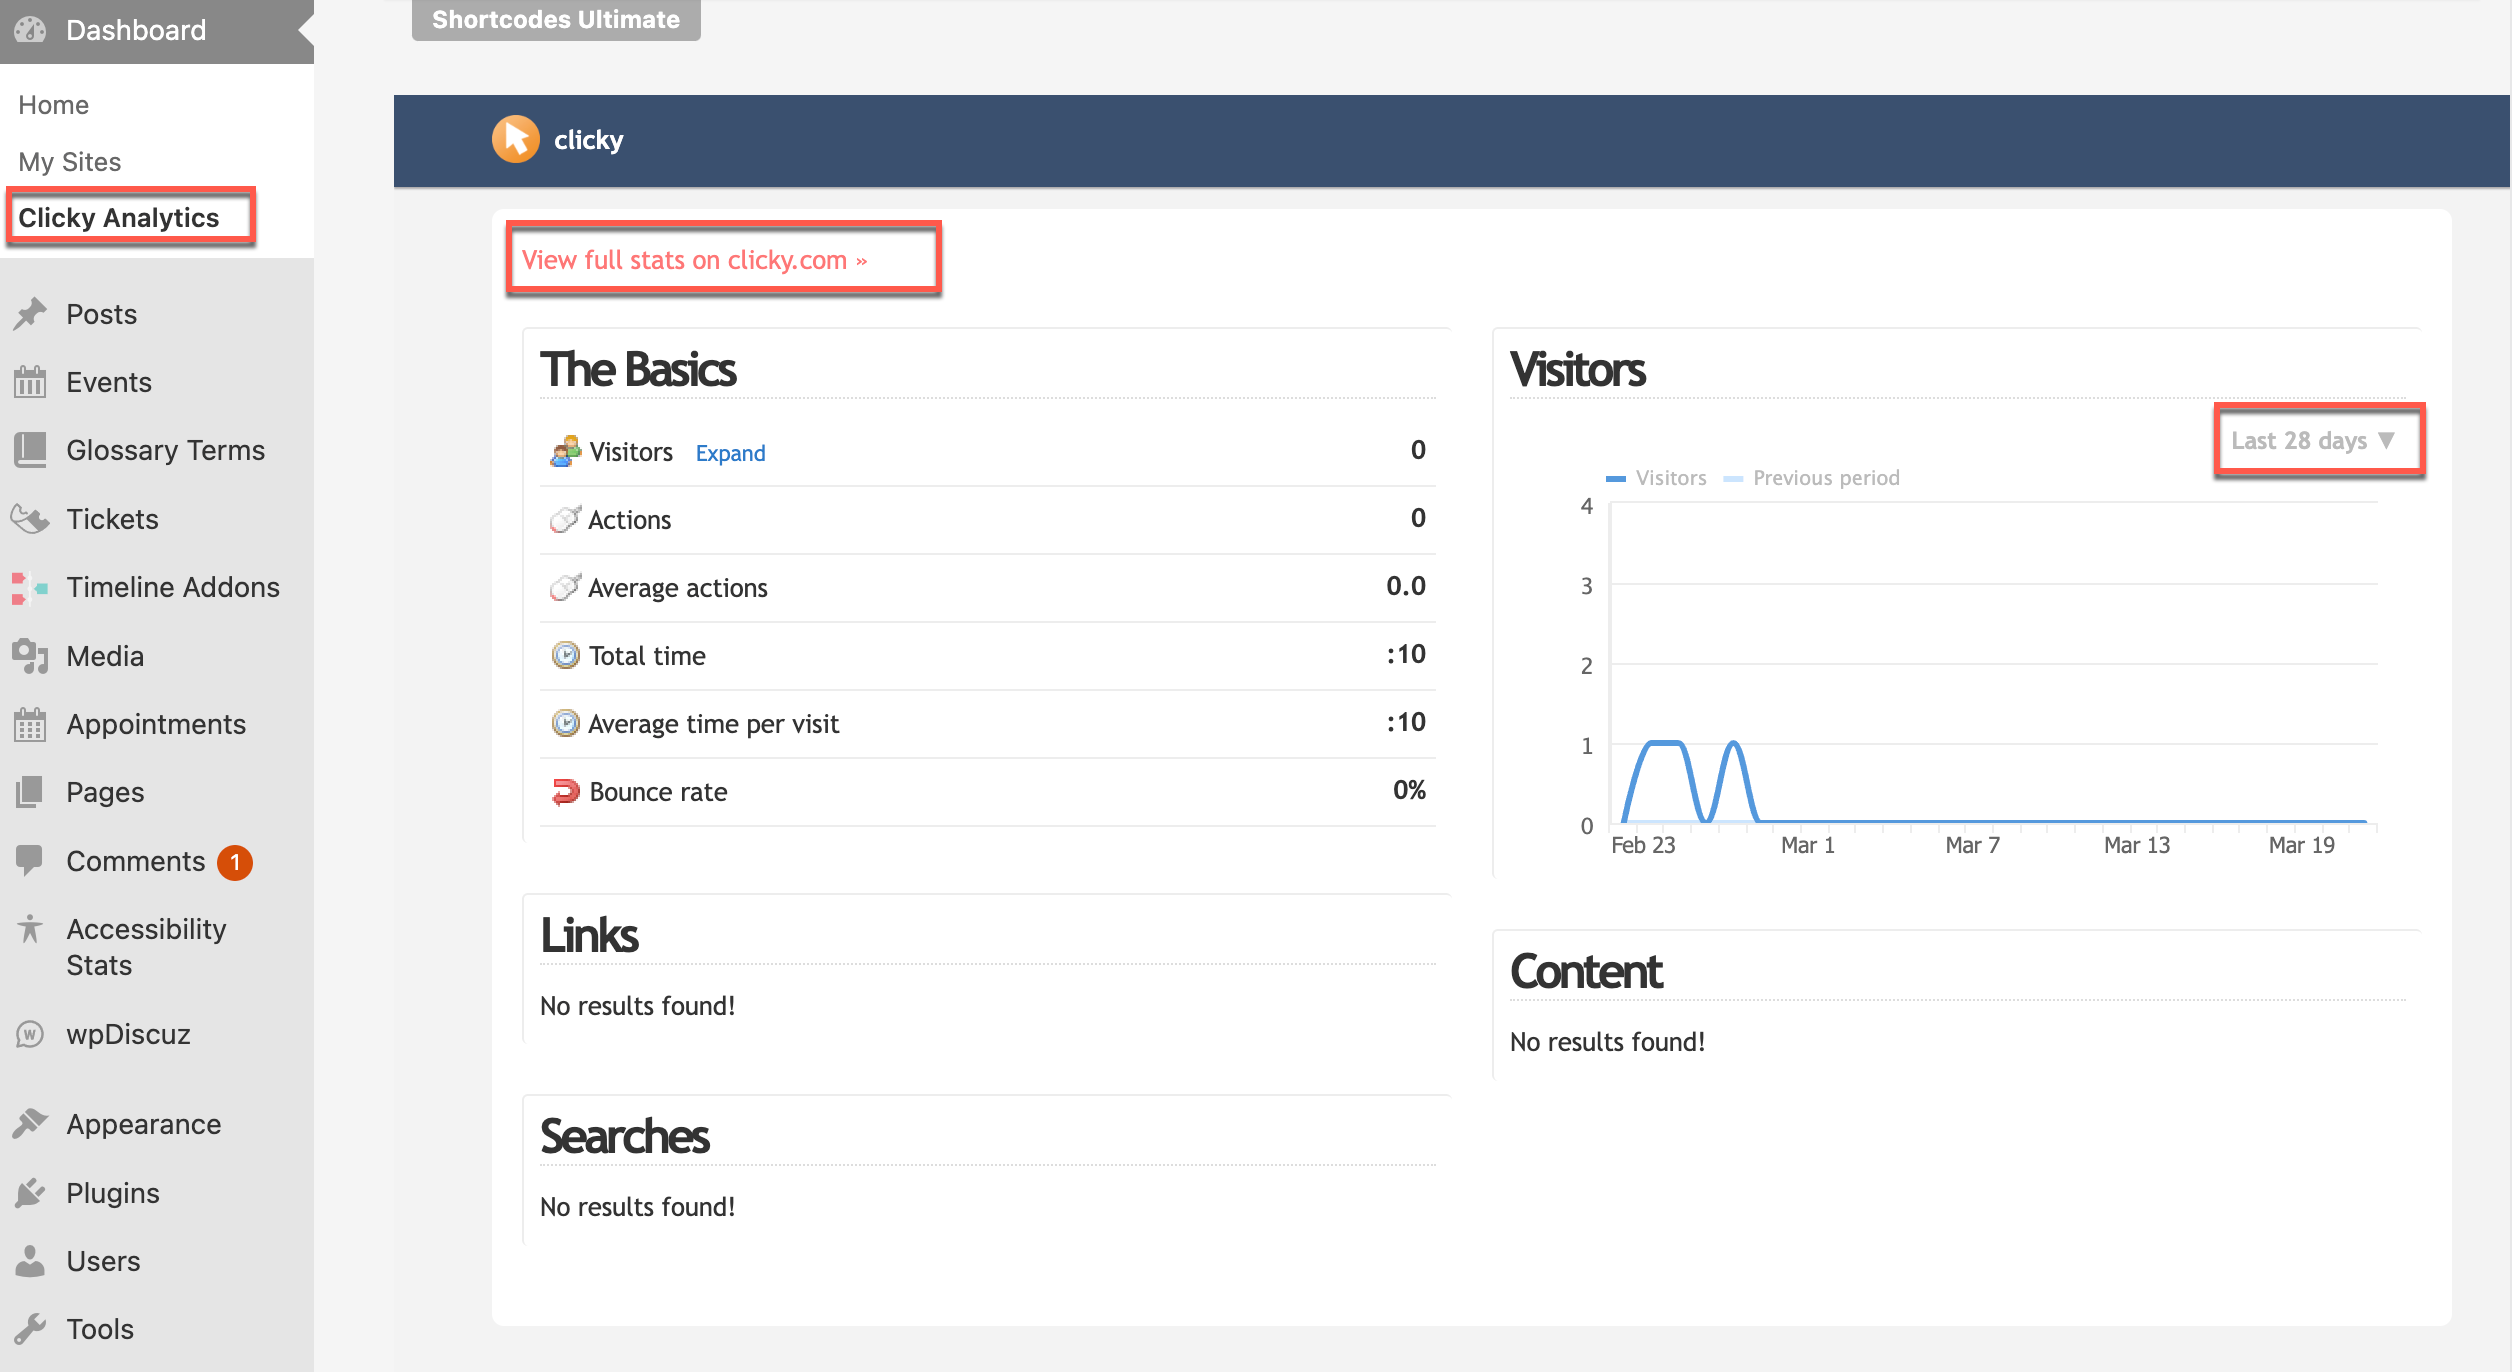
Clicky Access From the Dashboard of your Site
In the Dashboard with the Clicky Analytics plugin activated:
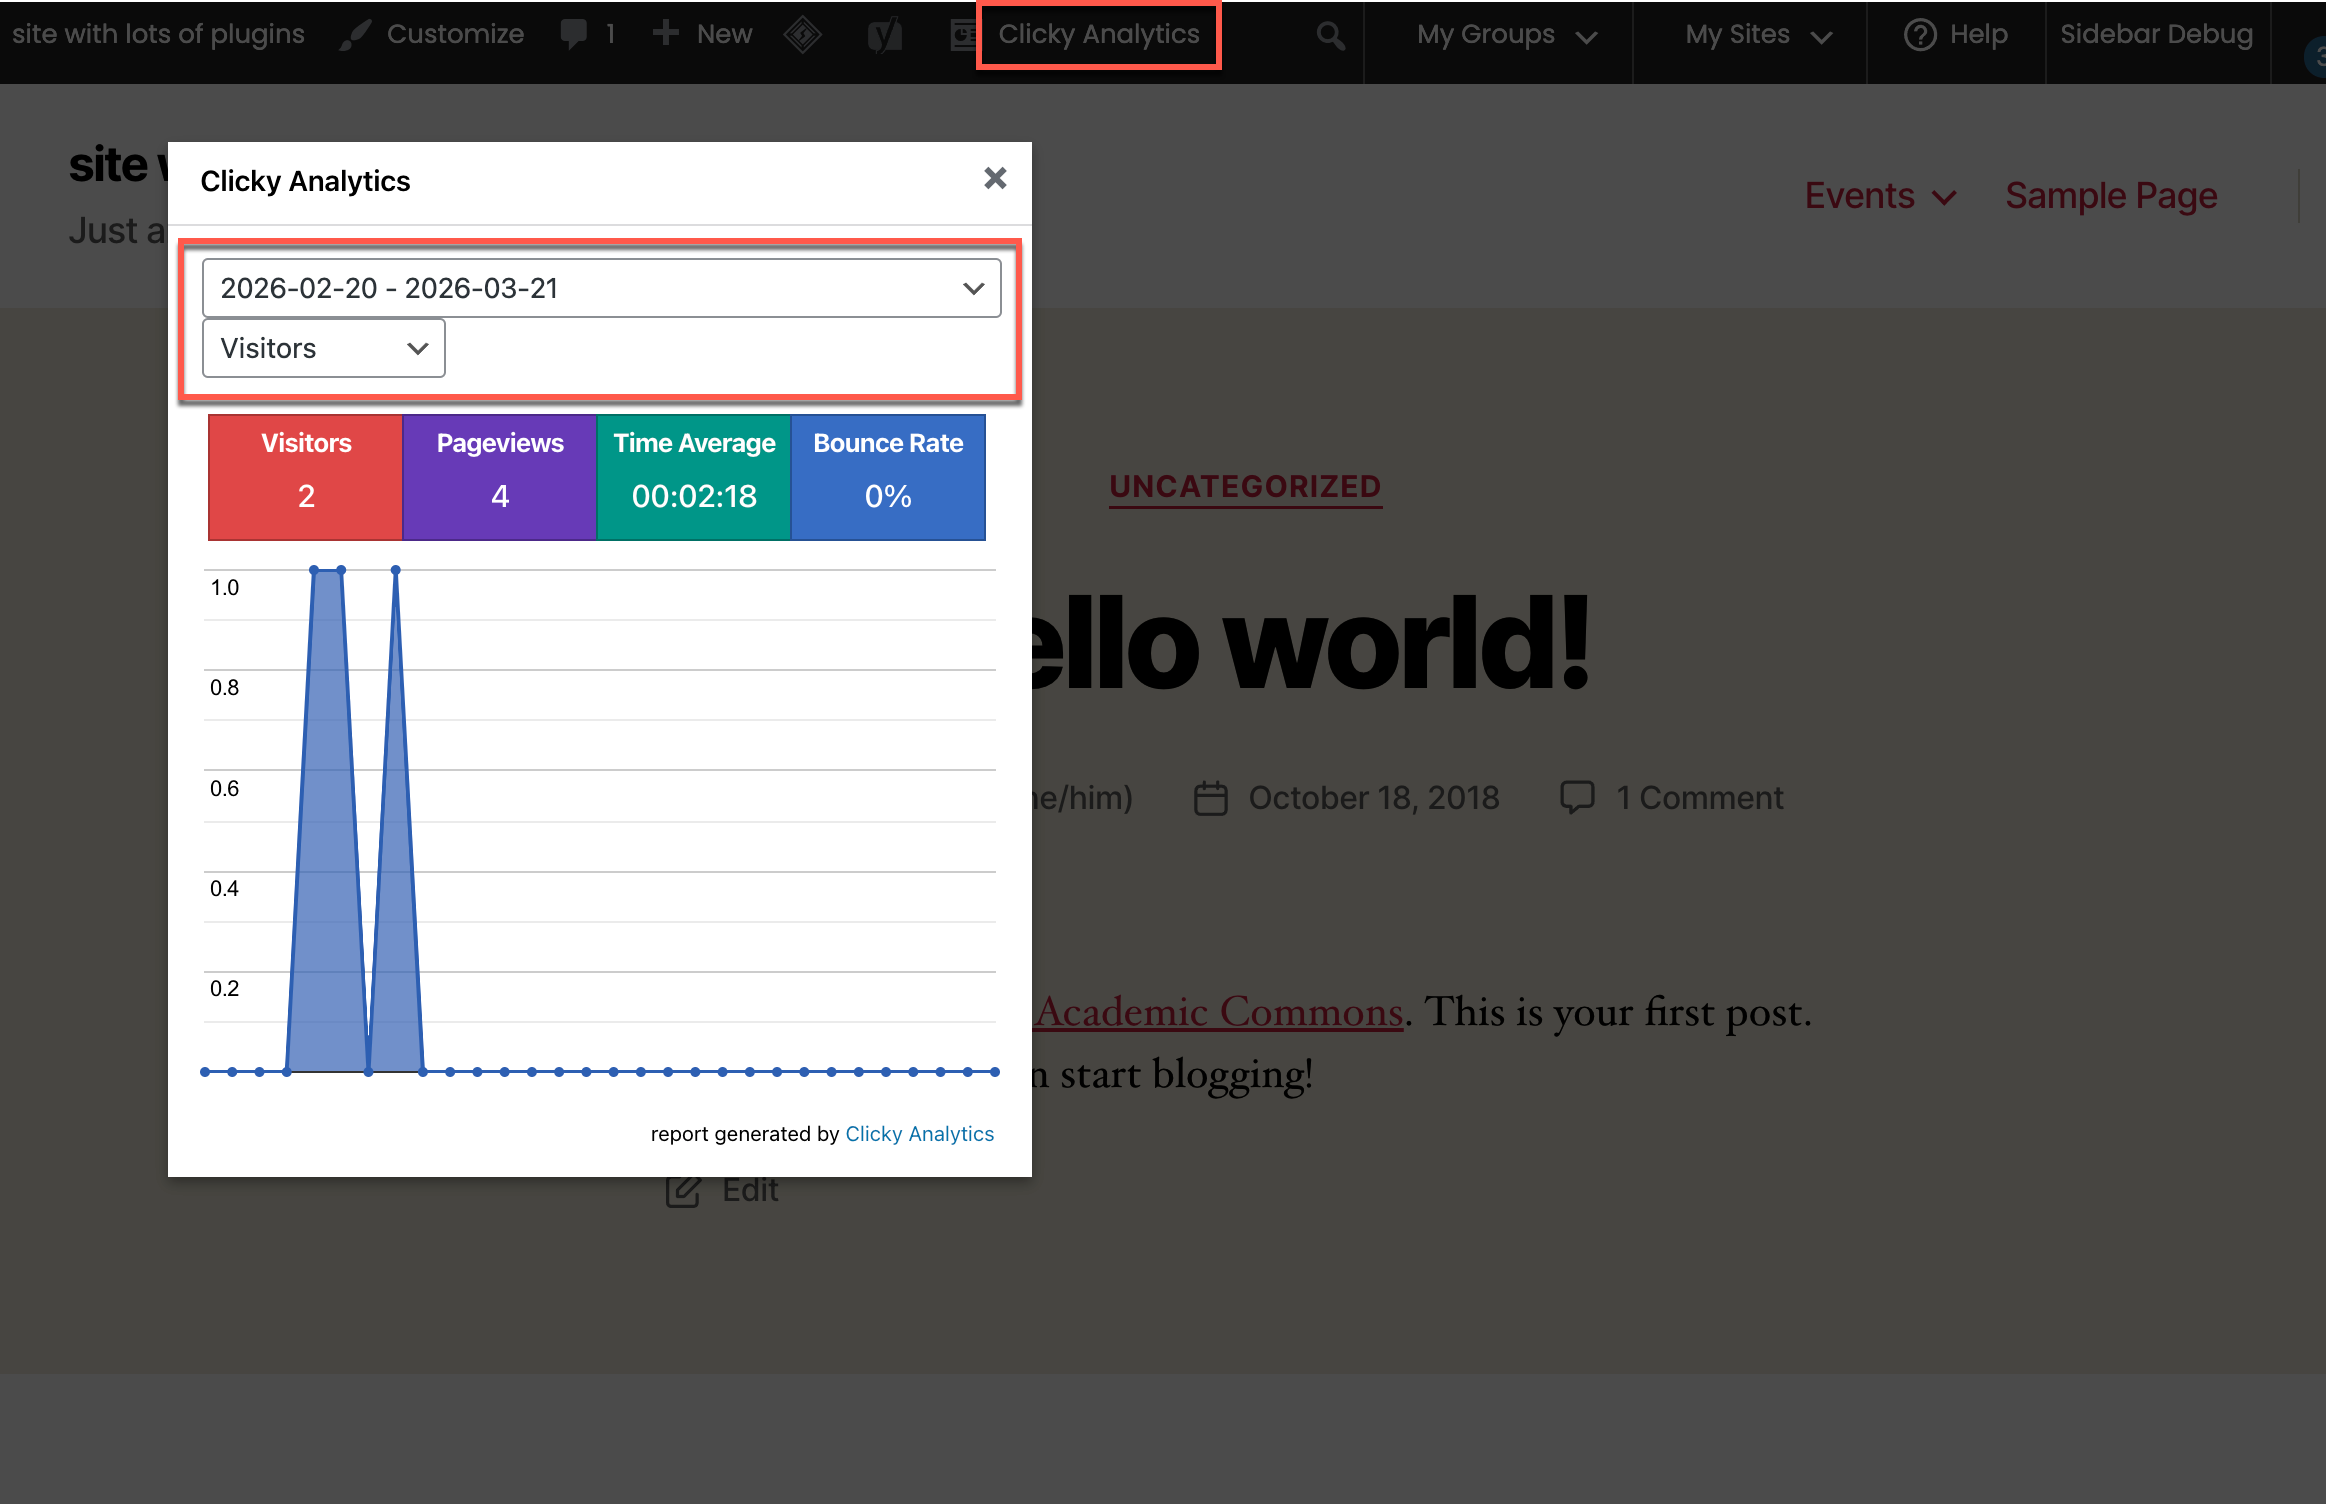
Clicky Access From Admin Bar
In the top admin bar, click on Clicky Analytics to view site statistics. This functionality can be controlled to be displayed for admins only or for a variety of user roles.
How Clicky Handles Bots
see also: https://clicky.com/blog/ai-bot-traffic
Clicky categorizes traffic from AI chatbots separately, allowing users to see which AI services are crawling their sites.
Optional Logging: While it is not recommended, users can change their site preferences to allow bot activity to be logged as “real” visitors.
Referrer Spam Prevention: Clicky actively works to filter out known spam referrers, such as those that try to boost their SEO by appearing in analytics logs.
Automatic Updates: Clicky consistently updates its internal blocklist based on reports and observed spam patterns.
Limitations: Not All Bots Are Blocked. Some sophisticated bots that behave like human users may still get through.
Discrepancies: Because Clicky is aggressive in filtering bots, its traffic figures might be lower than services that do not filter as heavily, such as GA4.