Monster Insights (for Google Analytics)

The Commons has the “Lite” version of the Monster Insights plugin. While it does not provide all the bells and whistles of the “Pro” version, it does a decent job of providing the metrics that you need, right on your WordPress dashboard. You still will need to set up  Google Analytics prior to using the plugin. Here are directions:

Getting Started With Universal Analytics (aka Google Analytics 2 or 3)


Getting Started

This document assumes that you are using an older version of Google Analytics called Universal Analytics (aka Google Analytics 2 or 3). If you are using the newer Google Analytics 4, please use these instructions.

How To Tell Which Version I’m Using

It isn’t easy to tell which version of Google Analytics you are using. If you signed up for Google Analytics before October, 2020, you are probably using Universal Analytics (aka Google Analytics 2 or 3). If you started after that, you are probably using the newer version, Google Analytics 4. The newer version is quite different, and slightly easier to use.

The Commons supports all these versions, but it’s probably good at some point to upgrade, since it is unclear how long Google will support the older version. Follow this link to upgrade from Universal Analytics to Google Analytics 4.

The most important difference in the various versions is the way your site pings Google to gather metrics. The older versions use a “Tracking ID” which has a format like this: UA-XXXXXXXX-X. (UA stands for Universal Analytics). The new version uses Measurement ID which has a format like this: G-XXXXXXXXXX.

Whichever version you are using, your first step is to go to your WP Dashboard, to Settings>>General and enter either your Tracking ID or Measurement ID. Once you do this, Google will start collecting metrics for your site.

Site admins can set up Google Analytics on their sites to gather and analyze site traffic.  A Google account is required. To get started, log into your Google account and go to Analytics – https://analytics.google.com.  You should see the following:

Click on the Sign up button to create a free Analytics account.

Enter your Account Name (free form – can just be your name), Website Name (this is the title of your Commons site), and the Website URL. Since all sites on the Commons are use an encrypted protocol, pick https:// in the dropdown. Typically, your URL will look like this:

 yoursitename.commons.gc.cuny.edu

If you have a mapped site, enter your domain name rather than your Commons site URL.

Pick an Industry Category and Time Zone and create your Analytics account.

For simplicity’s sake, these instructions will assume you have one site, one account, one user, and one property.

Notes For Advanced Users

Some things to know:

  • You can have multiple users on your Analytics account, each with various permissions levels
  • You can have multiple Analytics accounts tied to your single Google account.
  • You can have multiple properties (each with a different tracking ID) tied to an Analytics account.
  • If you want to analyze more than one site, you can either
    • create a new account/new property or
    • create a new property on the same account.

After you have successfully created a Google Analytics account, you should see a screen something like this:

Note the Tracking ID, circled in red. You need to add this to your Commons site so that Google Analytics will know where to get statistics for your property.

Do Not Use The Global Site Tag. This will not work on Commons sites.

Instead, copy the Tracking ID, go to your Site’s back-end, to Settings>>General, scroll down to Google Analytics ID and paste it in. It should have the format “UA-XXXXXXXX-X.” See below:

At this point, Google will start collecting statistics on your site.

Next Steps

Google Analytics can be overwhelming. Here are a couple FAQ to get you started:

  • statistics can be “real time” (i.e. right now) or for a set period of time
  • statistics can be analyzed online or sent via email
  • if emailed, they can be sent as PDFs or as spreadsheets (daily, weekly, or monthly)
  • many “canned” reports are available
  • you can create custom reports if needed, but this requires expertise
  • you will not be able to see data before you plugged in your tracking ID
  • if you remove your tracking ID from your Commons site, Google will stop providing statistics

It is beyond the scope of this document to “teach” Google Analytics.

A Typical Report

Here is how to create a simple “Content Drilldown” report that may provide most statistics that you need. It shows the number of total number page views as well as the most popular 10 pages of the month. (Ten pages is the default, but you can change this to any number.)

We have chosen a specific time duration – February 1 thru February 28. We have chosen to see the analytics by day (rather than week or month). To create a recurring, monthly report, click on the share icon, enter email recipients, frequency, and format.

As you can see, there are many configurations for even this most basic report. For example, you can add another dimension to the report by comparing “Pageviews” to say, “Bounce rates.”

Feel free to experiment with all Google Analytics has to offer.

Help With Google Analytics

There are many help resources available.  Here is a basic video:


-OR-

Getting Started With Google Analytics 4 (newest version)


Getting Started

This document assumes that you are using the most recent version – Google Analytics 4.

If you are using Universal Analytics (aka Google Analytics 2 or 3), please use these instructions. Please note that On July 1, 2023, standard Universal Analytics properties will stop processing new hits.  (As per https://support.google.com/analytics/answer/11583528)

How To Tell Which Version I’m Using

It isn’t easy to tell which version of Google Analytics you are using. If you signed up for Google Analytics before October, 2020, you are probably using Universal Analytics (aka Google Analytics 2 or 3). If you started after that, you are probably using the newer version, Google Analytics 4. The newer version is quite different, and slightly easier to use.

The Commons supports all these versions, but it’s probably good at some point to upgrade, since it is unclear how long Google will support the older version. Follow this link to upgrade from Universal Analytics to Google Analytics 4.

The most important difference in the various versions is the way your site pings Google to gather metrics. The older versions use a “Tracking ID” which has a format like this: UA-XXXXXXXX-X. (UA stands for Universal Analytics). The new version uses Measurement ID which has a format like this: G-XXXXXXXXXX.

Whichever version you are using, your first step is to go to your WP Dashboard, to Settings>>General and enter either your Tracking ID or Measurement ID. Once you do this, Google will start collecting metrics for your site.

To use Google Analytics, you need to have a Google account.  Follow this link to get started. To set up Analytics, click on Admin in the lower left hand corner of your screen. You should see a screen like this:
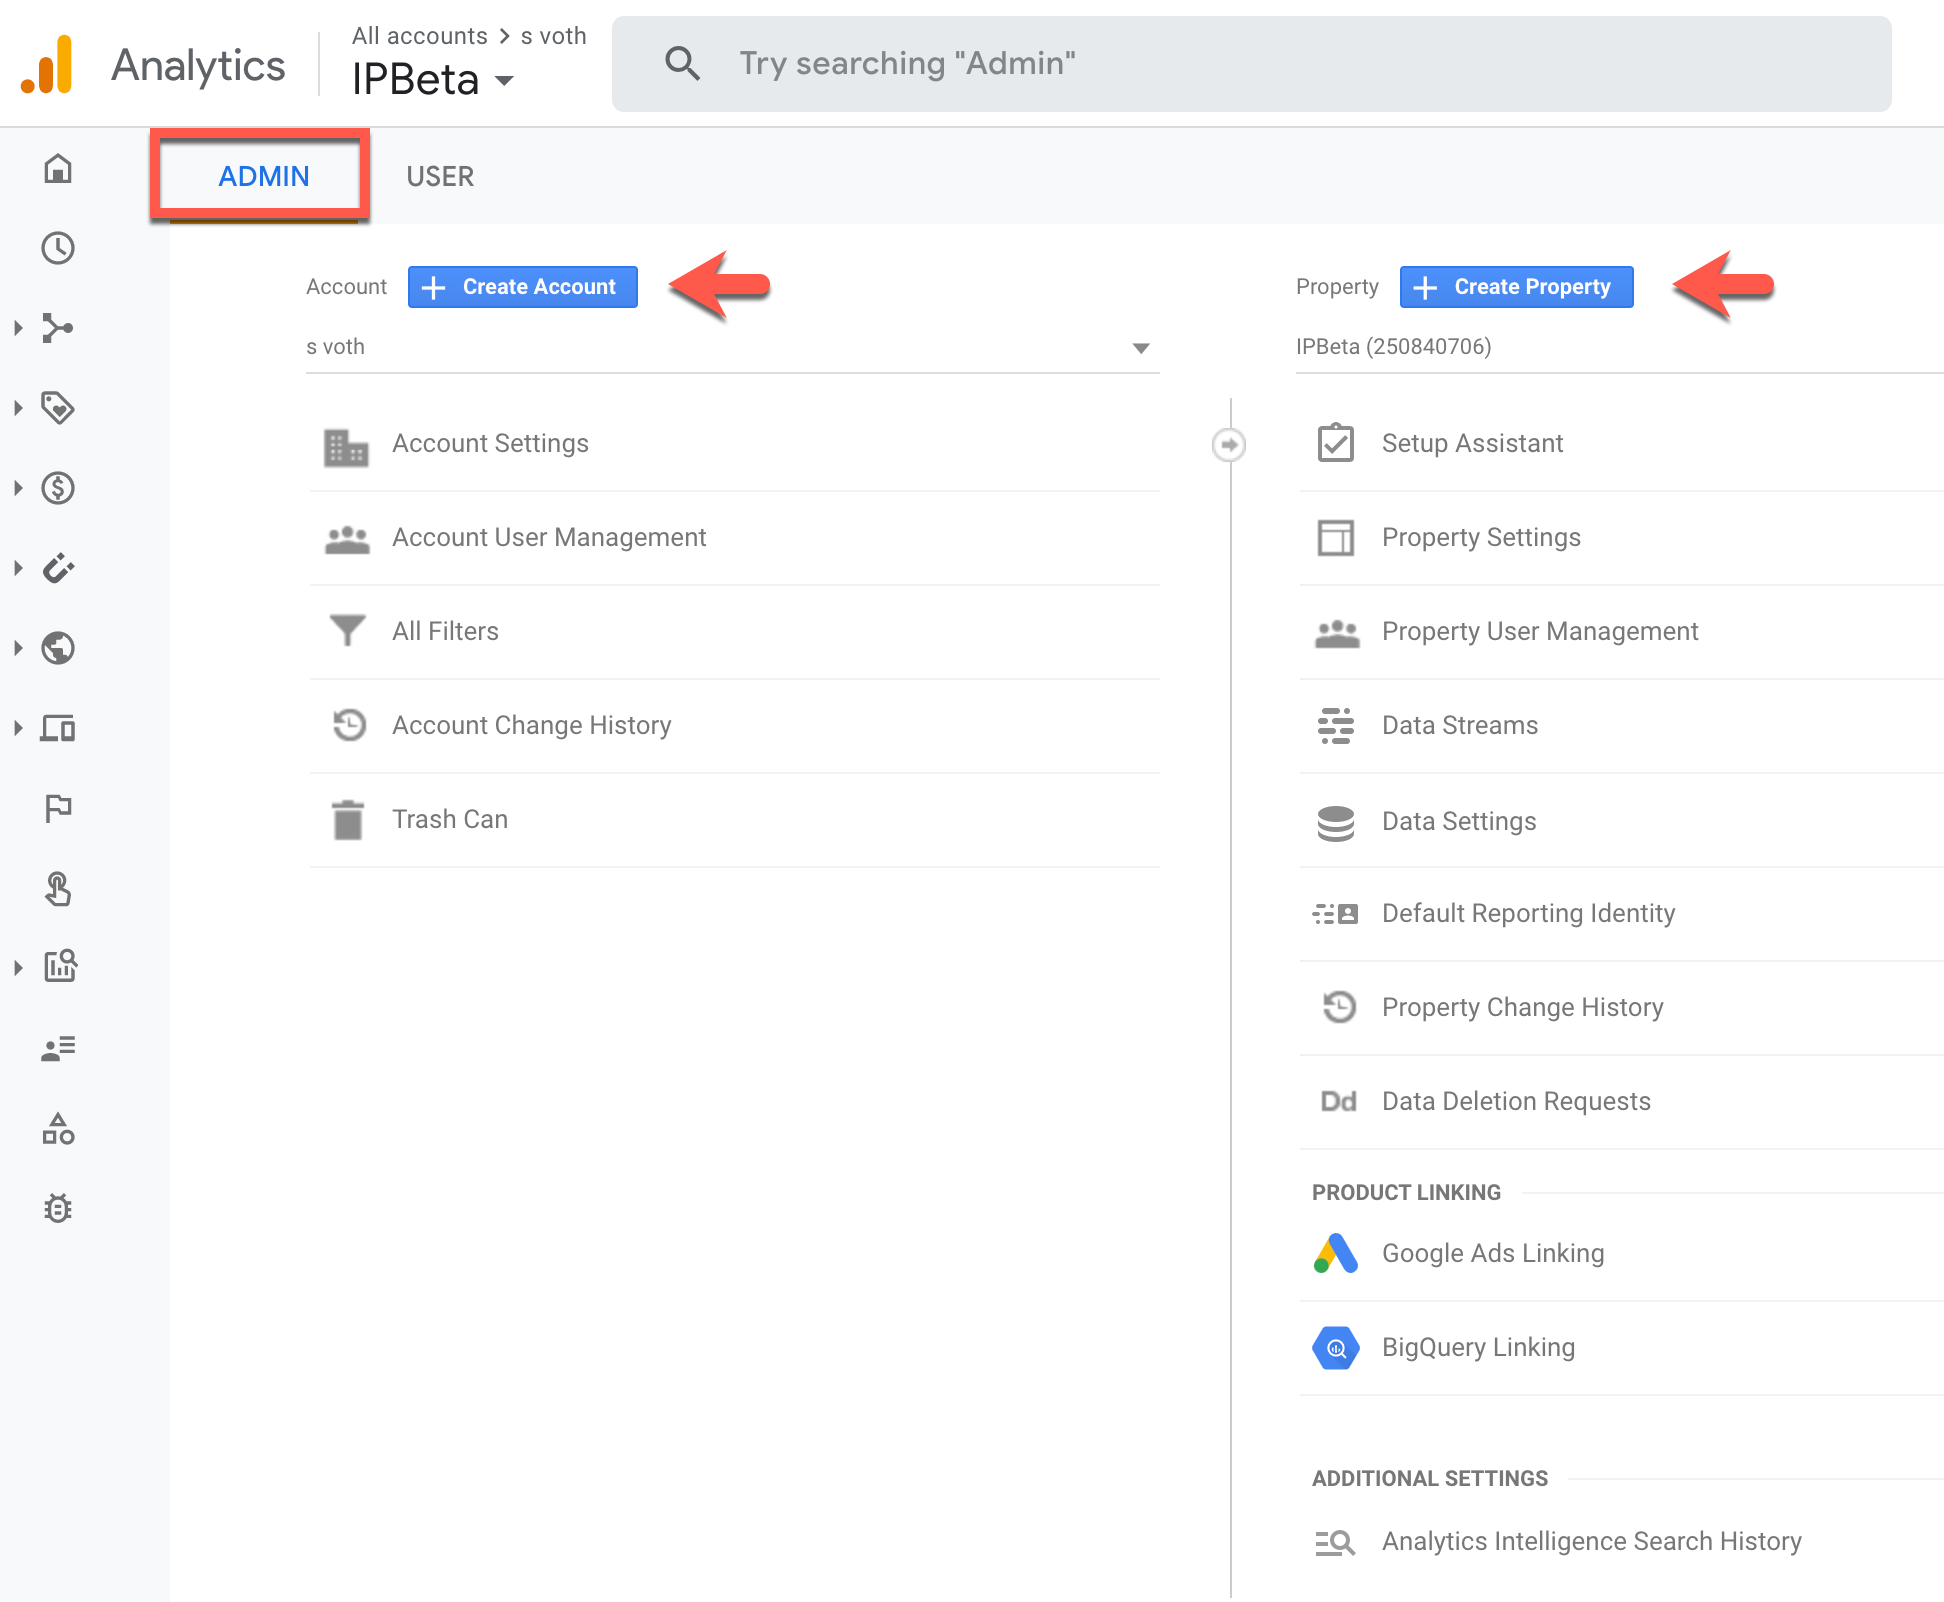
 

Important Terms

  • Account – you can have one or more accounts (limit is 100). The only required field is a free form name.
  • Property ID – each account can have one or more property IDs. The only required field is a free form name. You can also adjust the timezone here.
  • Data Stream – each property ID must have at least data stream. This is where you will need to provide your site’s url.
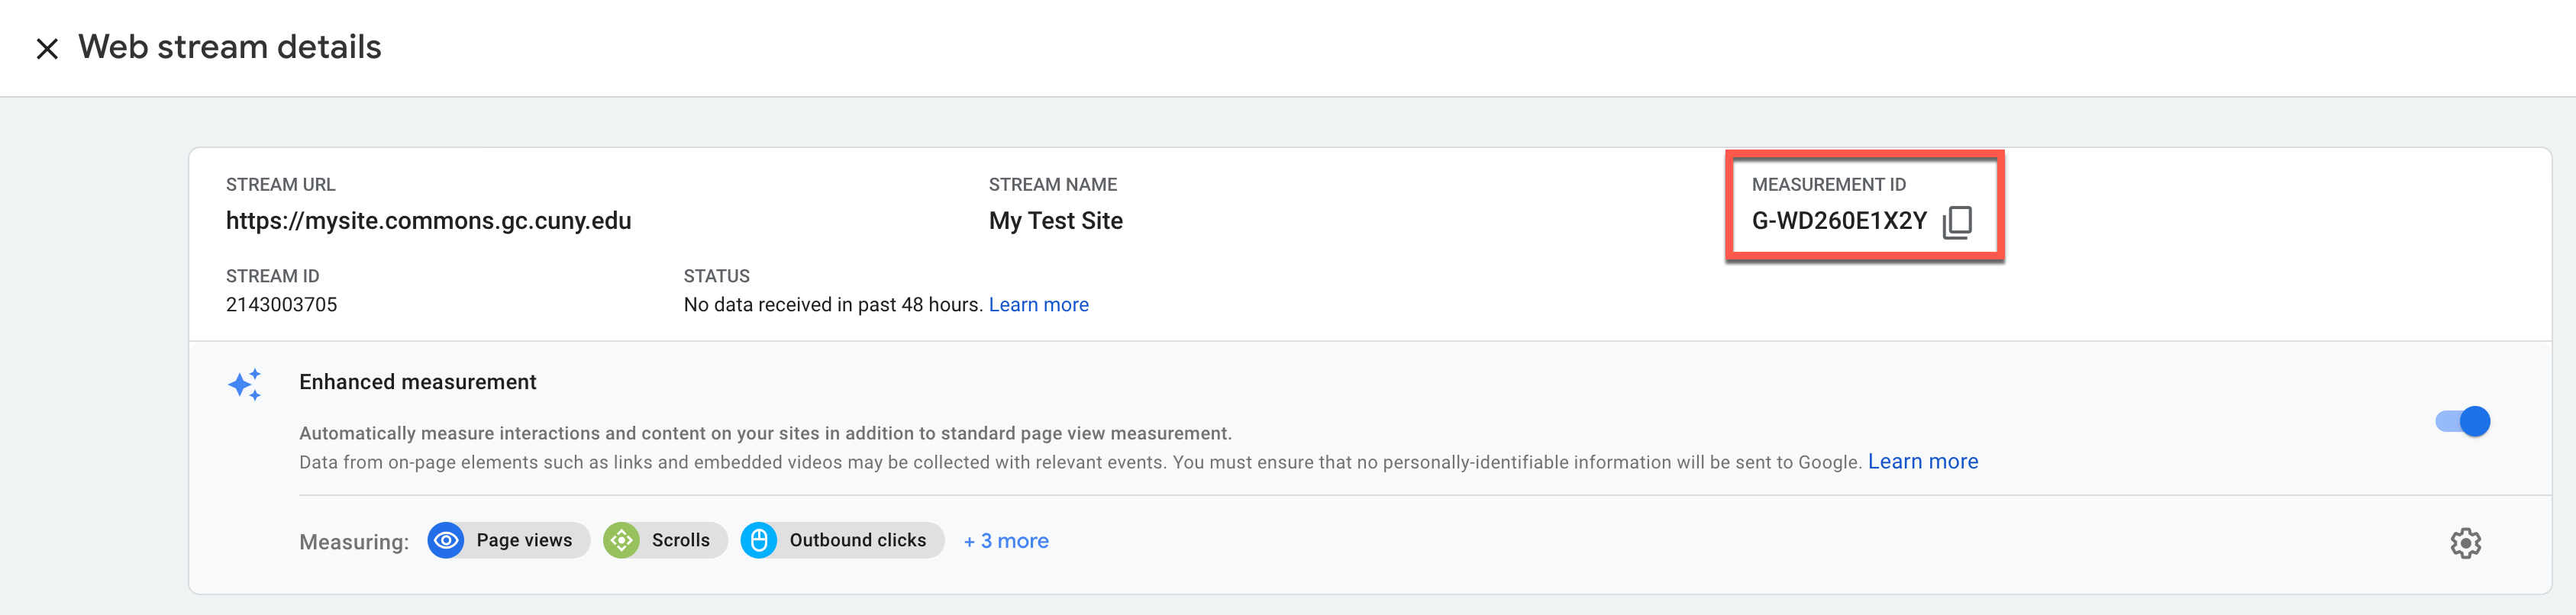
  • Measurement ID – each data stream has one Measurement Id. The format is G-XXXXXXXXXX. In our example below, it is G-WD260E1X2Y

It is a matter of choice how you set up your analytics dashboard. Some members might have 2 or more sites on the Commons and choose to make each an account. Others in the same position may want to just have one account with 2 or more property IDs associated with their sites. Each site on the Commons can have only one Data Stream and one Measurement ID.

Data Stream Setup

At the end of the Property ID setup, you will need to choose a platform. See below. Choose Web.

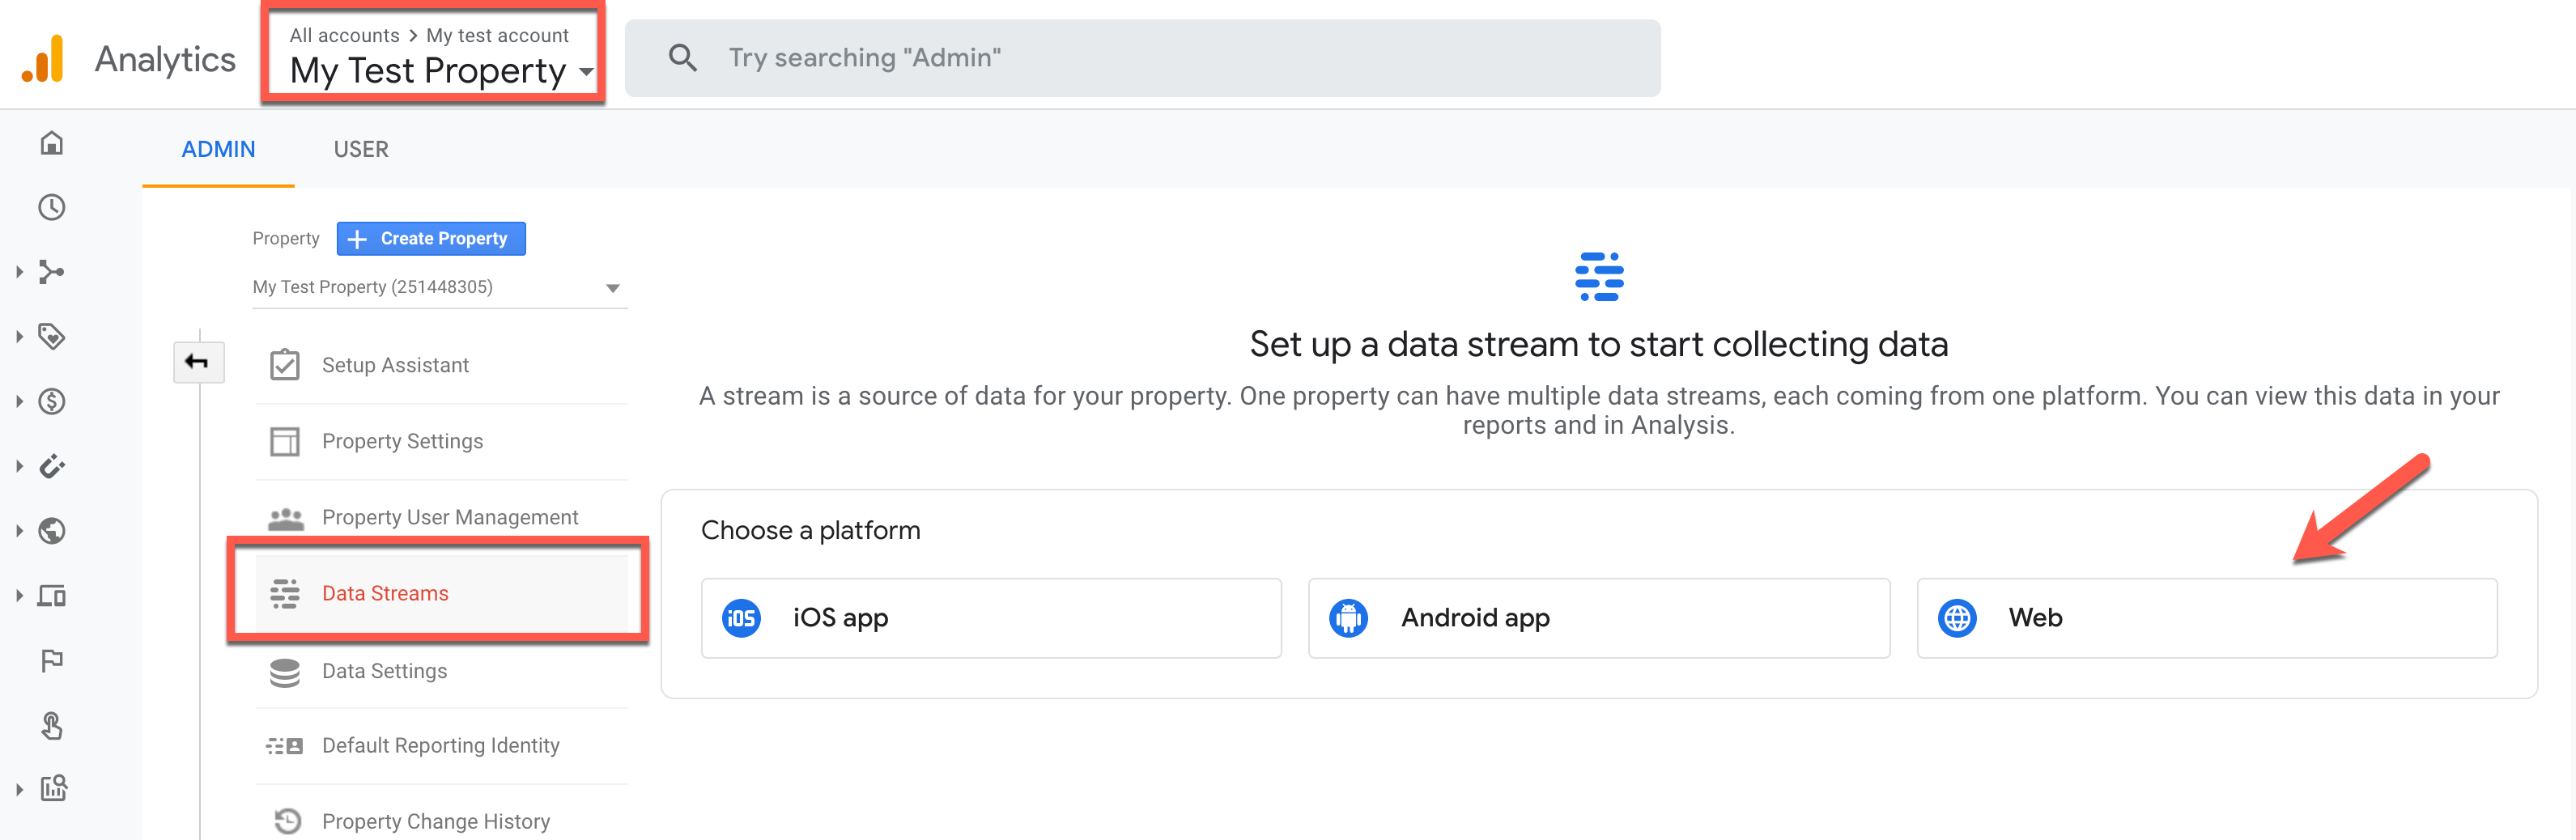
Once you choose Web, you should see the following screen. Fill in your site’s URL and give your data stream a name. (If you are using Domain Mapping, use your mapped URL, not your Commons URL.)

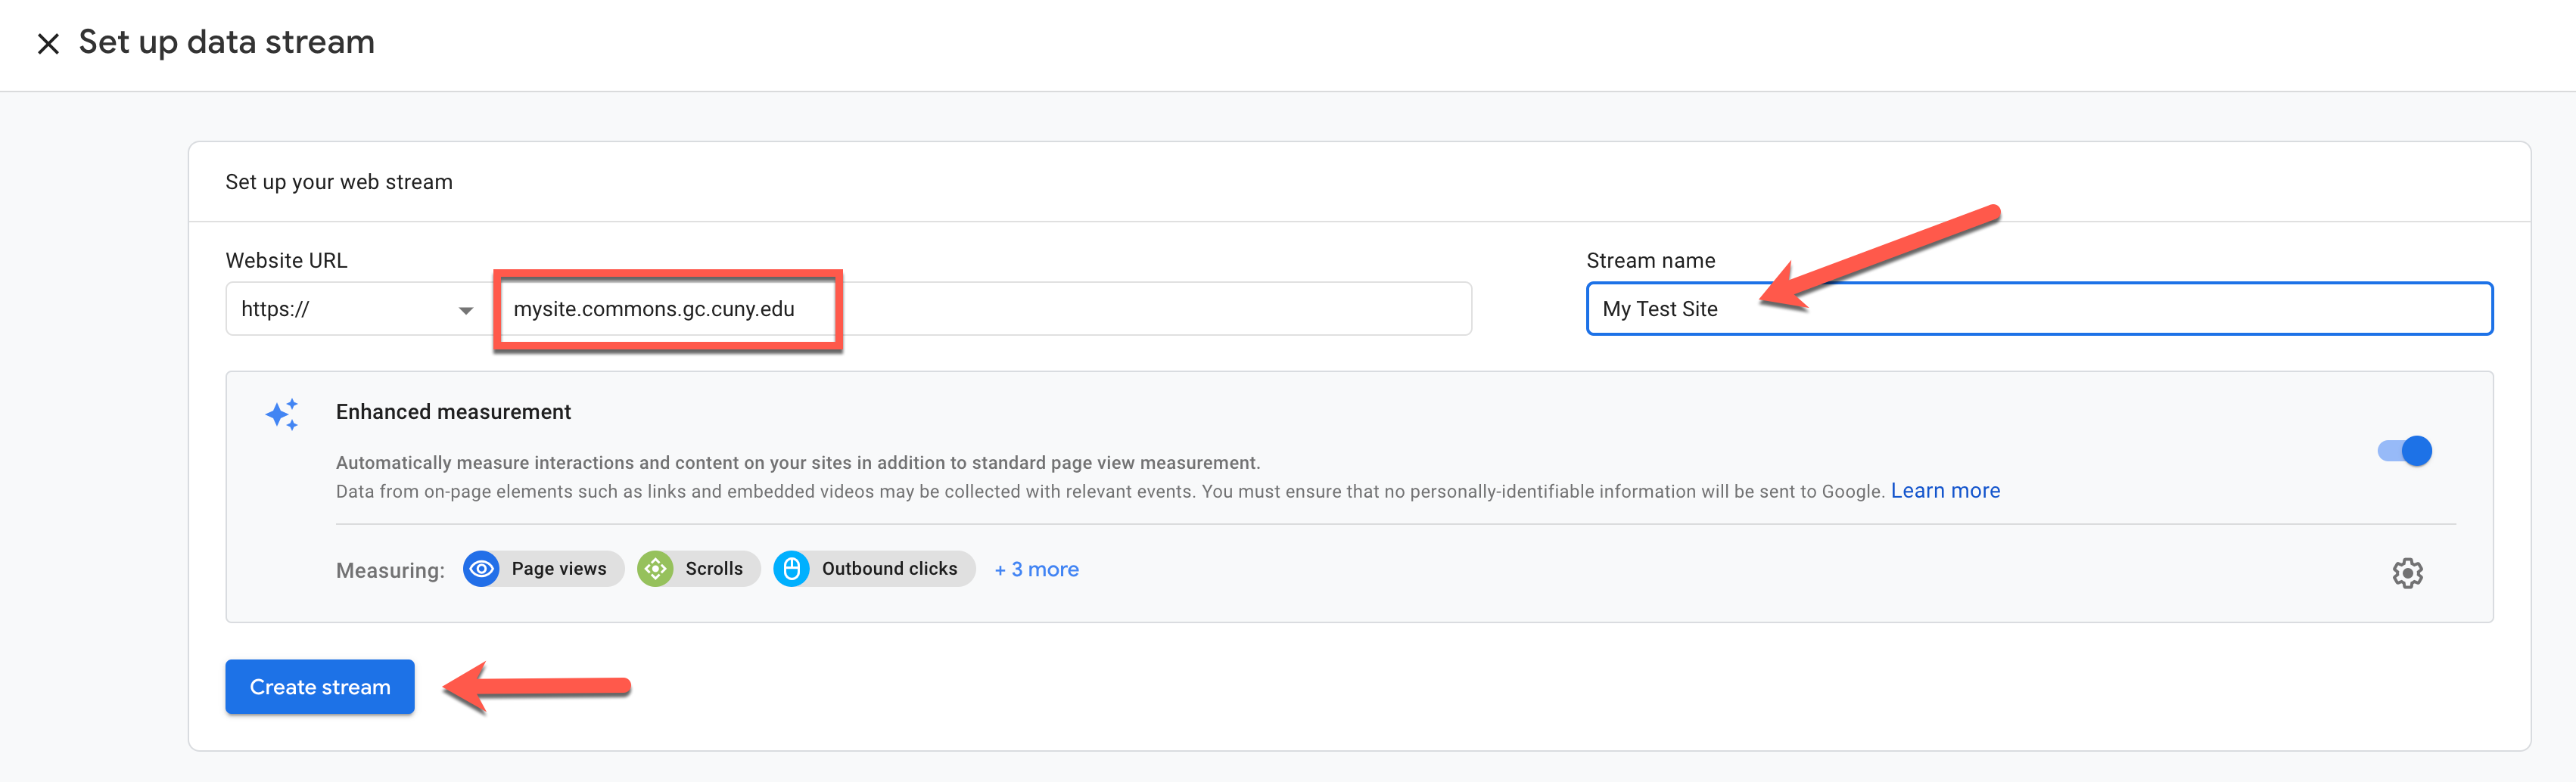
So now you have successfully created your data stream. You should see something like this:

Connecting Your Data Stream To The Commons

The next step is to add your data stream’s Measurement ID to your site on the Commons. Copy your Measurement ID and go to your site’s WP Dashboard, to Settings>>General. Paste it into the field marked Google Analytics ID:

Your setup is now complete. To test to see if it is working, go to your Commons site and click on a couple pages and posts. Do not leave the site. In another tab or another browser, go back to Google Analytics to the Realtime tab. This tab displays metrics on who is currently viewing your site. You should see at least 1 user. Sometimes it takes a little while to complete the set up. You should see something like this:


Here is a video that explains Google Analytics 4 Metrics


And One More Resource – https://www.clickminded.com/templates/agency/google-analytics-4-setup/

Once you have Google Analytics up and running, Monster Insights has a easy-to-use wizard that connects to your Universal Analytics Tracking ID. You are good to go if you are using the older version of Analytics.

If You Are Using Google Analytics 4

Monster Insights is not yet compatible with the new version of Analytics – Google Analytics 4.  (It probably will be very soon.) The current version of the plugin requires a Tracking ID (format UA-XXXXXXXXXX-X) rather than the new Measurement ID. But there is a workaround. When you set up your Property ID, click on Advanced Options.


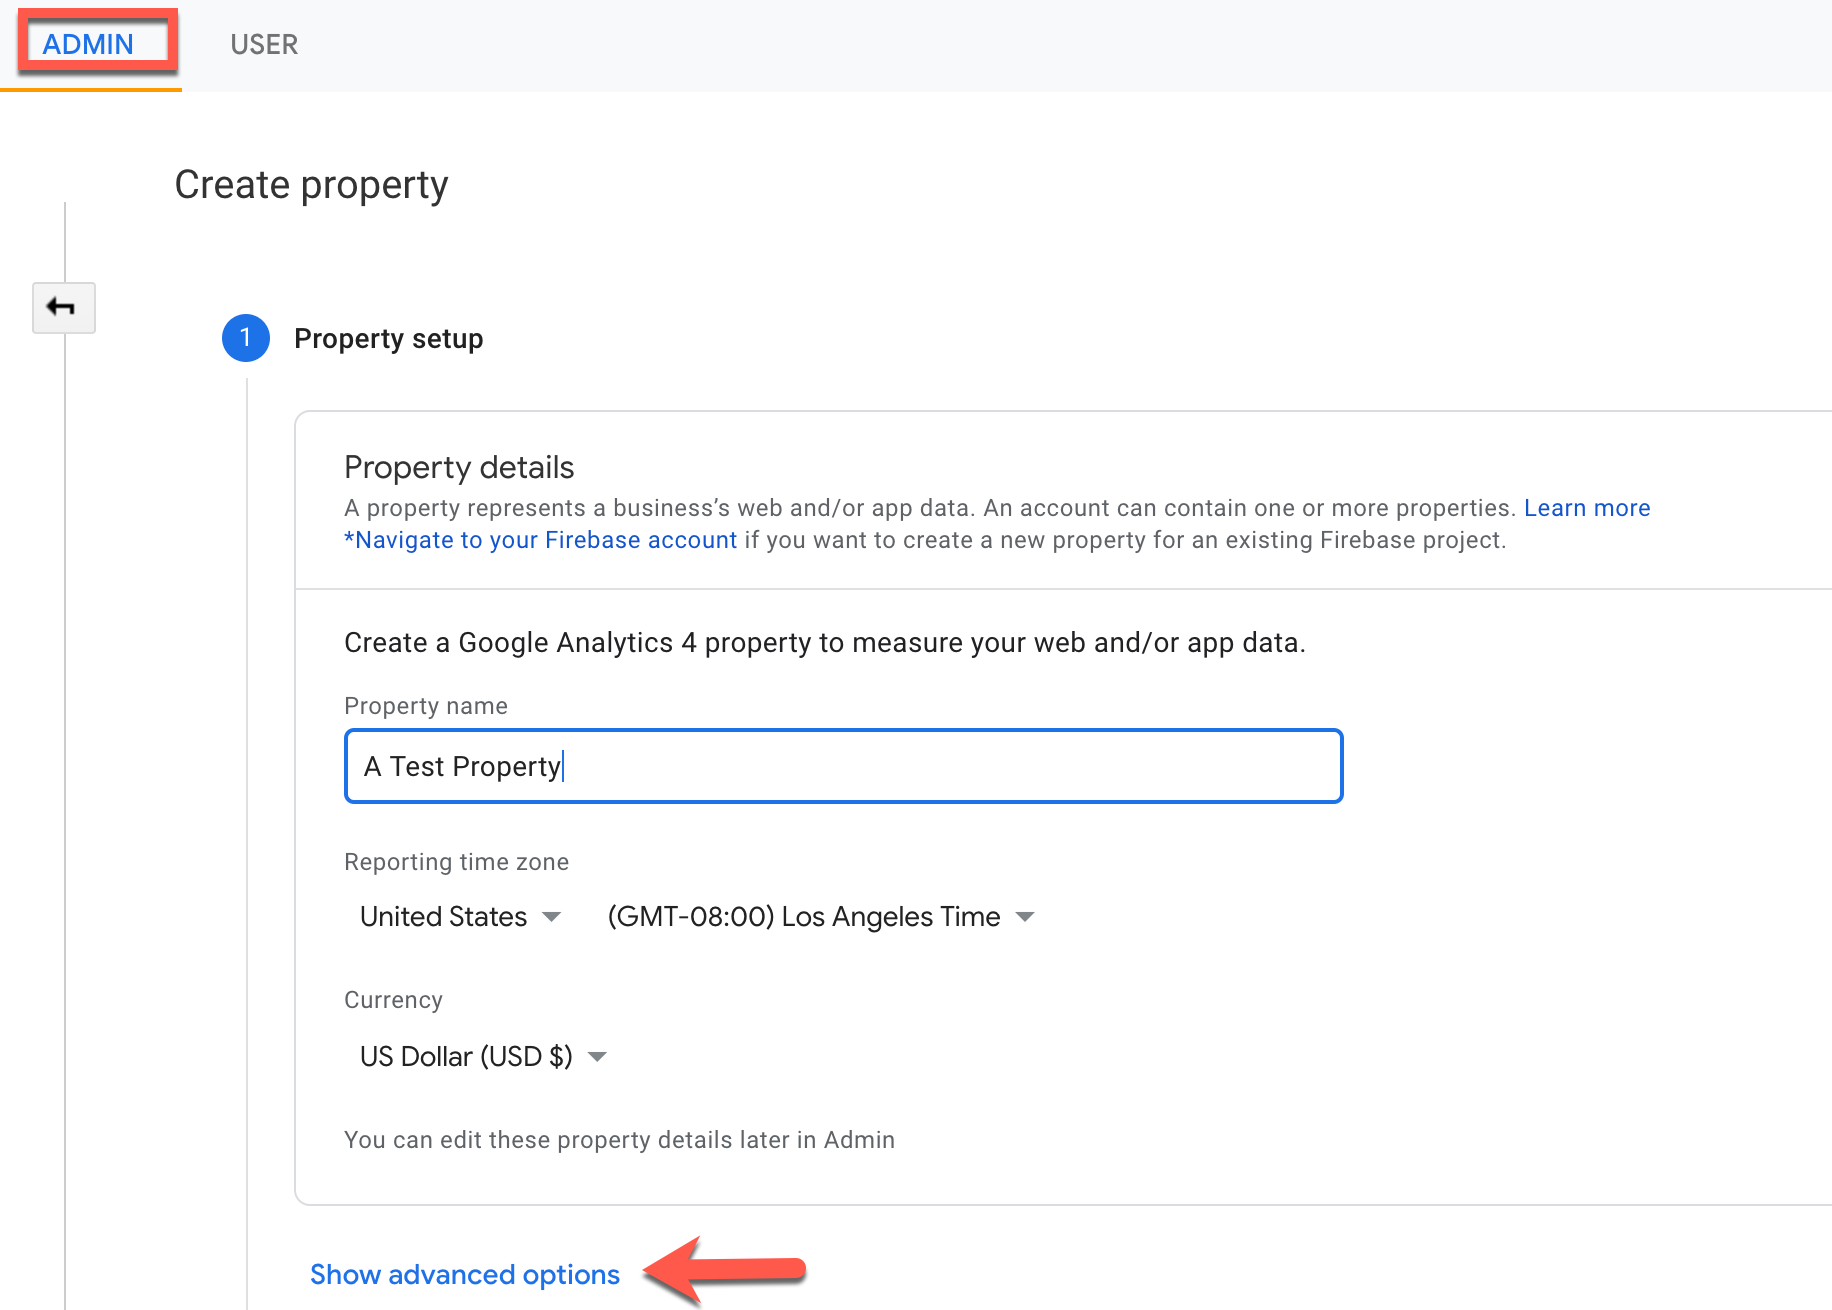
You should see this:


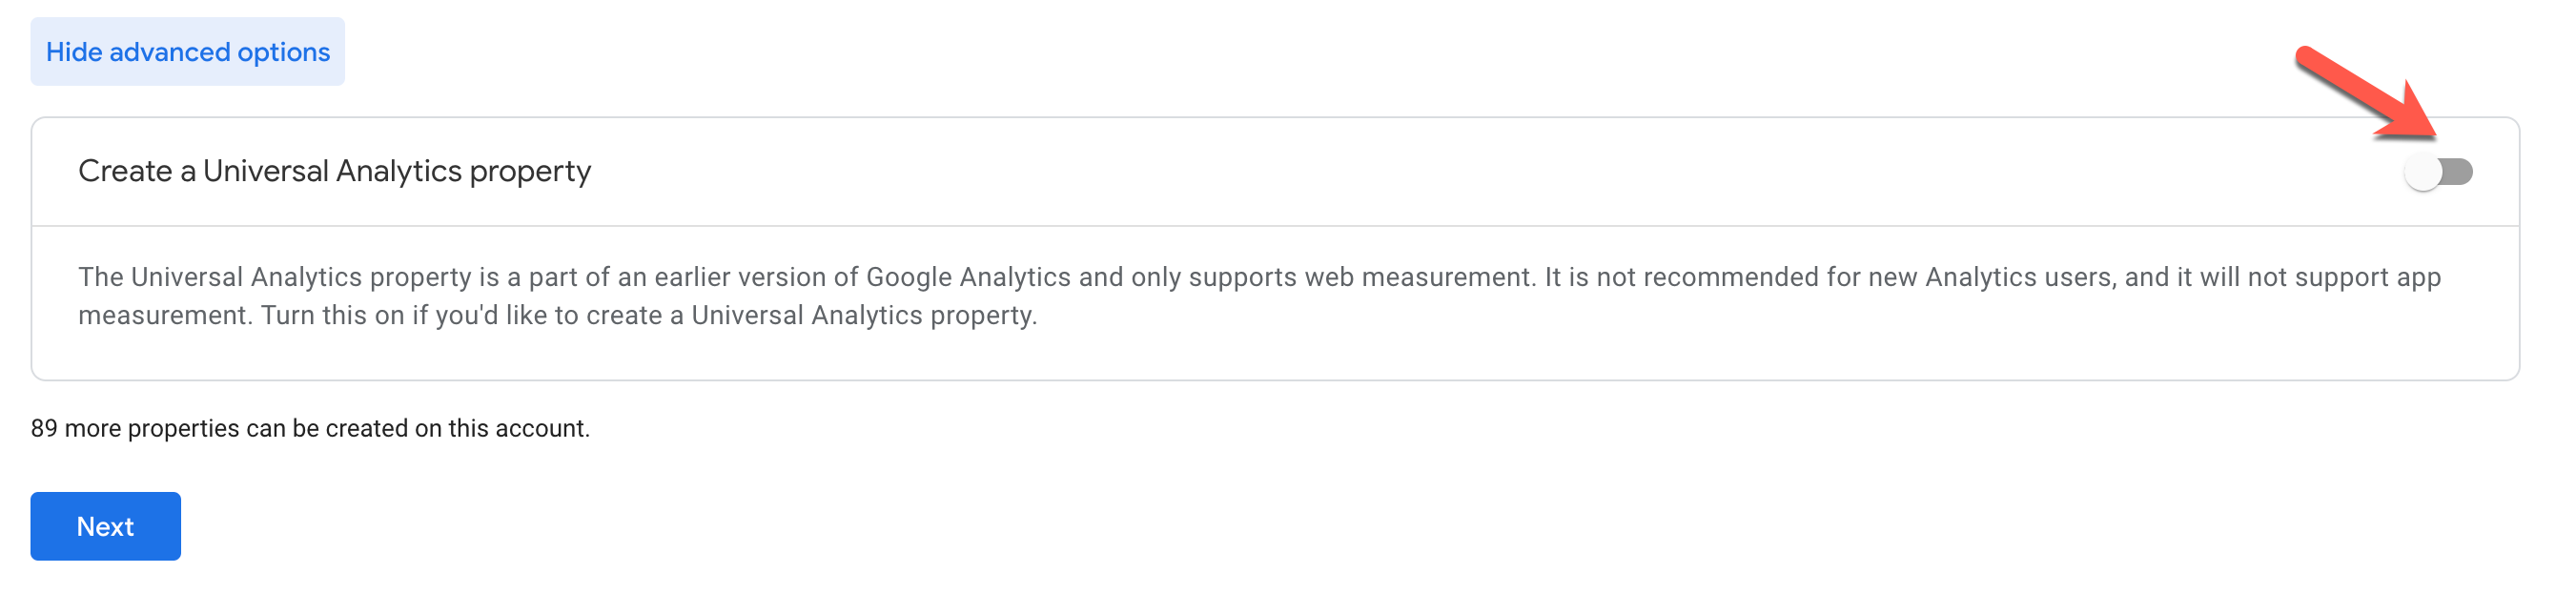
Click the  highlighted button to the right to see further options:

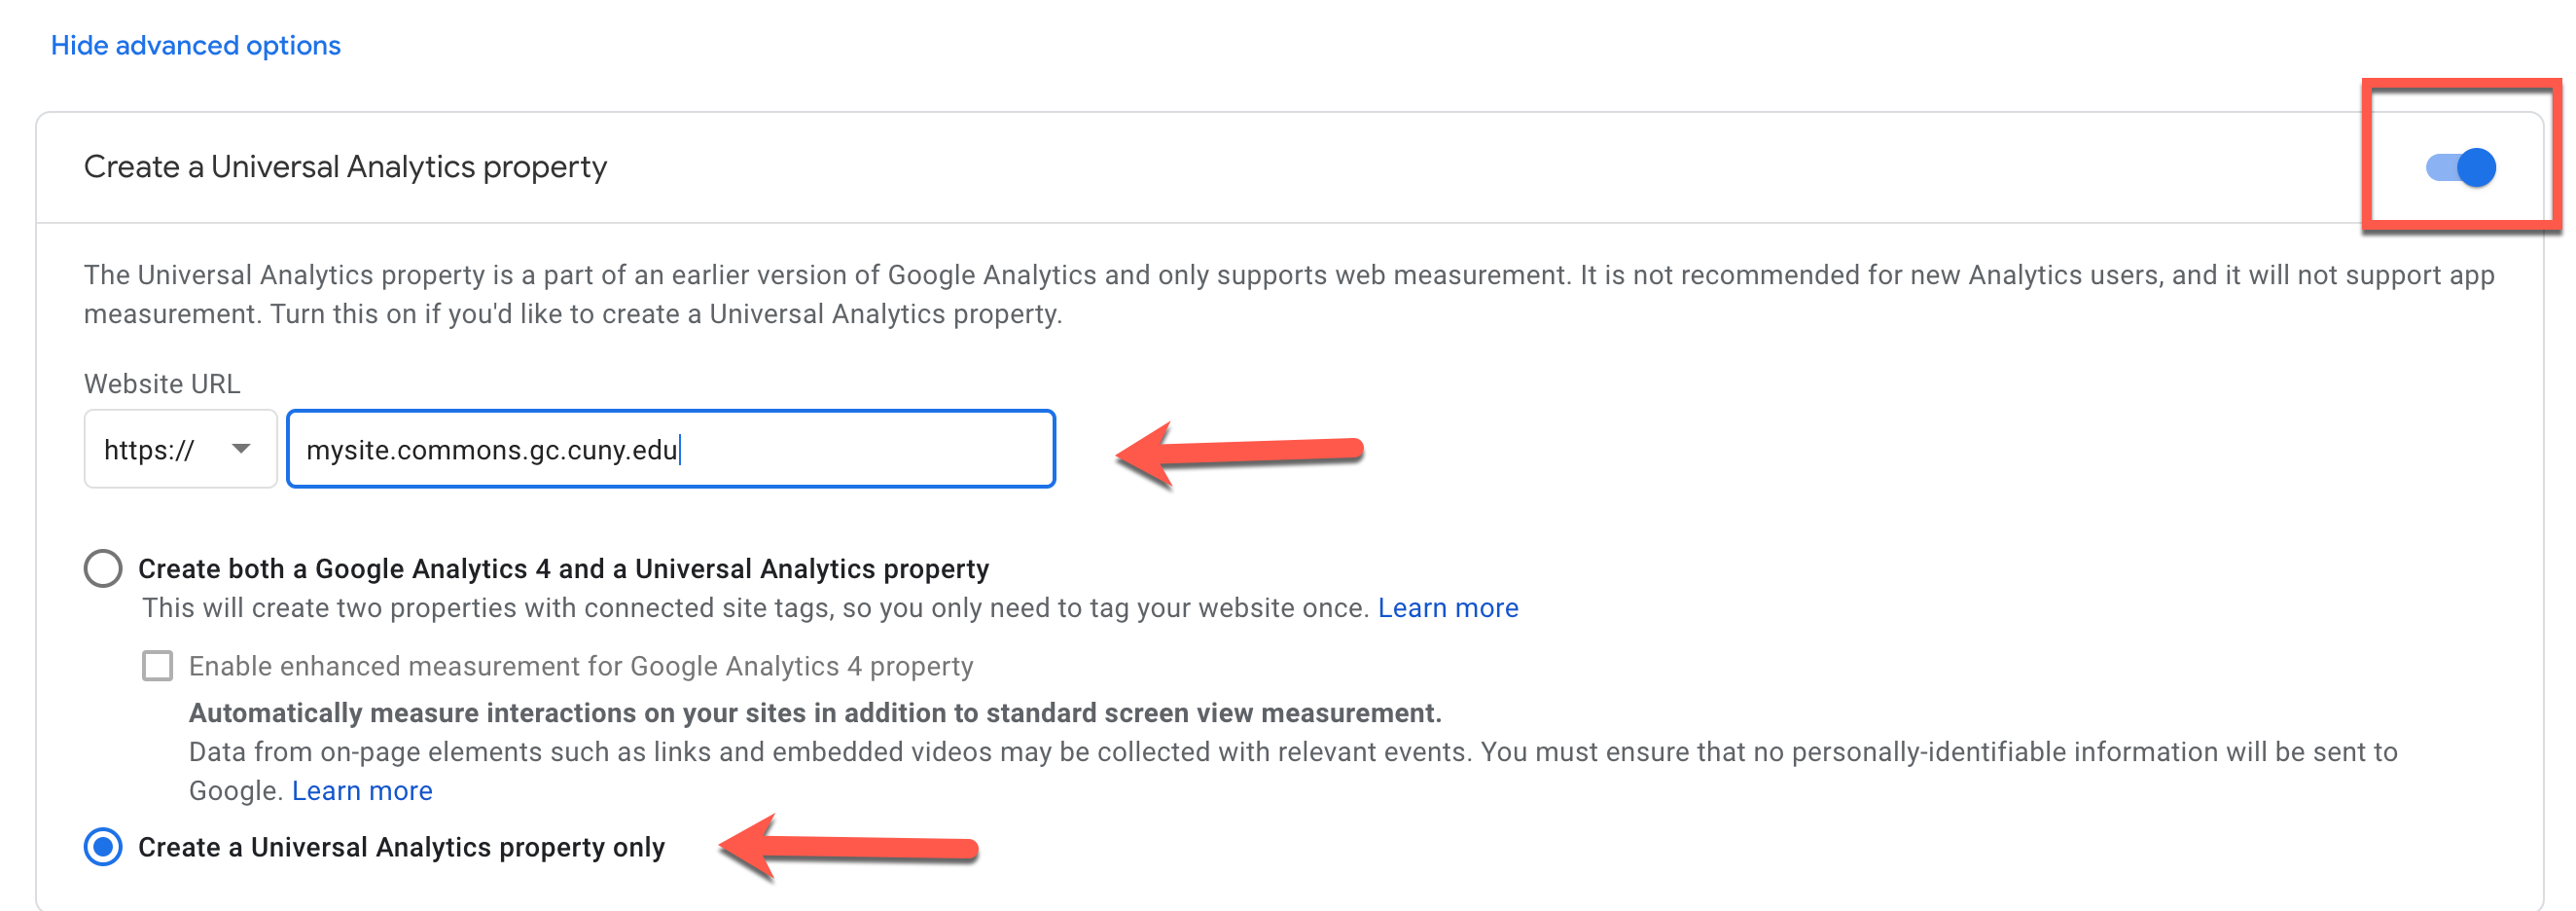
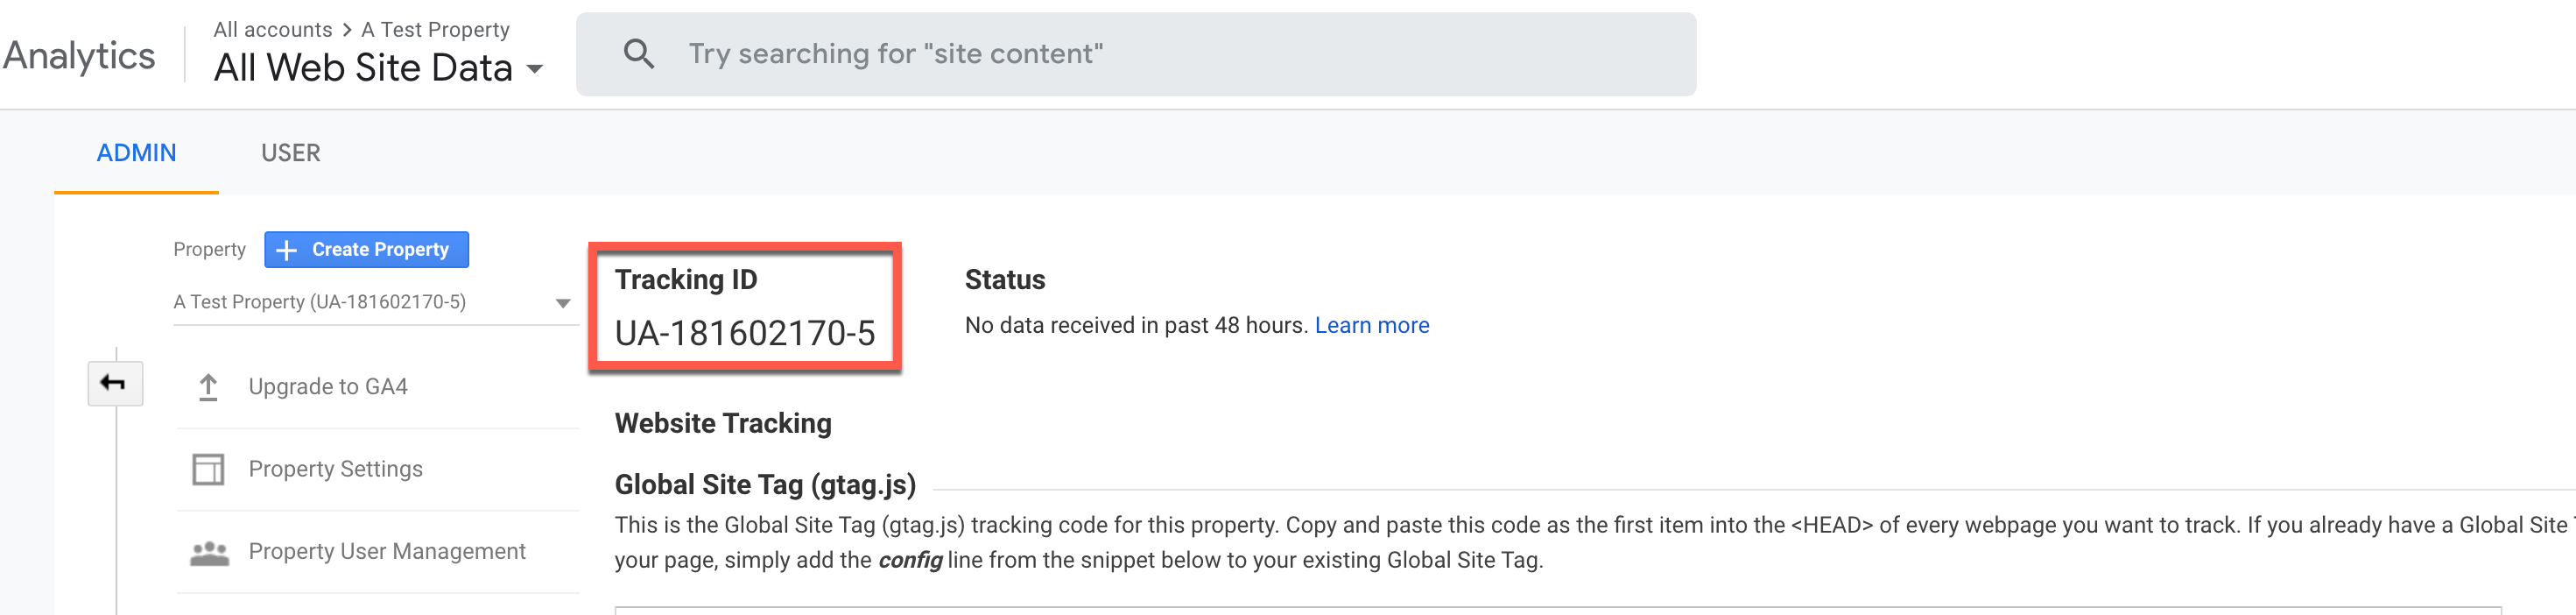
You will then see your Tracking ID. You will not need to (or be able) to create a data stream. Go to your WordPress dashboard, to Settings>>General, and paste in the Tracking ID into the Google Analytics ID field. Then proceed to Monster Insights set up wizard.


Here is some more information about the plugin: