
A Connected Group + Site
The Commons makes it possible to create or clone a connected group and site in one process. This process is broken down in two steps: first a group is created or cloned and then a site is created or cloned, or if it already exists, attached. To find out more about Connected Group and Sites, click here.
Accessing The Creation Portal
To create or clone a site, you need to go to the Commons Creation Portal page. To get there go to the Commons home page (you need to be logged on) and click on the “Create a new group or site”.
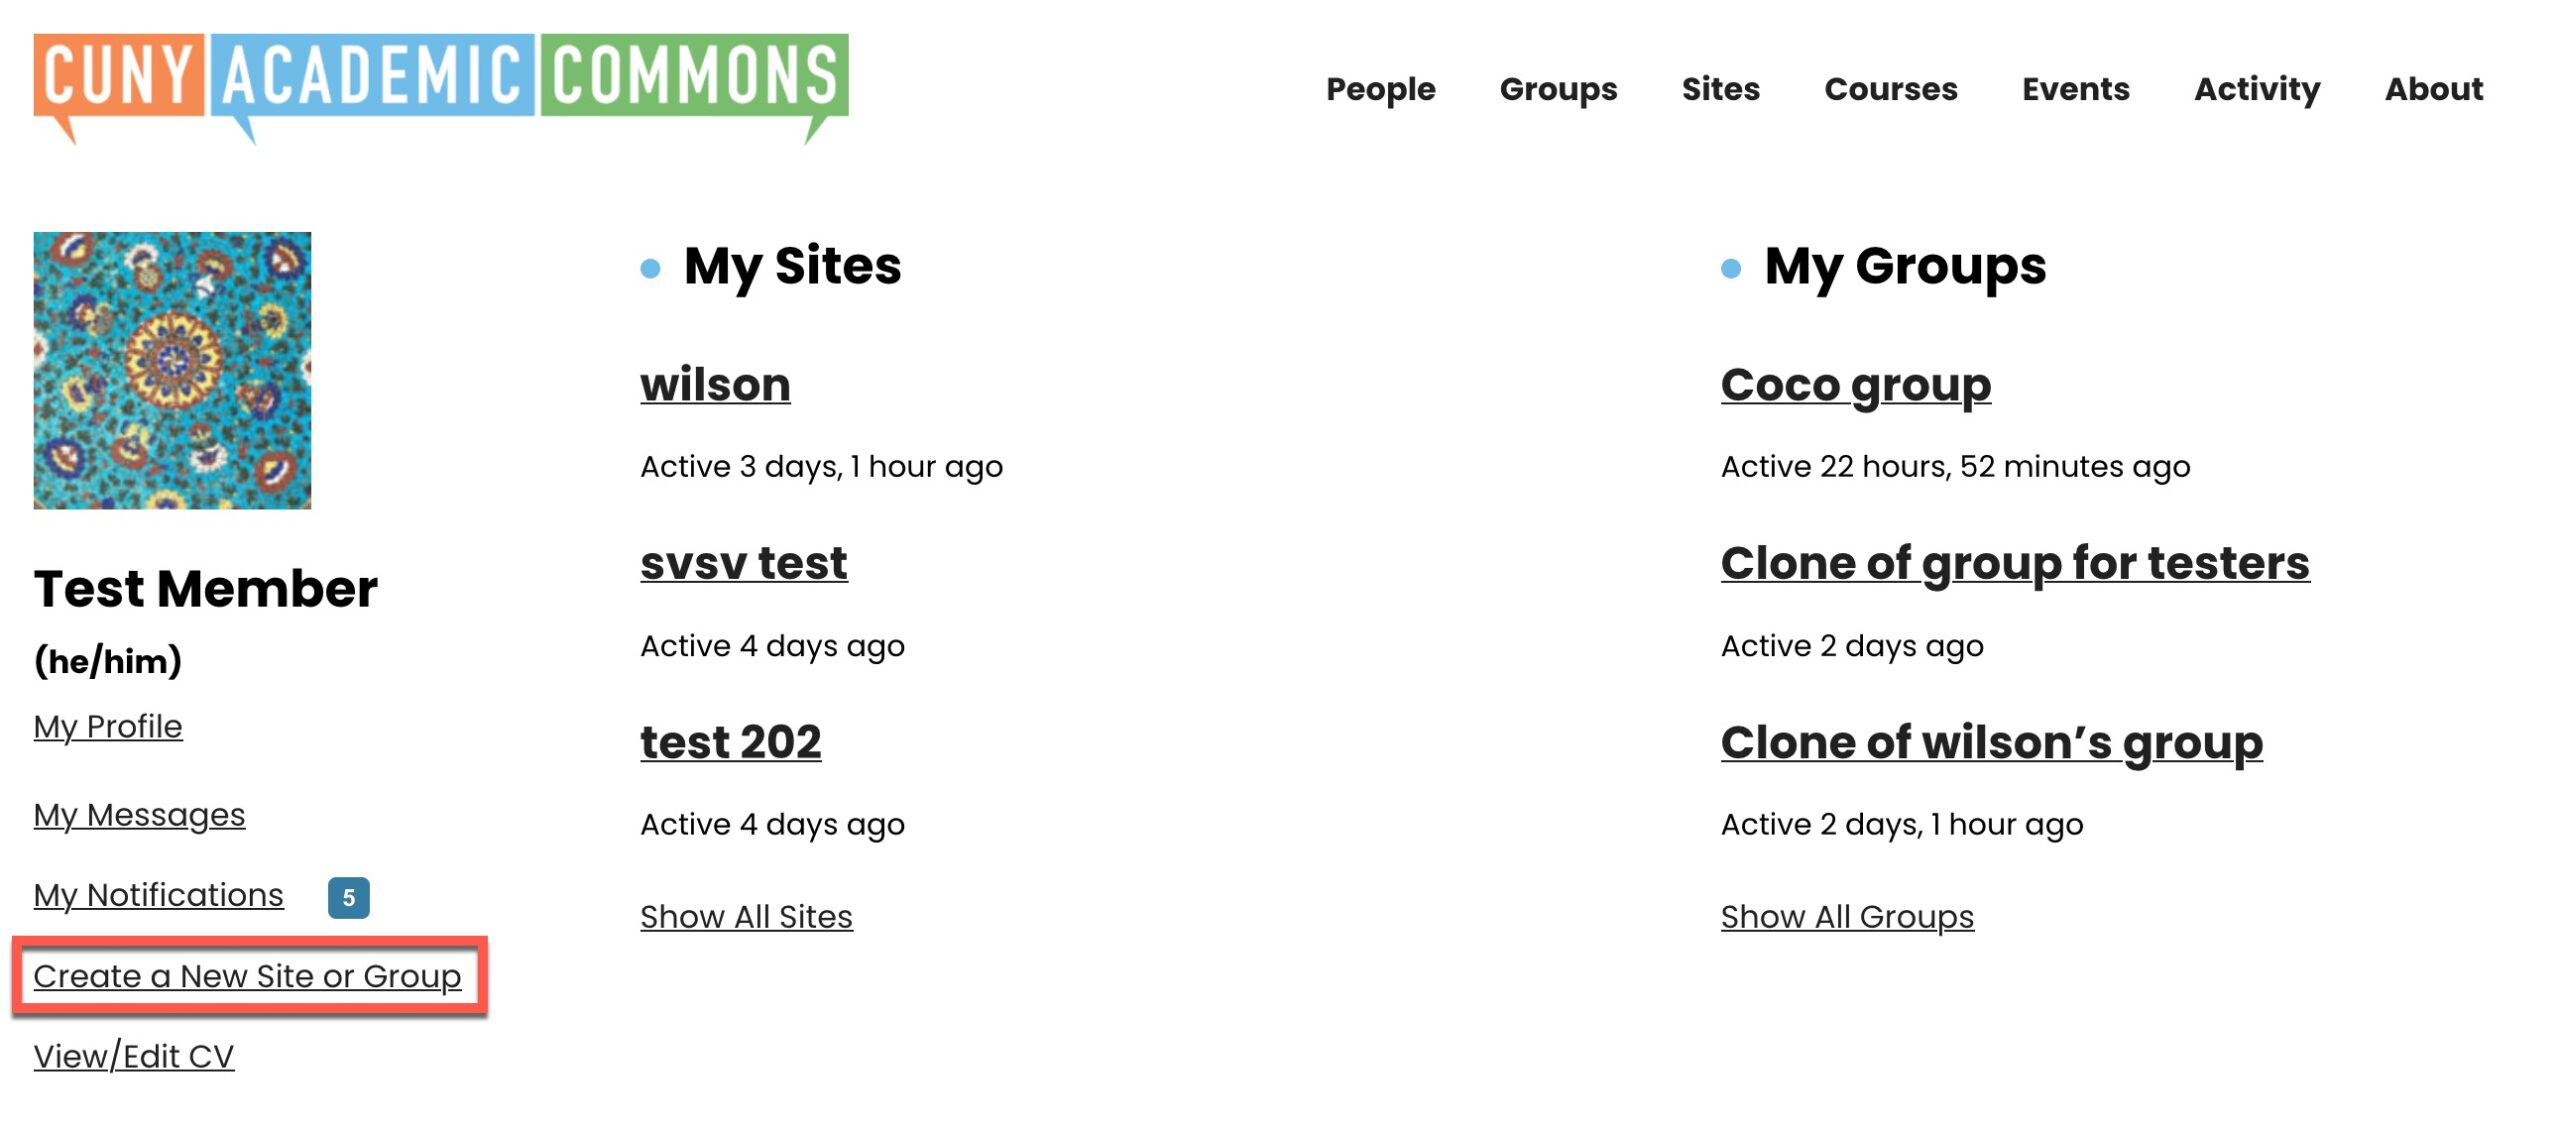
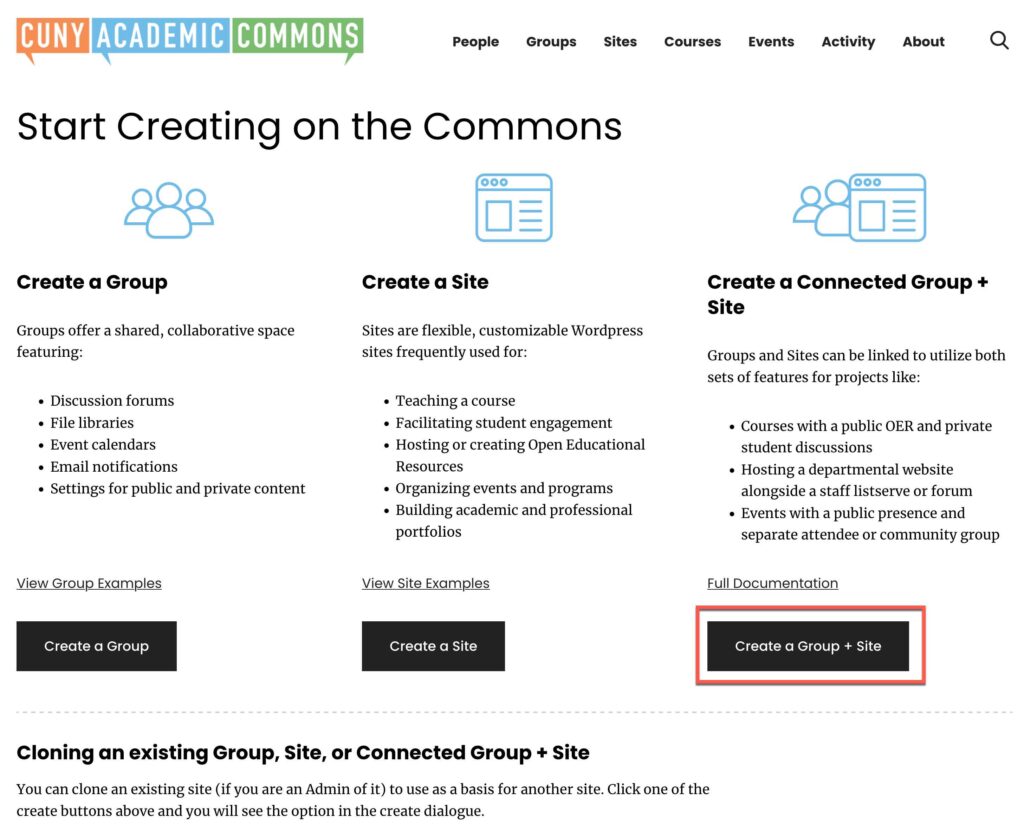
All requests to create groups, sites and connected Group and Site are funneled through the Commons Content Creation Portal. Here you can easily see what each one does and select the option that is most appropriate. In this case, we want to create a Connected Group + Site, so click on the button circled below:
Creation Portal
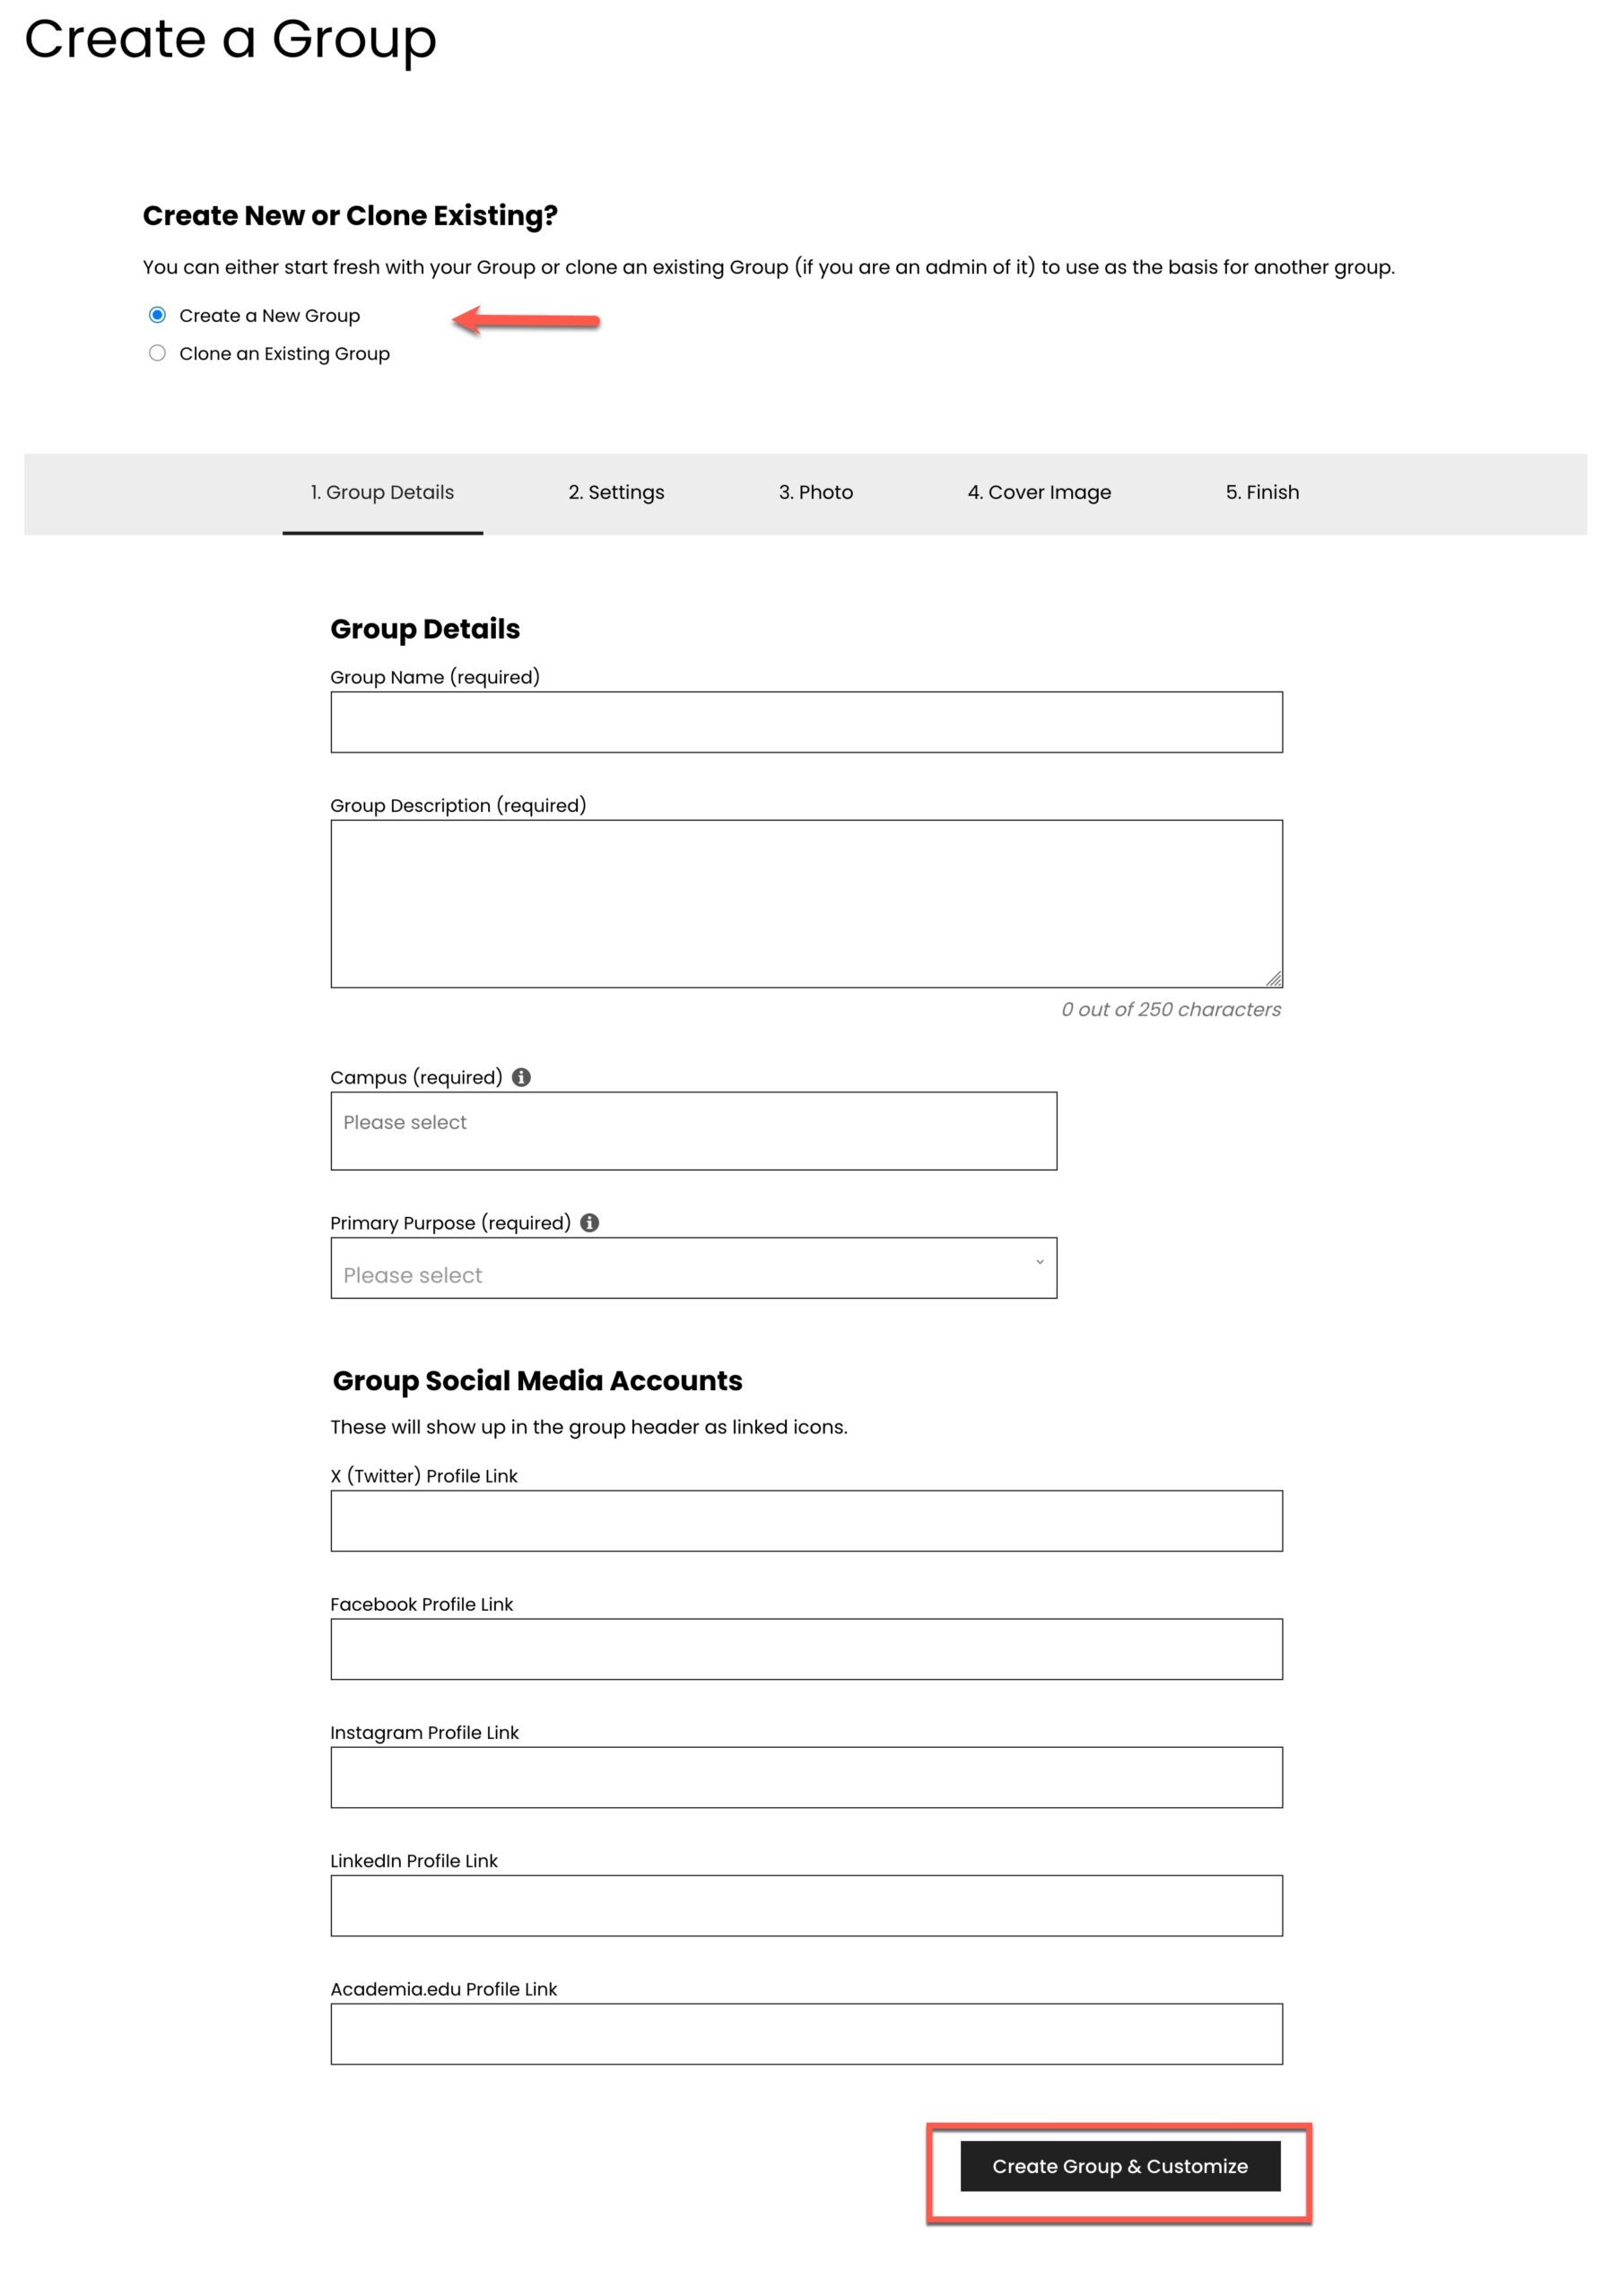
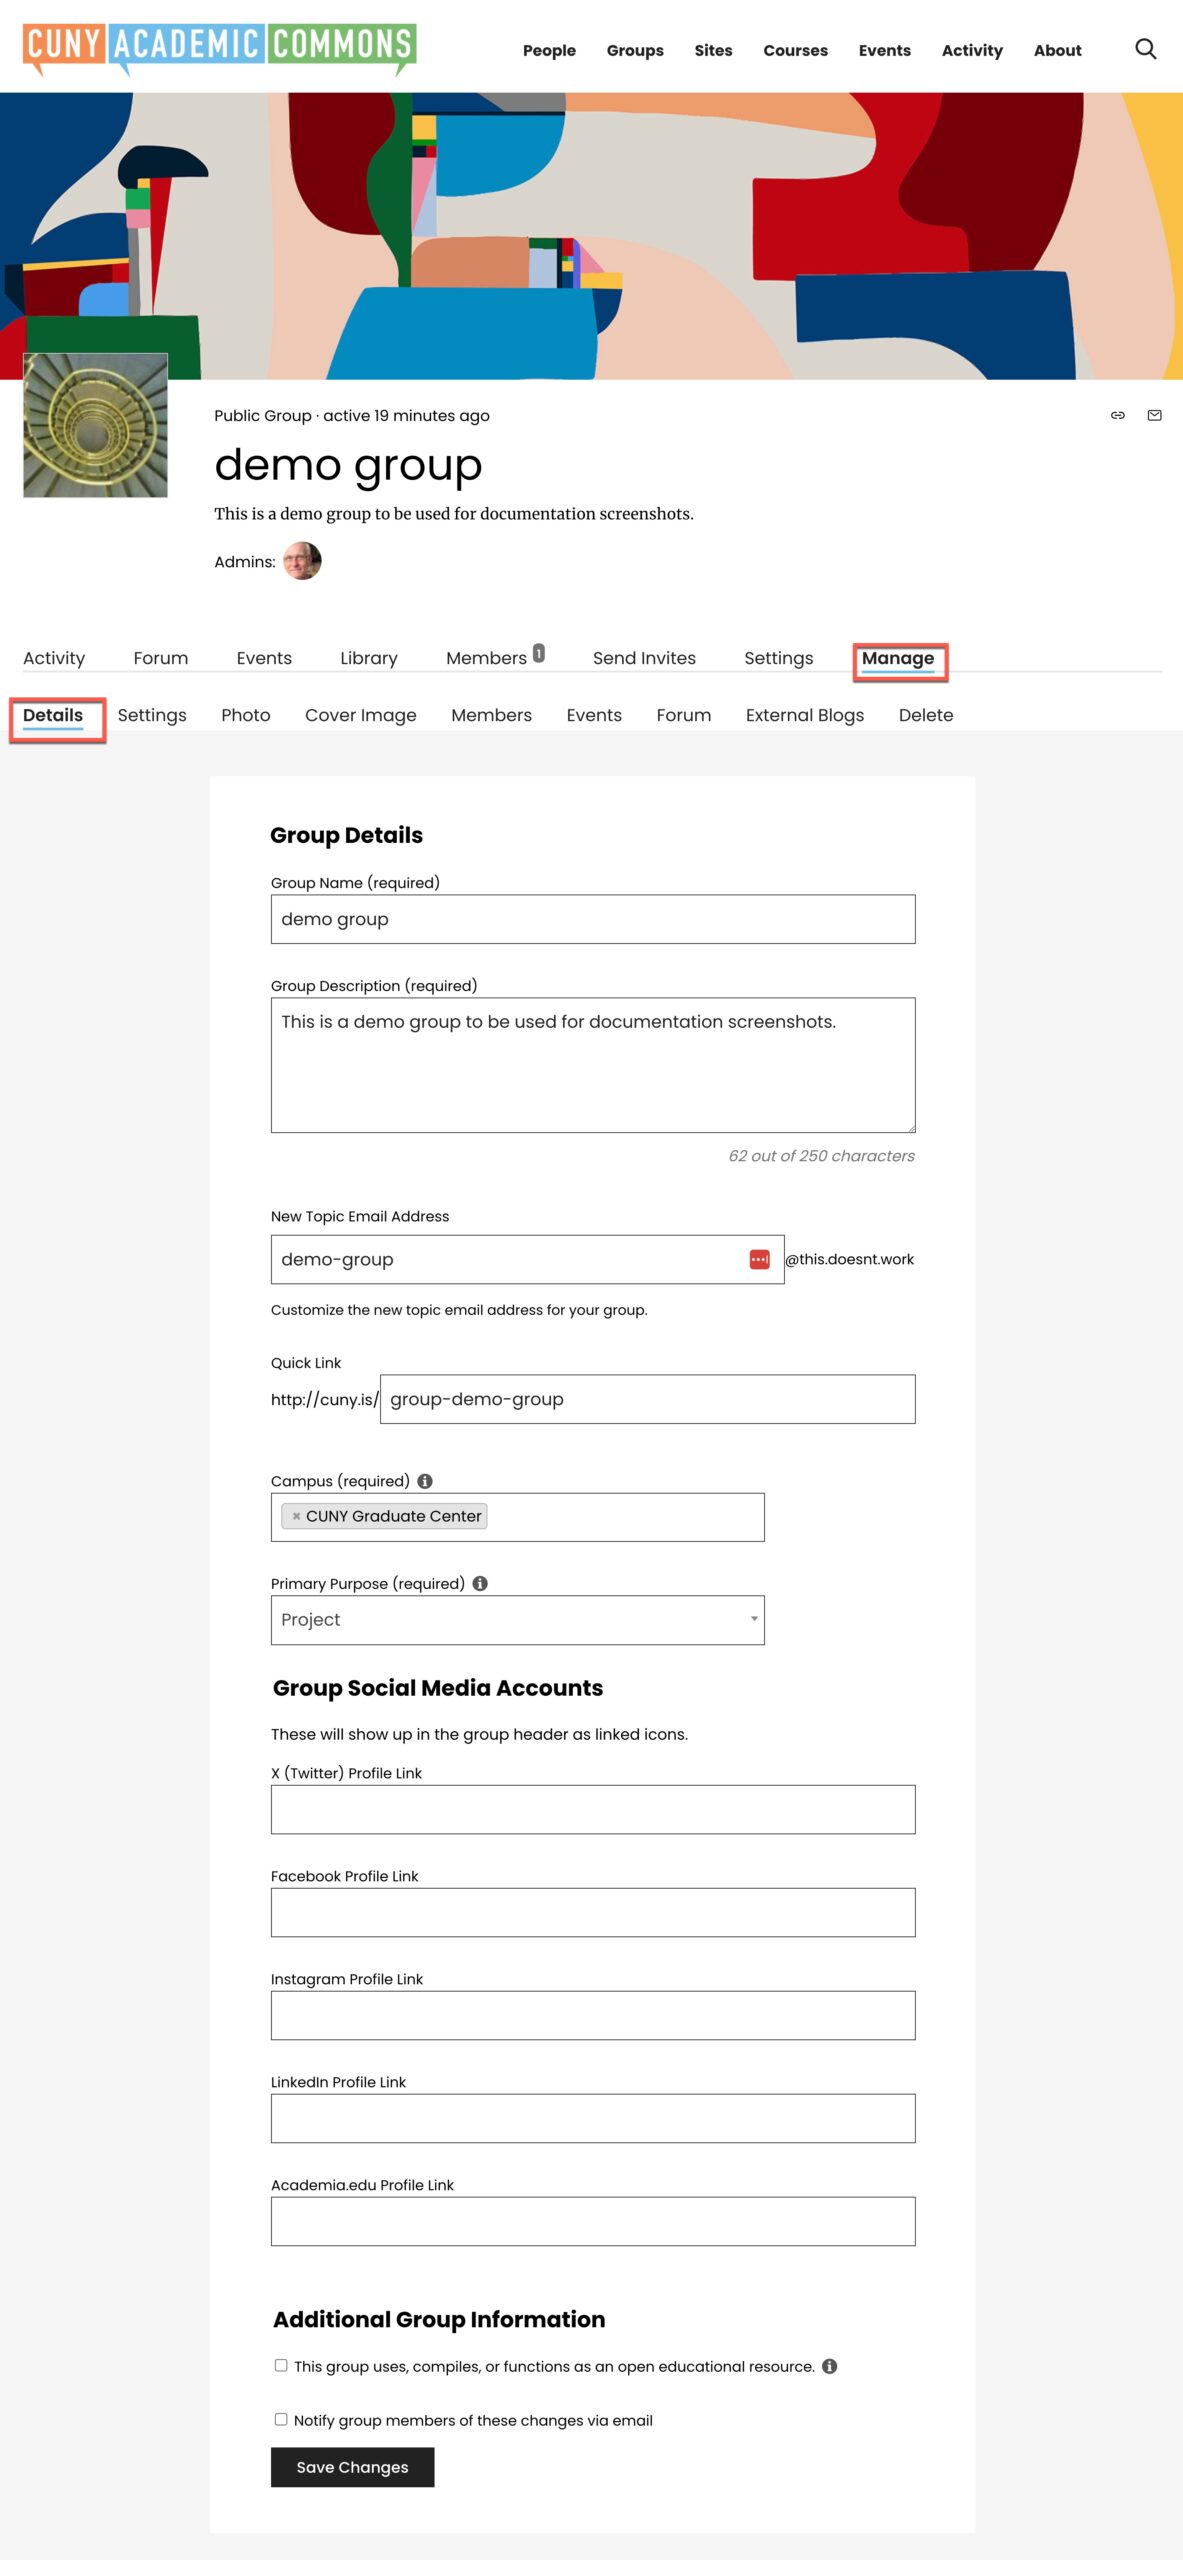
The Details Tab
Group Name: This is the name of the group. This can always be changed, but please note that if the URL of your group will not change. The group URL will be formatted using the group name as you first entered it – https://commons.gc.cuny.edu/groups/{original-group-name}
Group Description: The description will appear on the group front page. It can always be changed. It should be a succinct statement of purpose. If your group is public, it will be what users read and decide if they want to become a member.
Metadata: In order to better understand the purpose of the group, the Commons collects some basic data about it.
- Is it for a certain campus or campuses?
- What is the primary purpose? Choices are: Teaching, Committee, Conference, Department/Program/Center, Personal, Publication, Project, Portfolio, Working Group, Community of Interest, or Other
- Is it for teaching? If so, the Commons will add it to the “Courses” tab. We’d like to know:
- What Disciplinary Cluster does in fall under? Choices are: Arts and Humanities, Social Sciences, STEM, Professional, Other, Not Applicable
- What Semester? (spring, fall, winter, summer)
- What Year?
Click on the Clone Group button and you will be taken to the Setting tab.
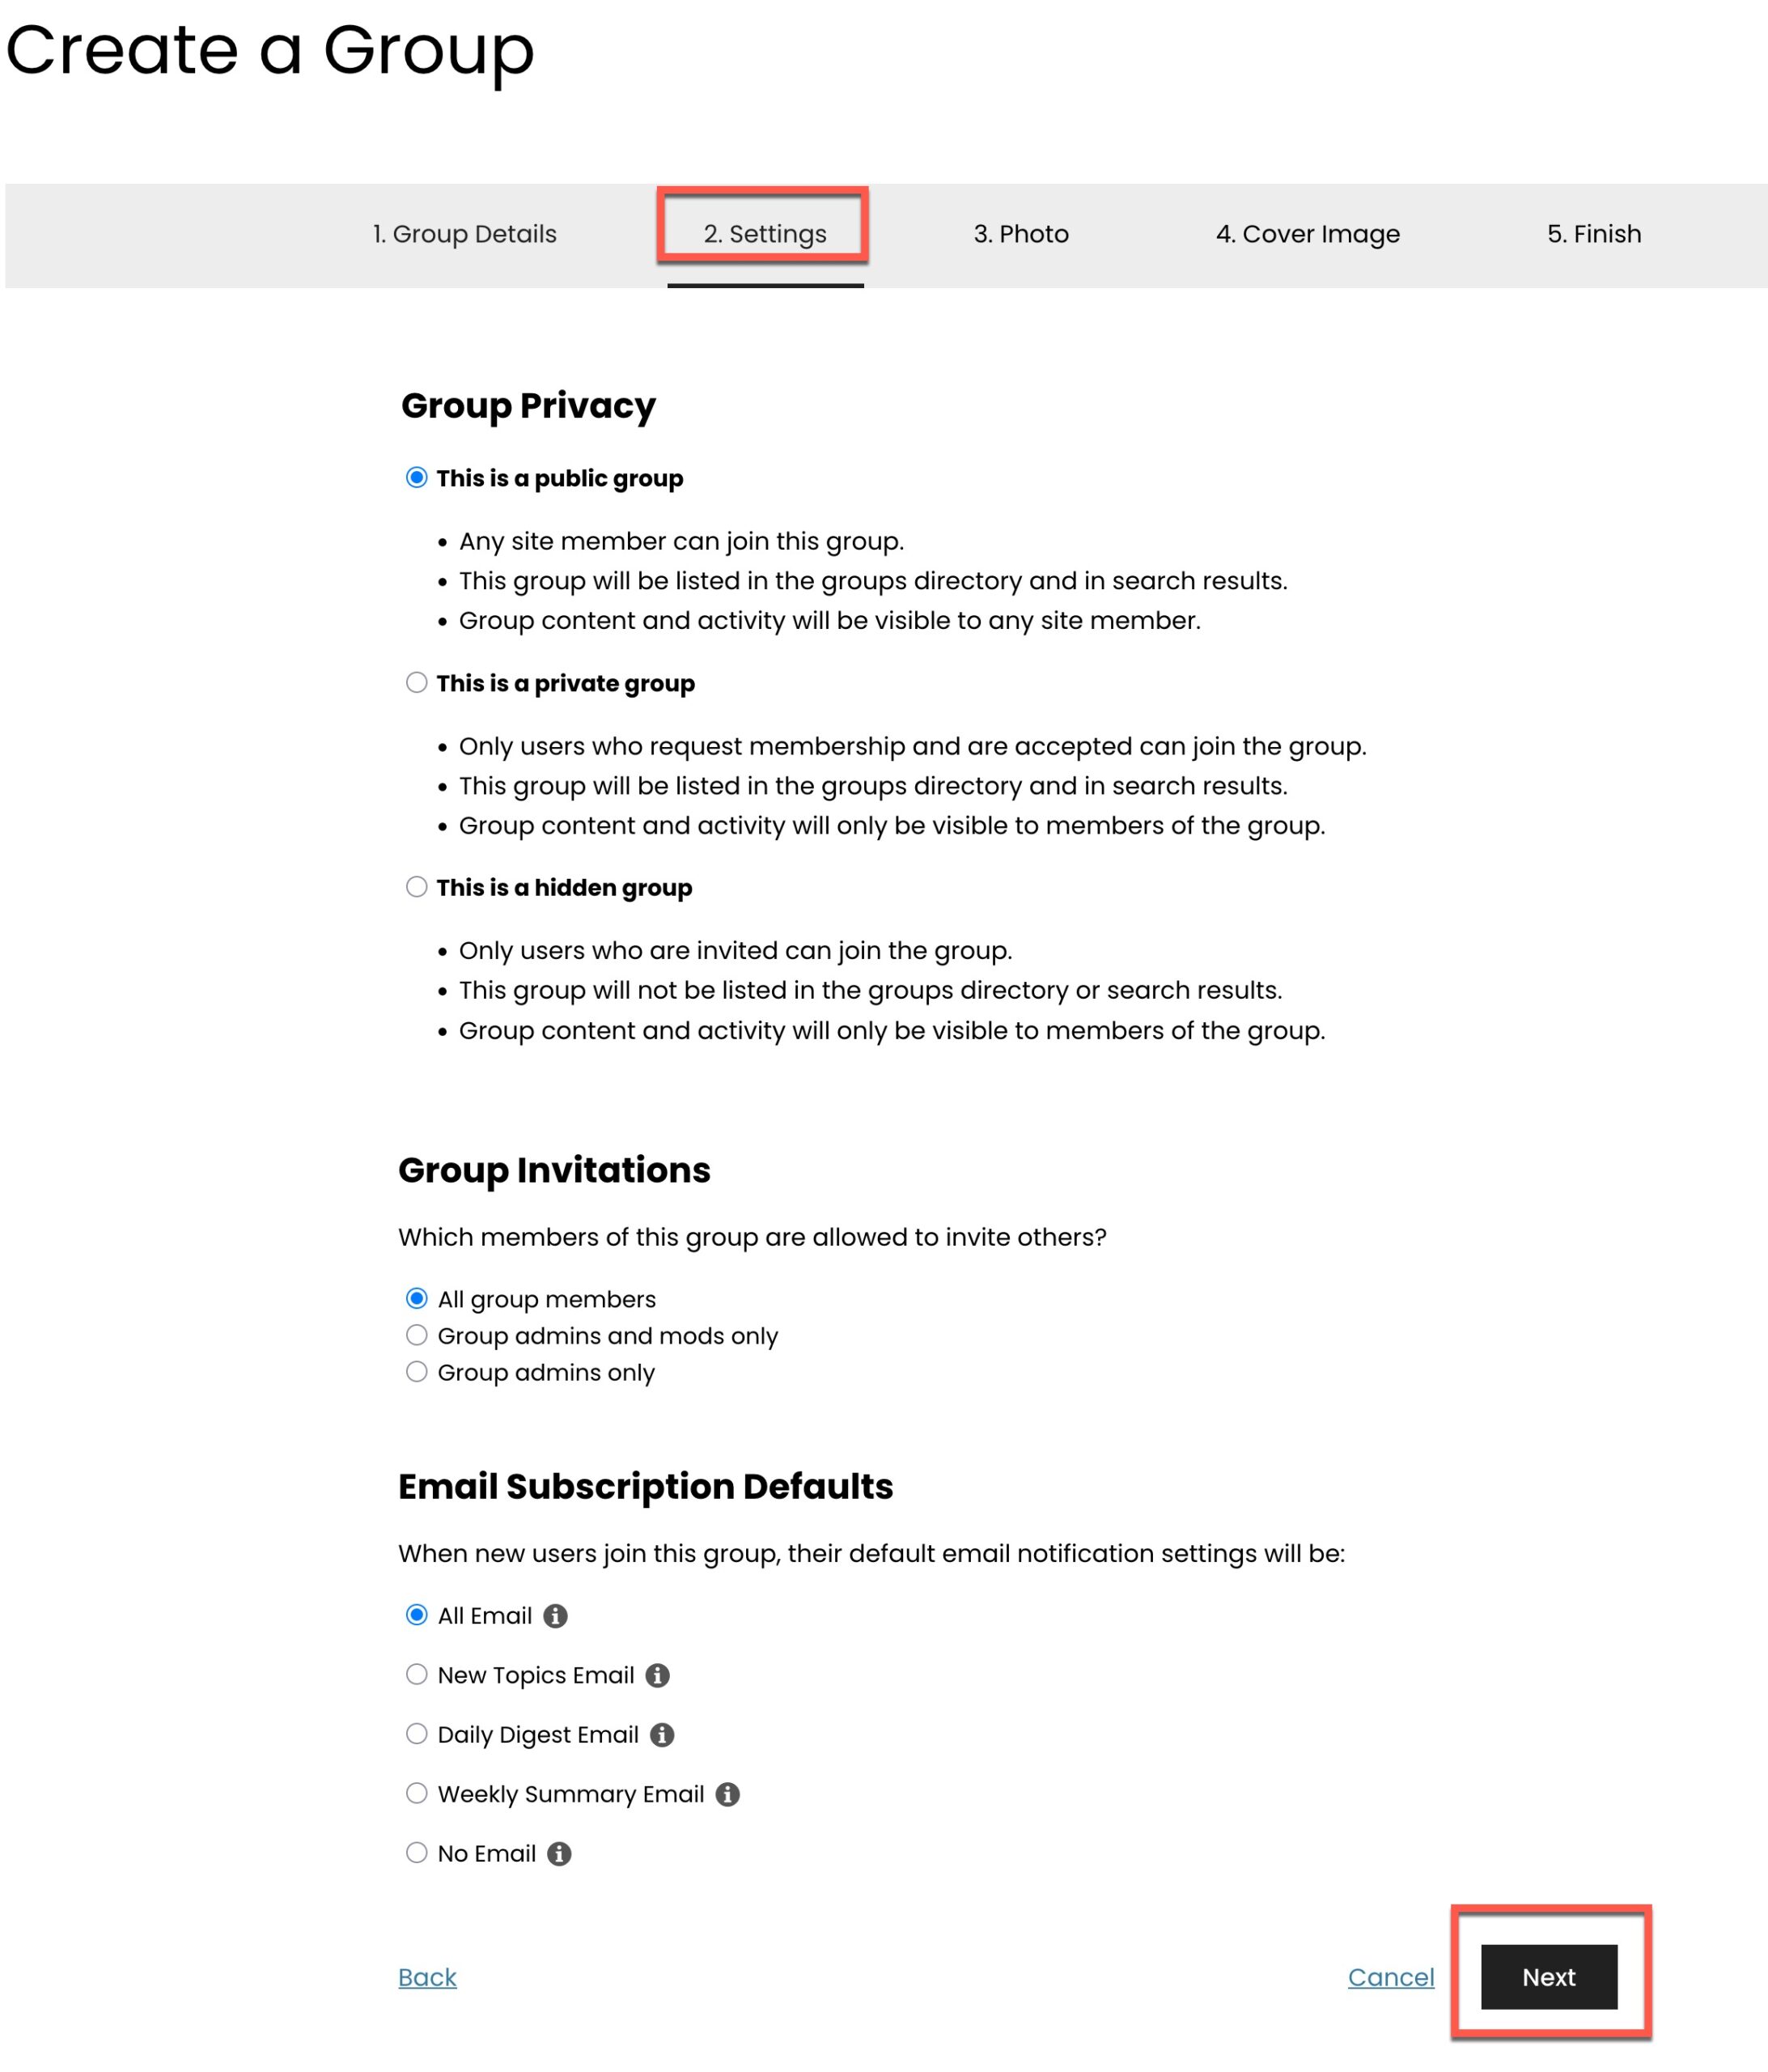
Settings Tab
Group Privacy: You need to decide if your group should be public, private, or hidden. Click here to understand the implications.
Group Invitations: You need to decide who can invite members.
Email Subscription Defaults: When members join the group, what email notification setting should be the default? (This setting can be changed by the new member. See more about this here: Understanding Email Notifications)
Click on the Next Step button circled above to go to the Photo tab
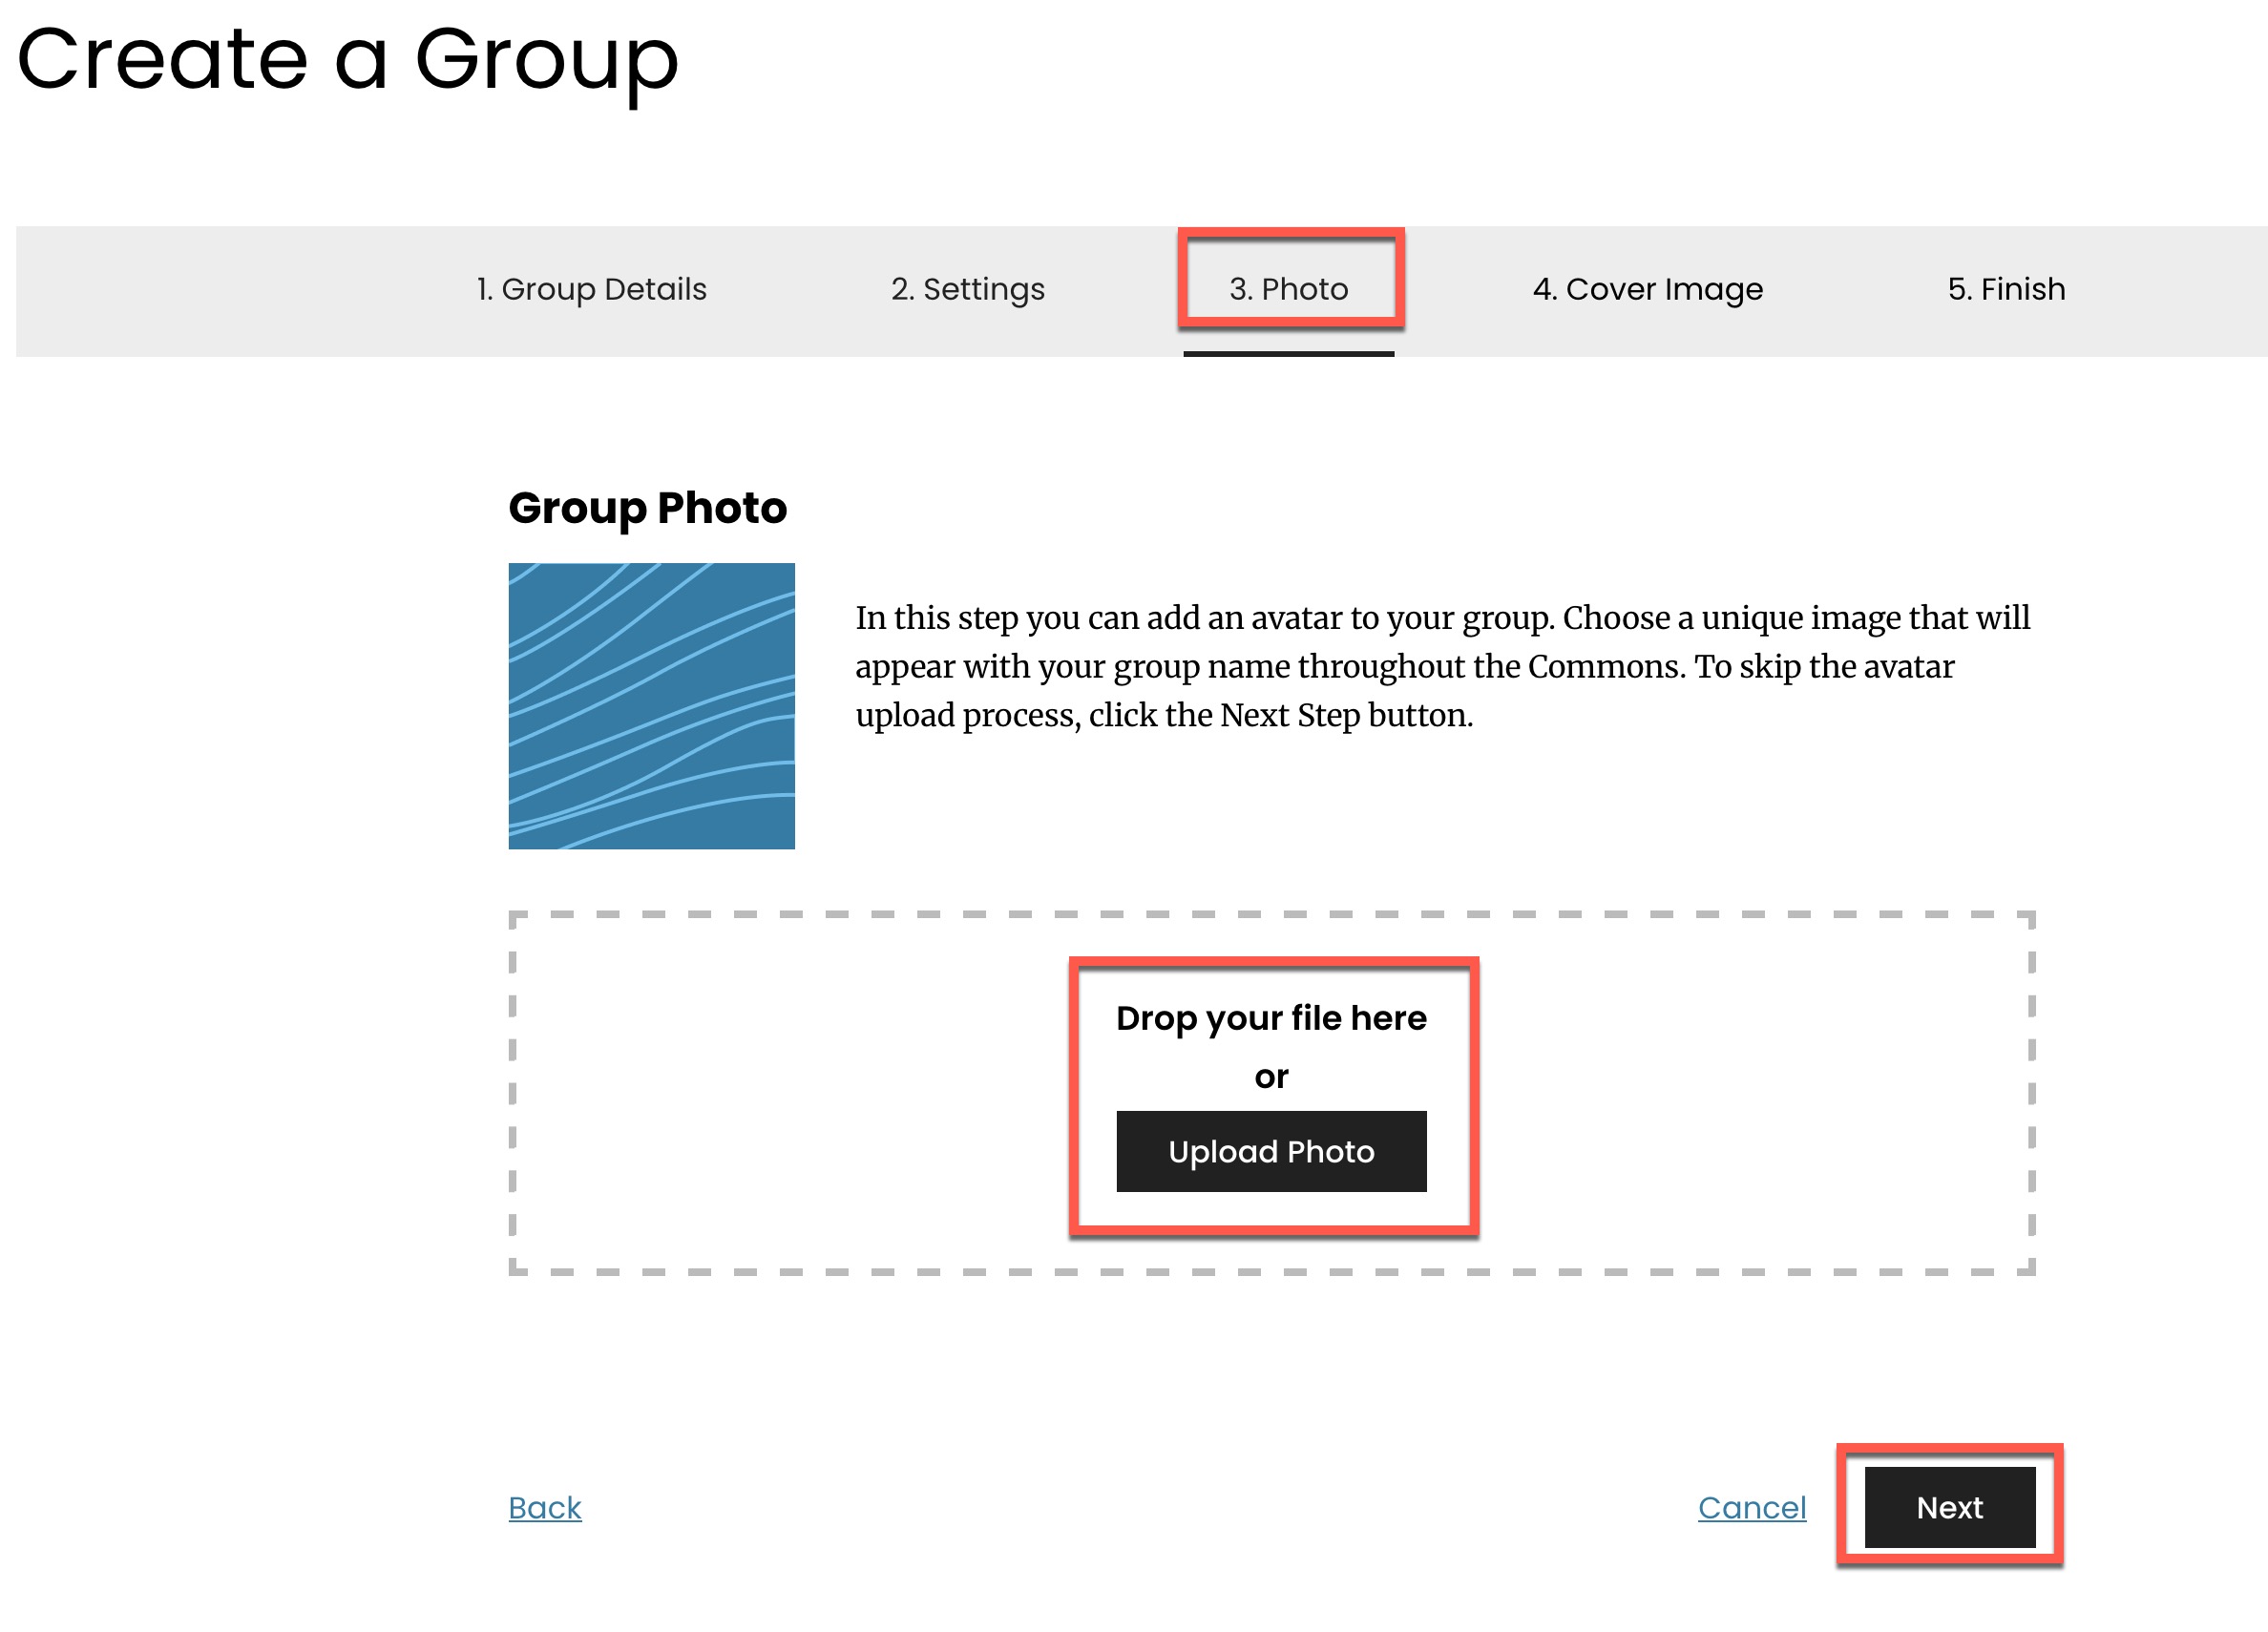
Photo Tab
On this tab you can add an optional cover image which will appear on the group’s home page. You may use an image of your own, a creative Commons licensed image or you can select an image from the Commons collection of Art Banners.
Click on the Next button, circled above, and you should see the Congratulations screen, with links to invite others to join, or to just go to the newly created group:
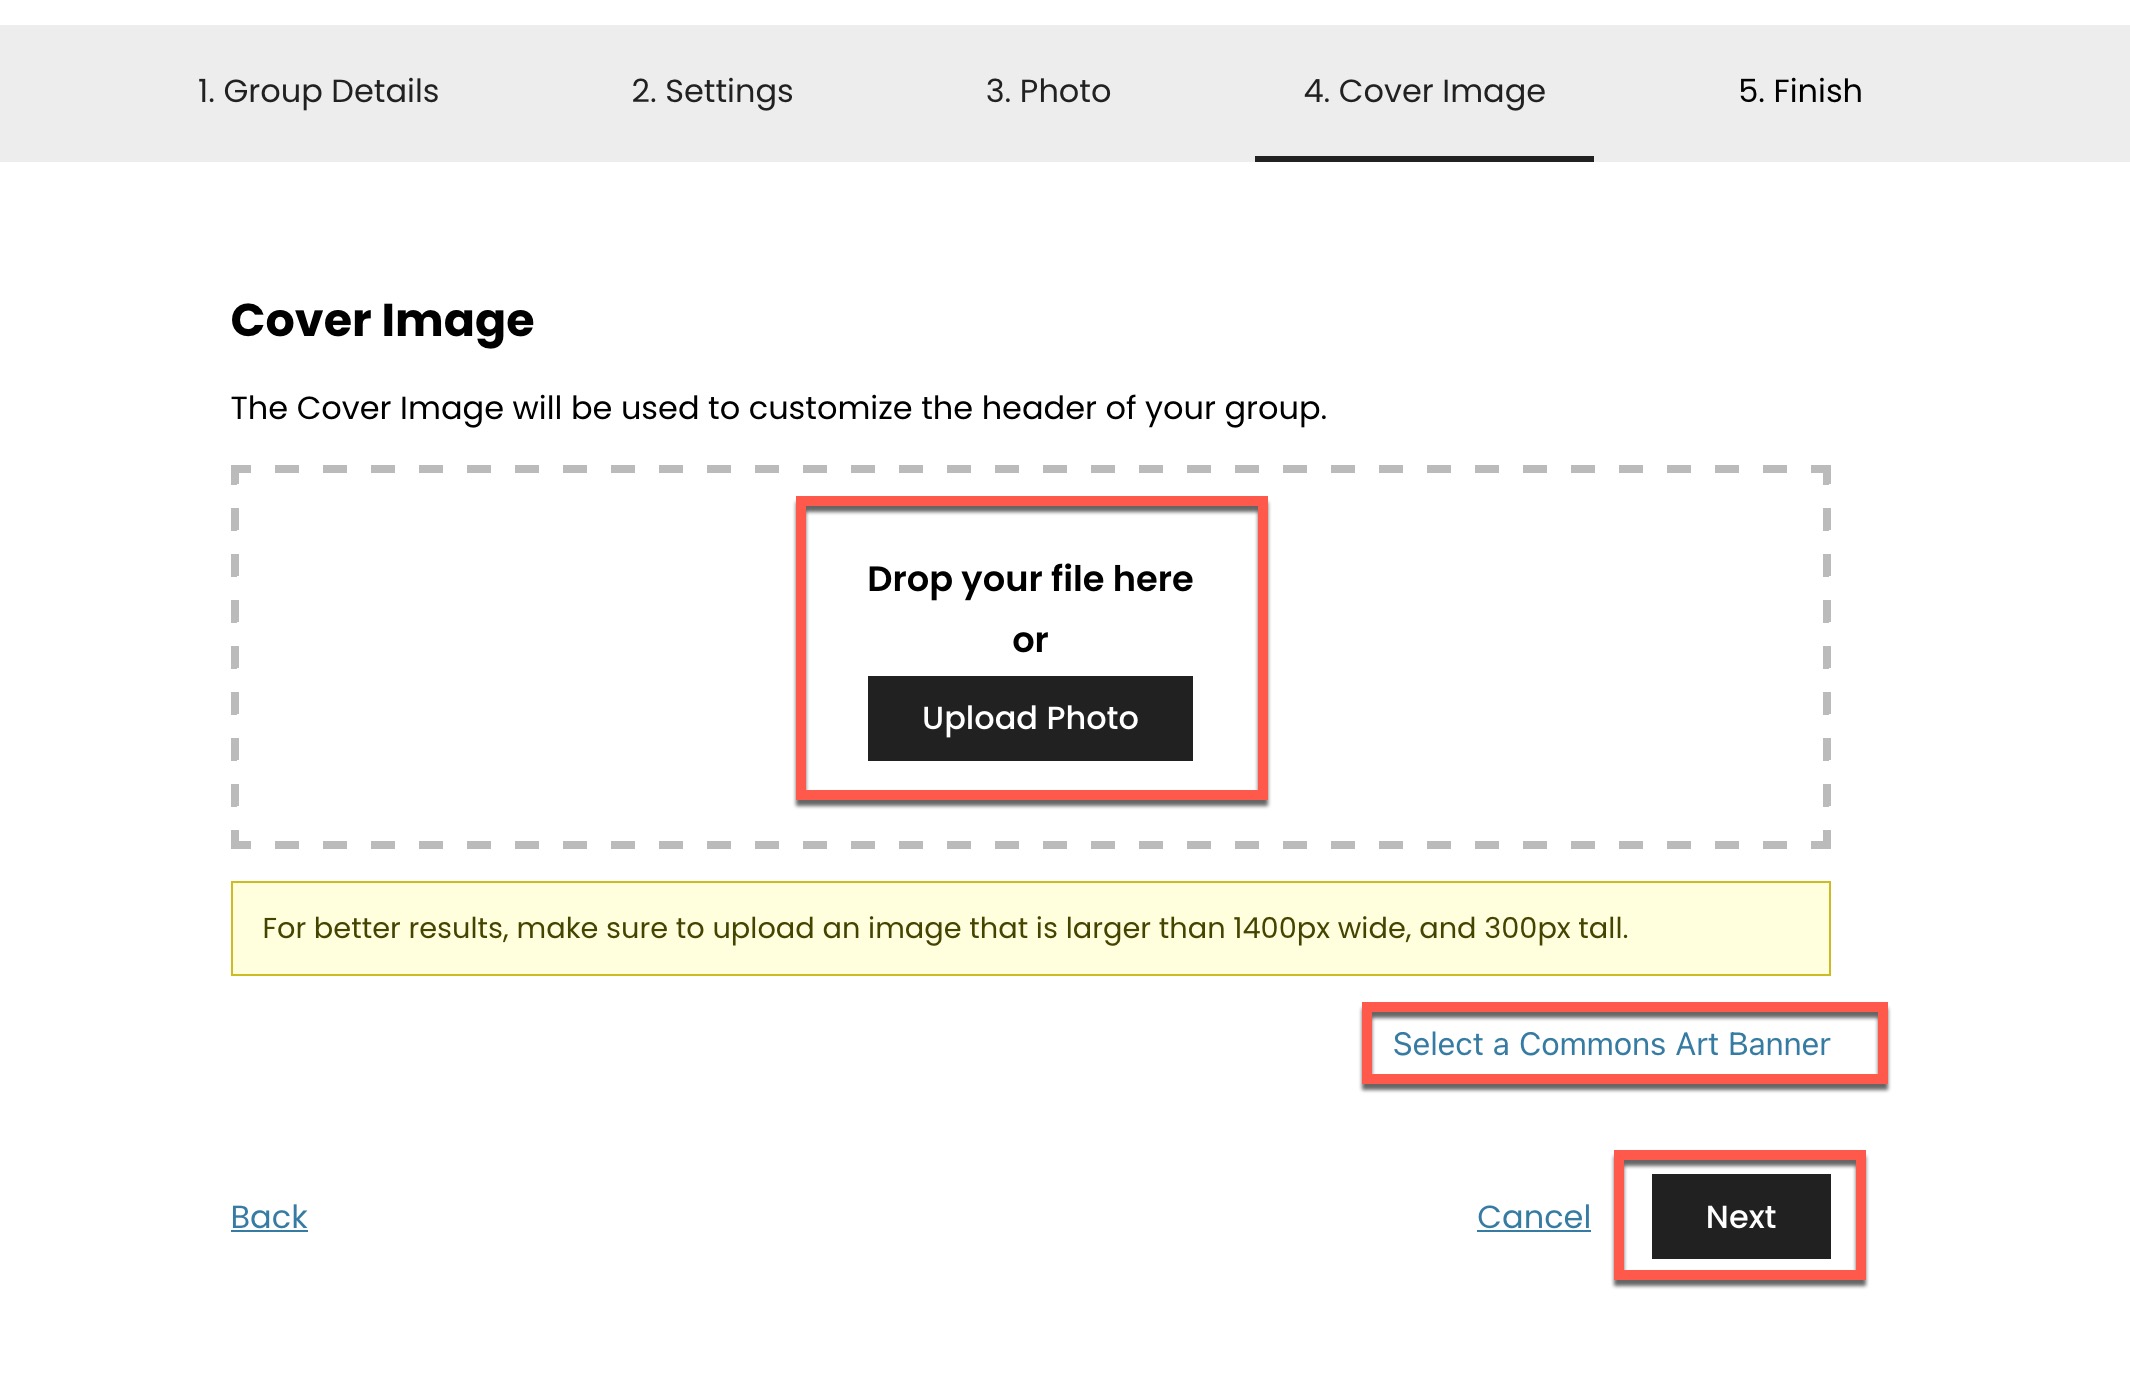
Cover Image Tab
On this tab you can add a photo that will be displayed on the front page of your group. You will have an opportunity to crop the image to better fit the space.
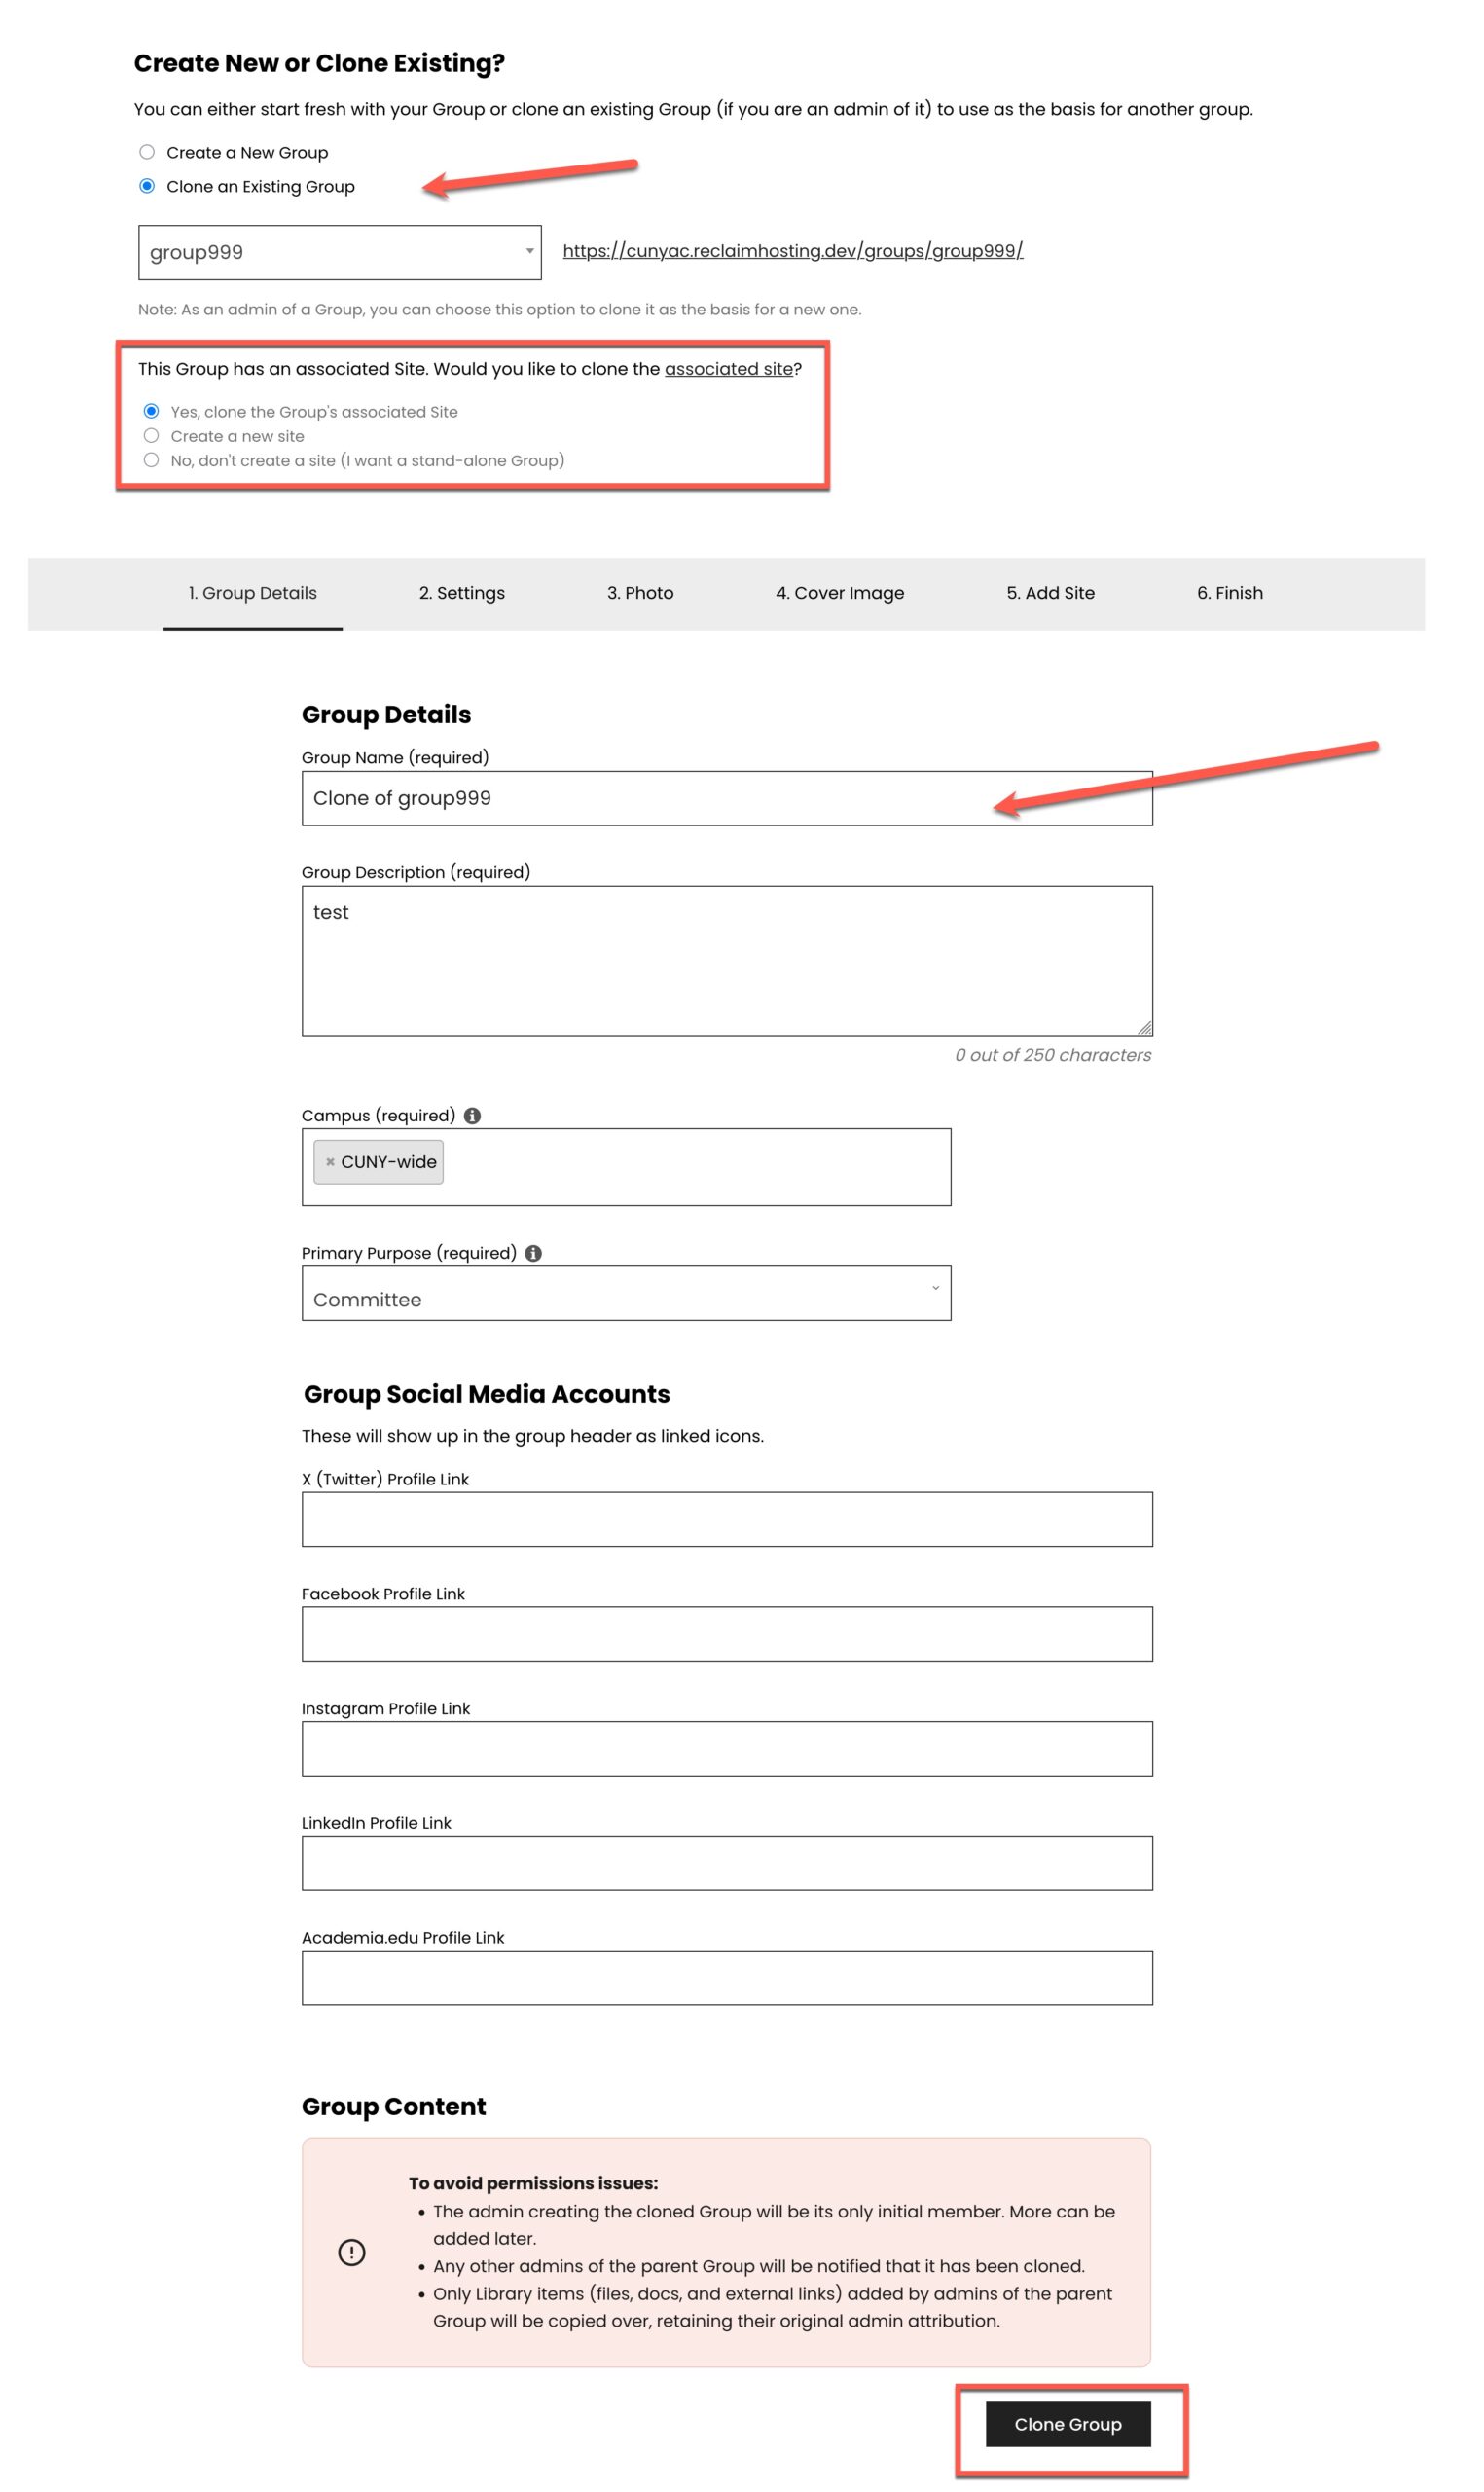
The Group Details Tab
Group Name: This is the name of the group. This can always be changed, but please note that if the URL of your group will not change. The group URL will be formatted using the group name as you first entered it – https://commons.gc.cuny.edu/groups/{original-group-name}
Group Description: The description will appear on the group front page. It can always be changed. It should be a succinct statement of purpose. If your group is public, it will be what users read and decide if they want to become a member.
Metadata: In order to better understand the purpose of the group, the Commons collects some basic data about it.
- Is it for a certain campus or campuses?
- What is the primary purpose? Choices are: Teaching, Committee, Conference, Department/Program/Center, Personal, Publication, Project, Portfolio, Working Group, Community of Interest, or Other
- Is it for teaching? If so, the Commons will add it to the “Courses” tab. We’d like to know:
- What Disciplinary Cluster does in fall under? Choices are: Arts and Humanities, Social Sciences, STEM, Professional, Other, Not Applicable
- What Semester? (spring, fall, winter, summer)
- What Year?
Click on the Clone Group button. Most settings from the cloned group will be applied to your new group.
A cloned group will inherit the settings, photo, cover image of the original group. These can be changed by going to the group Manage tab.
Step Two – Create or Clone the Connected Site
Now that the group is created, we go on to:
- Create a New Site -OR-
- Connect An Existing Site -OR-
- Clone an Existing Site
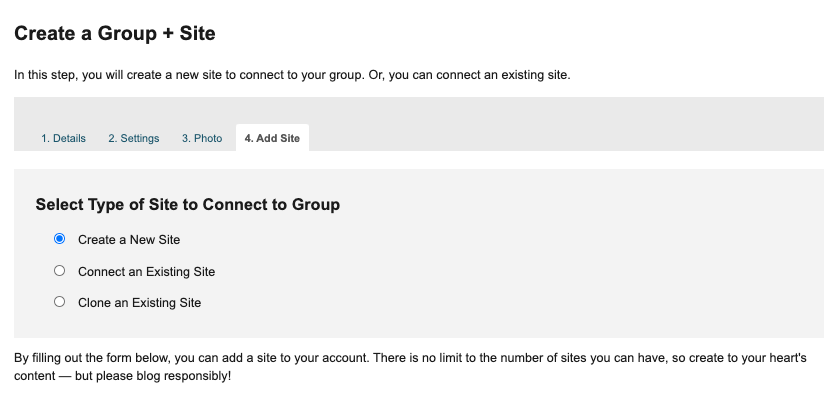
Depending on your choice, the pathways diverge.

Create a Group + Site
Site Domain: This is the web address of your site. Once your site is created, you cannot change it. It cannot contain spaces or special characters and must be in lower case. Sites on the Commons are subdomains and will have “.commons.gc.cuny.edu/” appended to them. If your domain name is already in use, you will receive a message to choose a different domain name. If you own or intend to buy a domain name, the Commons can map your site to that domain name.
Site Title: This can be anything you like and can be changed anytime using your WordPress Dashboard.
Metadata: In order to better understand the purpose of the site, the Commons collects basic data about it. By default, these field are populated with the value of your group’s metadata, but you can change them if you wish.
- Is it for a certain campus or campuses?
- What is the primary purpose? Choices are: Teaching, Committee, Conference, Department/Program/Center, Personal, Publication, Project, Portfolio, Working Group, Community of Interest, or Other
- Is it for teaching? If so, the Commons will add it to the “Courses” tab. We’d like to know:
- What Disciplinary Cluster does in fall under? Choices are: Arts and Humanities, Social Sciences, STEM, Professional, Other, Not Applicable
- What Semester? (spring, fall, winter, summer)
- What Year?
Site License: All content should be licensed appropriately so that it can shared by others under conditions determined by the content creator. The Commons uses CreativeCommons licenses. The Creative Commons provides a variety of different licenses that affect whether others can use the content, modify the content(with or without attribution) or use the content for commercial purposes. The site creation process contains a wizard to help you select the correct license for your site. The default license allows content consumers to share or redistribute your content with or without modifications as long as they attribute the content to you and that it is shared for non-commercial purposes.
Site Privacy Options: Site privacy settings determine how visible/searchable your site will be. You can make it visible to the entire Web or confine access to a single individual as well as other options between these two extremes. Commonly, sites under construction are made visible only to admins, and then later opened up using different options.
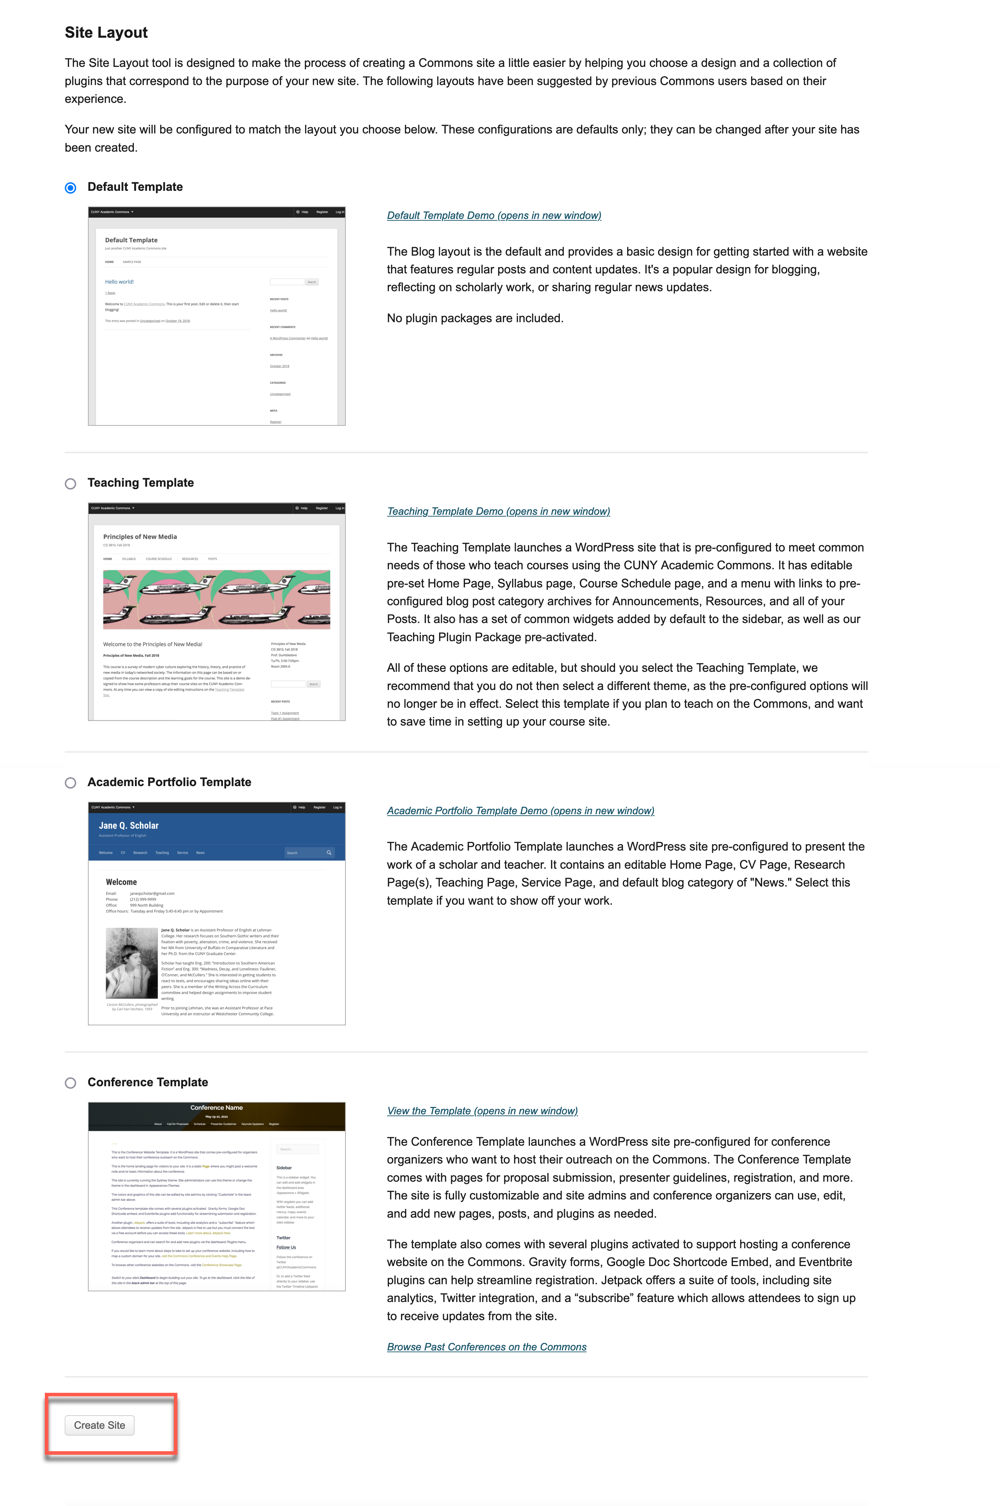
The Commons offers Site Templates that are designed to get you up and running fast. These layouts are tailored for different purposes. If you don’t see a template that matches what you want to do, use the default template. It is a plain vanilla layout with no presets. In all cases, you are welcome to change to any themes installed on the Commons.
At this point, you can also determine whether group members should be able to post to the group site, and what their role level should be.
Once you press “Create Site” you will see a spinner and progress texts to show how the site creation process is going.

Group + Site User Roles
Also, do you want members of your group be able to post to the group site?
Click on the Finish Button and if you have filled out all the required fields, you will receive a success message, with a link to your new site and group, as well as a button to start inviting others to join your group and connected site.
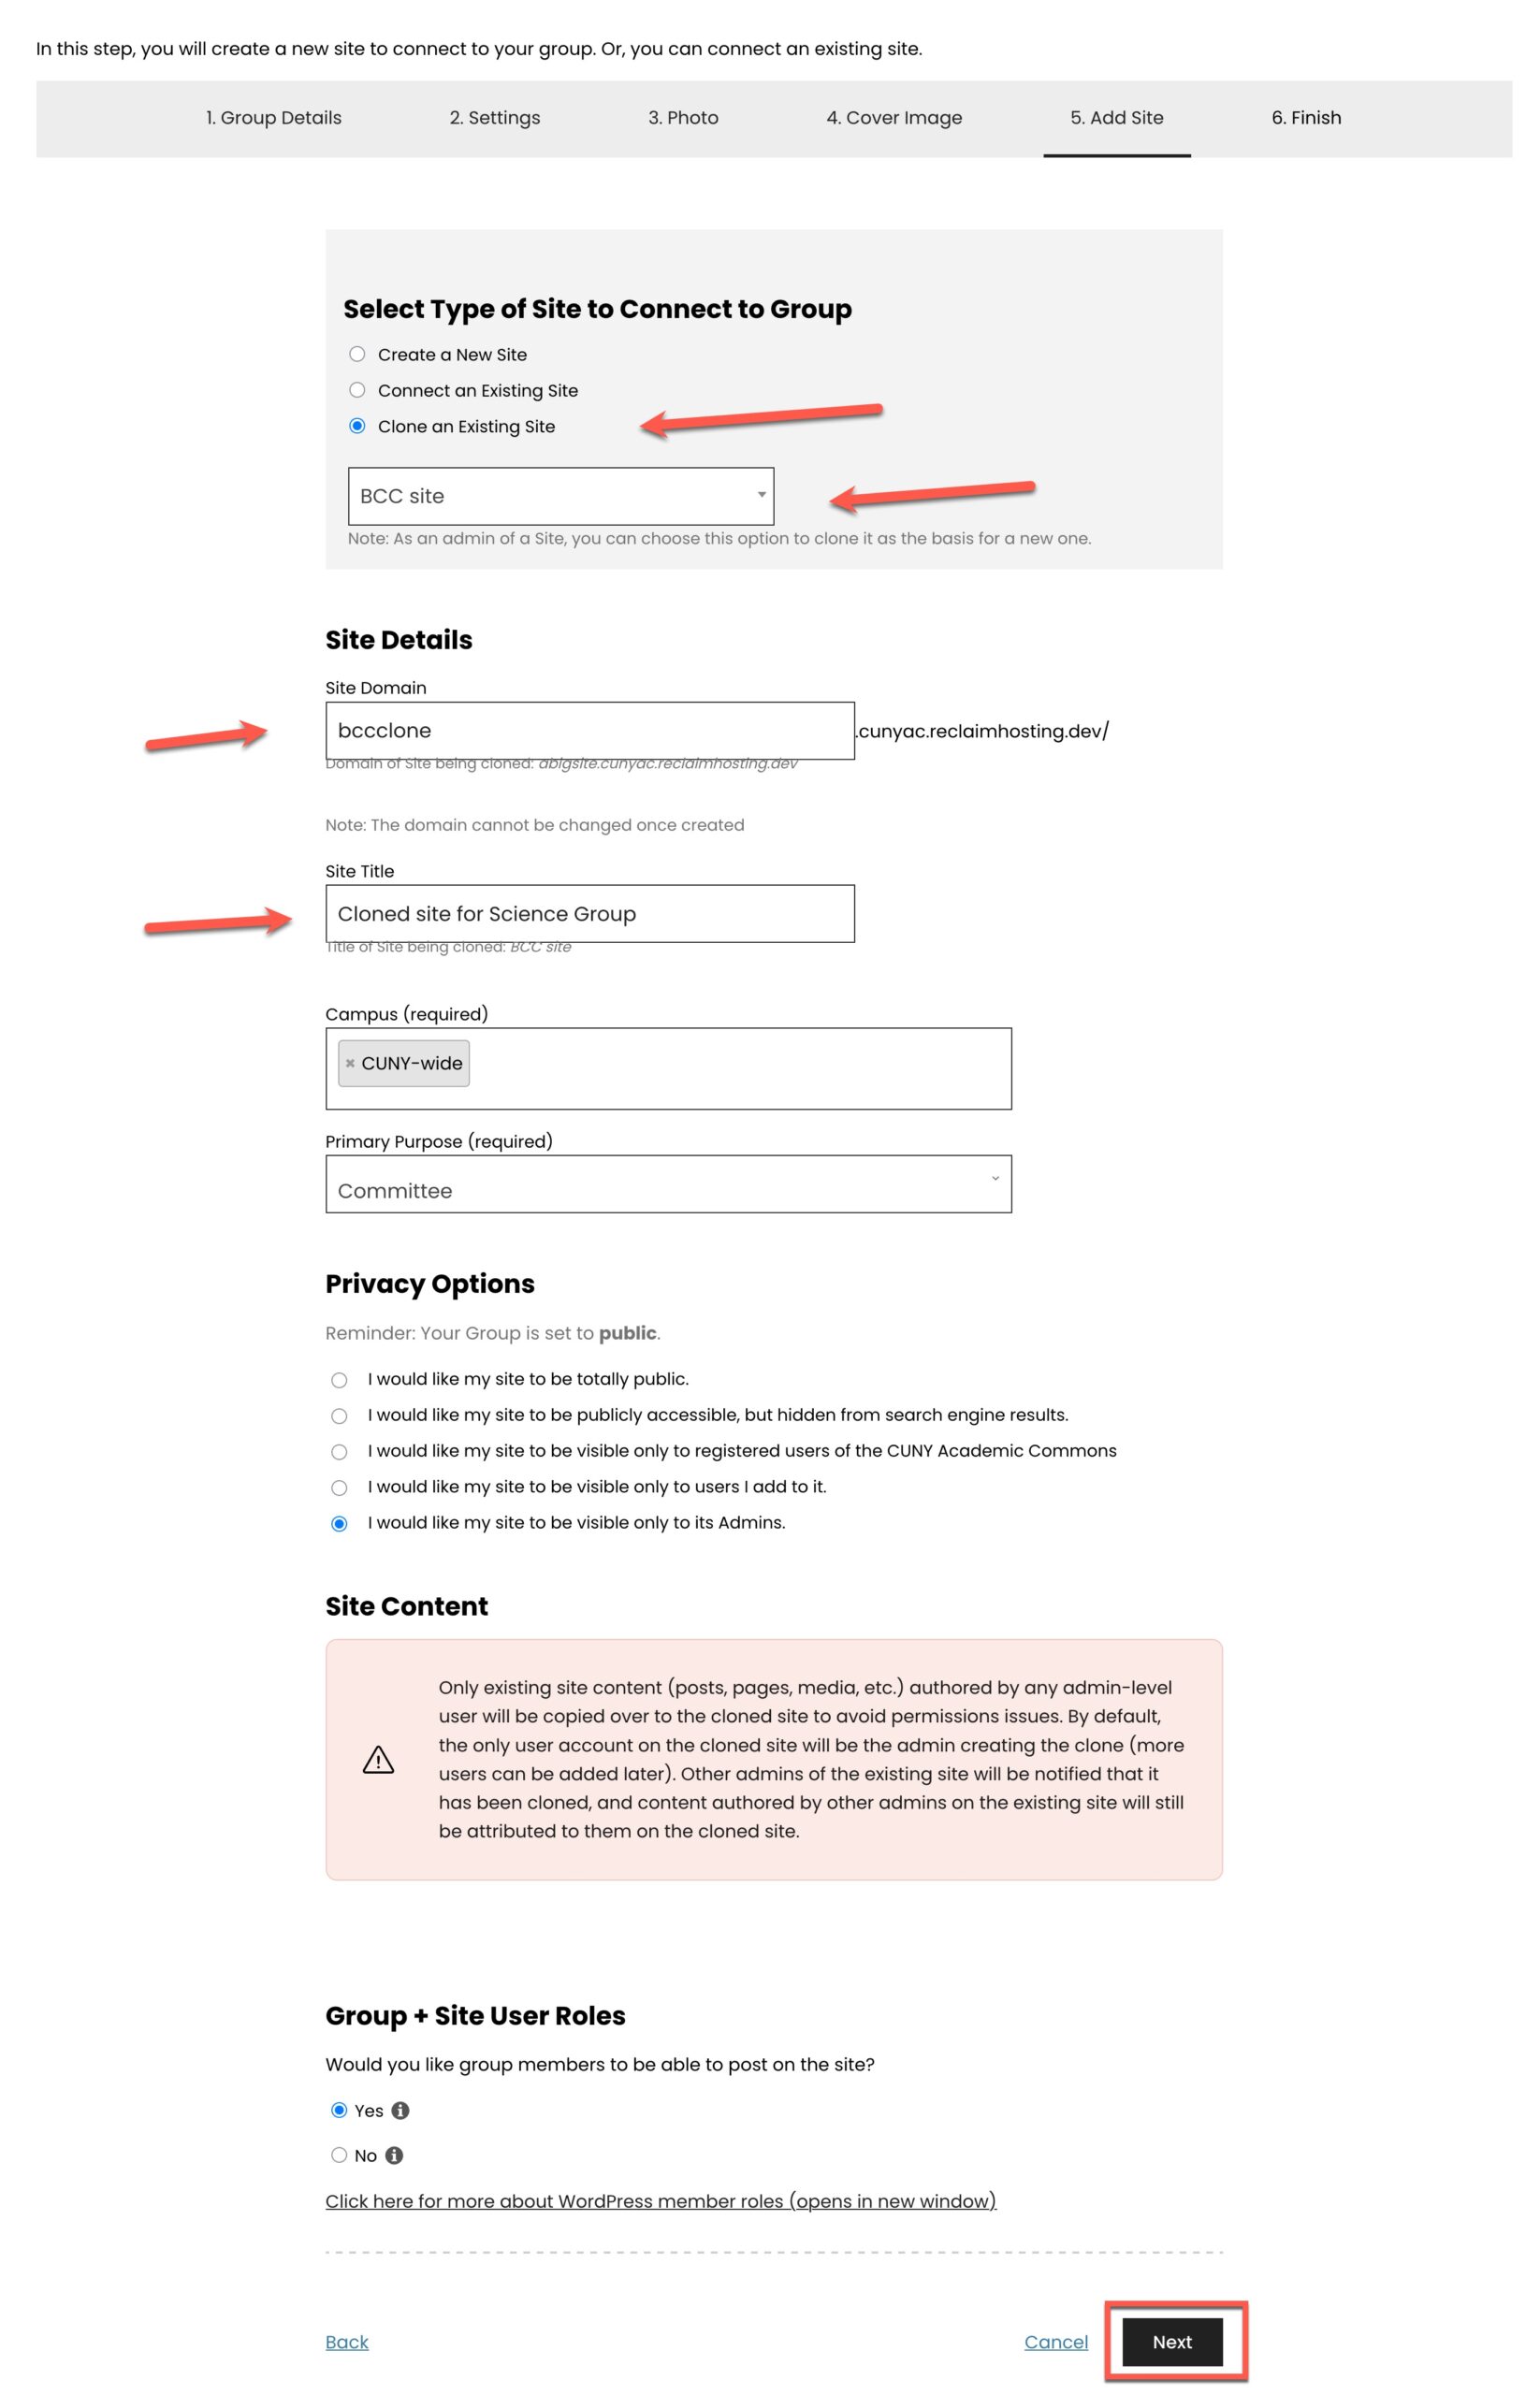
If you choose to connect your group to an existing site, you must be an admin of the site and that site cannot be connected to another group. The sites you can connect are displayed in the dropdown. In the example below, “BCC Site” is selected:

If you choose to “clone” an existing site, you need to be aware of the following:
- To clone a site, you must be an admin of the site. If you are not an admin, contact the admin and ask for permission. S/he can either clone it for you, or make you a temporary admin and you can do the cloning.
- All content (i.e. pages and posts) created by admins of the site will be copied over
- Content created by non-admins (e.g. student work) will not be copied over
- Admin content will be attributed to the original author, but original authors will not be automatically added as admins of the site. After the cloning process ends, you will be the only admin of the site. You can of course add add members (admins, authors, contributors, etc.) as you see fit.
- Site theme, plugins, menus, settings will be copied over so that the site looks the same, although non-admin content will be missing
- The cloned site will have a different URL
- The cloned site will have a different name
- The cloned site will have the same license as the original site, but may be changed after the cloning process, if needed.
In the example below, “A Site For Teaching” will be cloned and you will need to provide a new domain name and new site name:
After you click the “Finish” button, you will see the following:
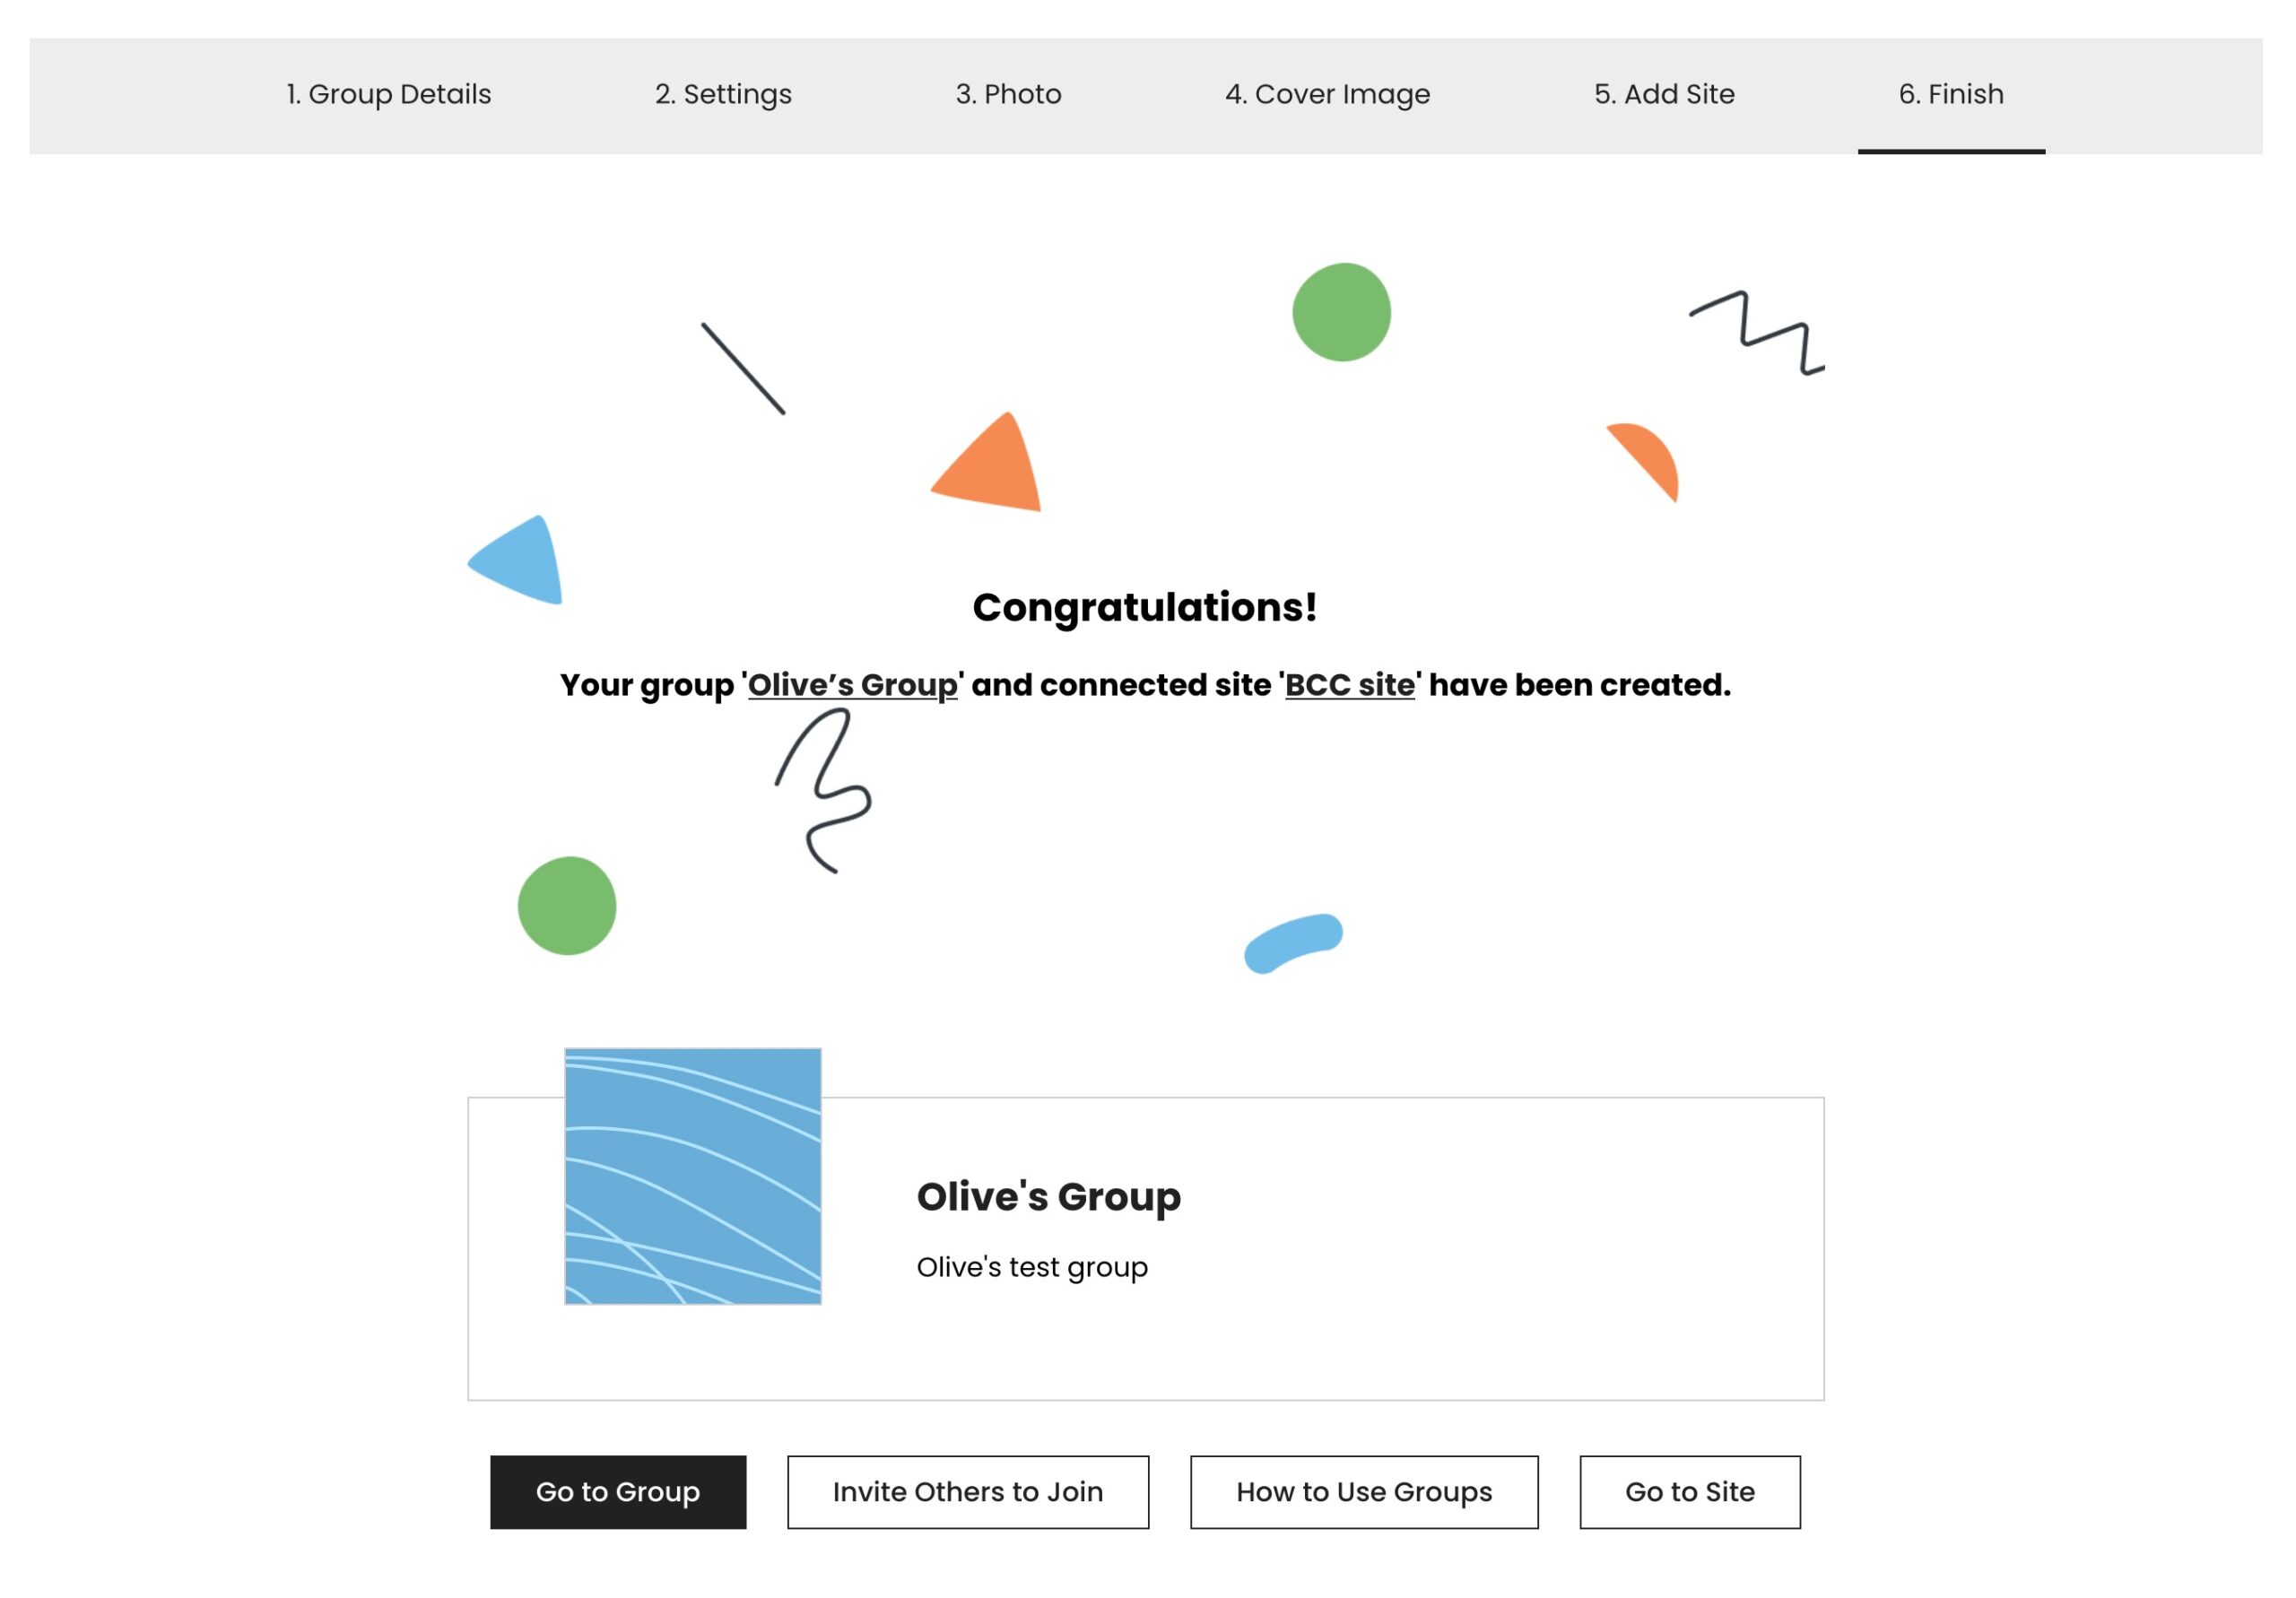
Congratulations
Please note that although you have successfully followed the steps to create a group and a connected site, there are a number of custom settings that are available. As an admin of the group, these can be accessed by clicking on Manage, circled below.
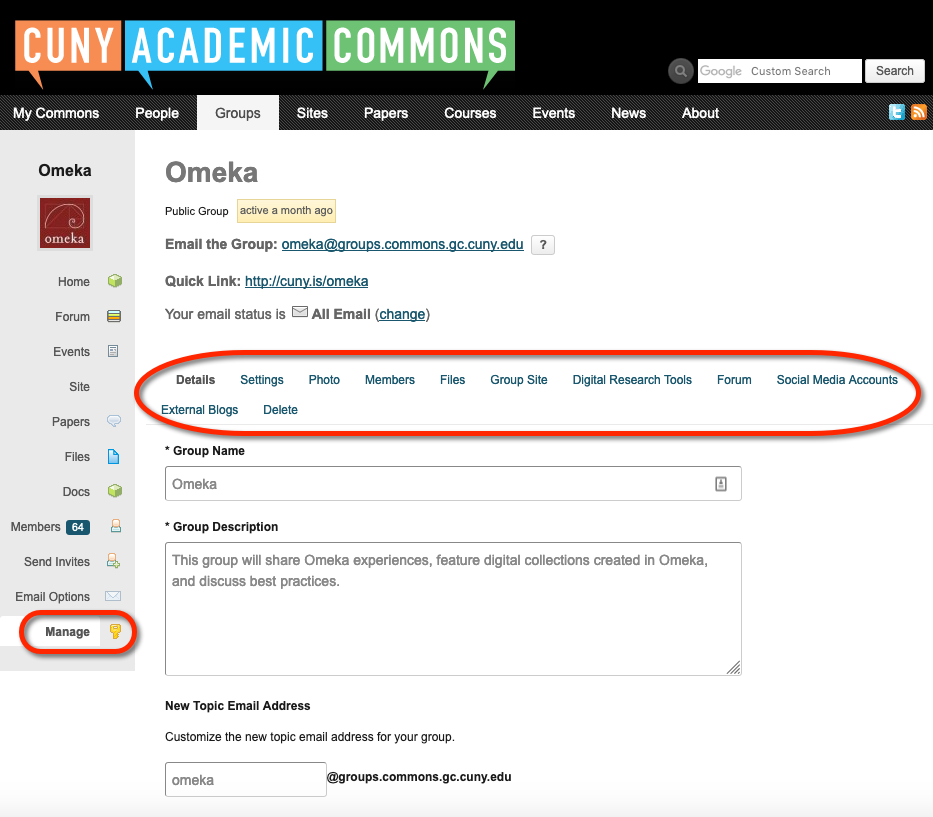
Once you have created a group, you and whoever is also delegated to be an admin will see the “Manage” option in your group’s sidebar, circled below.
All the settings for your group can be adjusted here. They include: